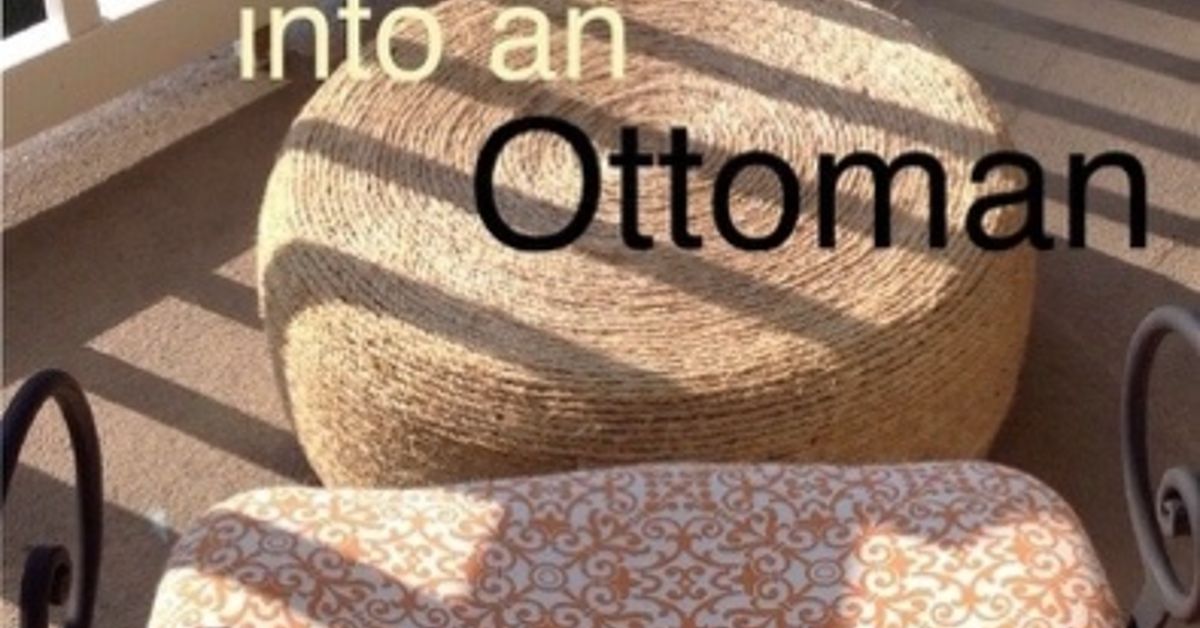
An old tire may not look like living-room material. At first glance, it looks more suited to a garage corner, a recycling center, or the world’s least comfortable doughnut shop. Add plywood, rope, a little cushioning, and some patient gluing, however, and that road-weary rubber can become a surprisingly stylish DIY ottoman.
This tire into an ottoman DIY project is affordable, customizable, and approachable for beginners who are comfortable using a drill and jigsaw. The finished piece can serve as a footrest, occasional seat, side table, or decorative accent. More importantly, it gives a bulky item another useful life instead of leaving it outdoors to collect rainwater or take up storage space.
The basic construction method is simple: clean the tire thoroughly, attach plywood circles to create solid top and bottom surfaces, wrap the exterior with rope, and add an optional upholstered cushion. Established tire-ottoman tutorials use the same general formula, although details such as rope type, padding, storage access, and furniture feet vary.
Why Turn an Old Tire into an Ottoman?
A tire already has several qualities furniture makers must otherwise build from scratch. It is round, rigid, relatively stable, and capable of supporting substantial pressure around its sidewalls. Once enclosed between plywood disks, it forms a sturdy base without requiring complicated framing or advanced joinery.
Upcycling also keeps a difficult-to-store object in productive use. Scrap tires occupy considerable space, and poorly managed tire piles may create environmental and fire hazards. Reusing one tire will not solve the entire waste-tire problem, but it is still a practical example of turning a discarded material into something functional.
The project is also flexible. Natural rope produces a coastal or farmhouse appearance. Dark cord creates a modern industrial ottoman. A padded fabric top makes the piece softer, while furniture feet give it a more polished silhouette. In other words, the tire supplies the skeleton, but you decide what outfit it wears.
Tools and Materials
Essential materials
- One used passenger-vehicle tire
- One sheet of 1/2-inch or 3/4-inch plywood
- Approximately 200 to 250 feet of 3/8-inch rope, depending on tire size
- Construction adhesive rated for the selected materials
- High-temperature hot glue sticks
- Six to twelve flathead or washer-head screws per plywood disk
- Mild detergent and a non-toxic degreaser
- Medium- and fine-grit sandpaper
- Felt pads, rubber feet, or four furniture legs
Optional materials for a cushioned top
- One- to three-inch high-density upholstery foam
- Polyester batting
- Durable upholstery fabric, canvas, faux leather, or outdoor fabric
- Staple gun and upholstery staples
- Hook-and-loop strips for a removable cushion
- Decorative handles or braided trim
Recommended tools
- Tape measure
- Pencil and homemade compass
- Drill and drill bits
- Jigsaw with a fine-cut wood blade
- Clamps
- Hot glue gun
- Utility knife or foam-cutting knife
- Safety glasses, hearing protection, gloves, and dust mask
A jigsaw is well suited to curved plywood cuts. A higher-tooth-count blade generally leaves a smoother edge, while clamping and supporting the workpiece helps prevent movement. Keep the saw’s shoe flat, guide it slowly, and let the blade do the cutting rather than forcing it around the circle.
Choose the Right Tire
Ask a tire shop for a clean, retired passenger-car tire that has not been exposed to oil, fuel, pesticides, or unknown industrial chemicals. Many shops have scrap tires available, although local rules may control how they can be distributed or disposed of.
Inspect the entire tire before bringing it indoors. Reject it if steel cords are exposed, the rubber is badly crumbling, the bead is distorted, or sharp pieces protrude from the sidewall. A cosmetic crack is one thing; a miniature metal porcupine is another.
Size also matters. A compact passenger tire generally produces an ottoman that works well beside a chair. A large truck tire creates a much heavier coffee-table-sized piece and requires more plywood, rope, adhesive, and floor space.
How to Make a Tire Ottoman Step by Step
Step 1: Deep-clean the tire
Work outdoors or in a well-ventilated utility area. Remove loose dirt with a hose, then scrub the tire inside and out using warm water, detergent, a stiff brush, and a non-toxic degreaser. Pay special attention to the tread grooves, which have spent years enthusiastically collecting road grime.
Rinse until the water runs clear. Allow the tire to dry completely, preferably outdoors for at least a full day. Starting with a clean, dry surface improves adhesive performance and reduces the chance of bringing dirt or unpleasant odors into the house. Tire-upcycling guides consistently emphasize thorough cleaning before painting, gluing, or decorating.
Step 2: Measure the tire
Measure the tire’s outside diameter in several directions because used tires are not always perfectly round. Decide whether the plywood should sit slightly inside the outer edge or extend close to it.
For a fully rope-covered ottoman, cutting the disks approximately 1 to 1 1/2 inches smaller than the tire’s outside diameter creates a gentle transition from plywood to rubber. For a removable storage lid, measure the opening inside the bead and cut the top disk slightly larger than that opening so it rests securely on the lip.
Step 3: Draw two plywood circles
Mark a center point for each disk. A simple homemade compass can be made from a strip of scrap wood: place a screw or nail at one end as the pivot, drill a pencil hole at the required radius, and rotate the strip to draw a circle.
This method is more reliable than tying a pencil to a loose piece of string, which frequently produces a shape resembling a circle that has recently received troubling news. Homemade circle jigs are commonly used to mark repeatable plywood disks for round furniture projects.
Step 4: Cut and sand the disks
Clamp the plywood securely over scrap supports so the blade can pass through without striking the workbench. Put on eye and hearing protection, then cut just outside the marked line with a jigsaw. Keep the saw level and move slowly around the curve.
Test the circles against the tire. Sand the edges until both pieces fit evenly. Slightly rounding or tapering the top edge helps the rope flow smoothly from the disk onto the sidewall. Sanding also removes splinters that could snag fabric or hands.
Step 5: Attach the bottom disk
Center one plywood circle on the tire. Mark evenly spaced fastener positions, keeping them far enough from the plywood edge to reduce splitting. Drill pilot holes through the plywood, then secure the disk to the tire using appropriate flathead or washer-head screws.
Use enough fasteners to prevent rotation or lifting; six evenly spaced screws are a common starting point for an average passenger tire. Confirm that no sharp screw tips project into accessible areas. Mechanical fasteners are important because decorative hot glue alone should not be expected to hold the structural parts of an ottoman together.
Add felt pads for an indoor ottoman, rubber pads for a patio version, or four evenly spaced furniture feet. Predrill the feet’s mounting holes to reduce the chance of splitting the plywood. Feet make the project look more like intentional furniture and less like a tire wearing a rope disguise.
Step 6: Secure the top disk
For a permanently enclosed ottoman, fasten the second disk to the top using the same method. Check that it sits level before tightening every screw.
For hidden storage, leave the top removable. Cut the lid large enough to overlap the center opening and attach a smaller plywood ring beneath it as a locator. The lower ring should fit inside the tire opening, preventing the lid from sliding sideways. Add a rope loop or recessed handle so the top can be lifted easily.
Step 7: Begin the rope coil
Mark the exact center of the top disk. Apply construction adhesive over a manageable area, following the product label for ventilation, compatibility, open time, and curing instructions. Secure the rope end at the center with hot glue, then wrap it into a tight spiral.
Keep each new coil pressed firmly against the previous one. Small gaps become more obvious as the spiral expands, so correct them immediately rather than hoping a throw blanket will live on top forever.
Hot glue provides fast initial grip, while a compatible construction adhesive can create a broader bond after curing. High-temperature hot glue is commonly recommended for stronger bonding on materials such as wood, but the heated nozzle and molten adhesive can cause burns. Never force a glue stick into the gun, and keep the tool away from children.
Step 8: Wrap the sidewalls
Continue the spiral across the plywood and down the tire’s shoulder. On the vertical portion, work one complete horizontal row at a time. Apply adhesive in short sections so it does not skin over before the rope reaches it.
Rotate the ottoman instead of walking around it. Periodically step back and inspect the rows from several angles. If one section begins drifting, push it into alignment before the glue sets.
Natural manila or sisal rope creates a warm, textured look but may shed fibers. Cotton rope feels softer but can stain more easily. Synthetic polypropylene rope resists moisture better and is usually the more practical option for a covered porch or patio. Whatever material you select, purchase extra from the same batch because a mid-project change in diameter or shade will be noticeable.
Step 9: Finish the rope end
When the final row reaches the bottom edge, cut the rope cleanly with sharp shears or a utility knife. Seal a synthetic rope end carefully according to its manufacturer’s instructions, or bind a natural-fiber end with thread to reduce fraying.
Tuck the end beneath the ottoman where it will not be visible. Reinforce it with adhesive and hold it in place until secure. Allow all adhesives to cure fully before turning, moving, or using the ottoman.
Step 10: Add an optional cushion
Trace the top disk onto high-density upholstery foam and cut the circle with a long serrated knife or foam cutter. One-inch foam adds mild padding, while two or three inches creates a softer seat. Batting can be wrapped over thicker foam to smooth the edges and prevent an overly sharp, hockey-puck profile.
Cut upholstery fabric with several extra inches around the perimeter. Center the foam and plywood on the wrong side of the fabric. Pull the fabric firmly over the edge and place the first staples at four opposing points. Continue stapling outward from those anchors, alternating sides to maintain even tension.
Trim excess material and cover the raw underside with a neat fabric circle if desired. Upholstery guides recommend stretching fabric evenly and working from the center toward the edges, while foam and batting provide comfort and soften the finished shape.
Common Tire Ottoman Mistakes
Skipping the cleaning stage
Adhesive cannot form a dependable bond over road dust, tire dressing, oil, or damp rubber. Cleaning is not the glamorous part of the project, but neither is watching fifty feet of rope detach itself during movie night.
Depending only on hot glue
Hot glue is useful for positioning rope quickly, but heat, humidity, and repeated handling can weaken some bonds. Use an adhesive specifically labeled as compatible with rubber, wood, and the chosen rope, and follow its curing requirements.
Pulling the rope inconsistently
Excessive tension can pull rows out of alignment. Too little tension leaves loose coils and visible gaps. Maintain firm, steady pressure and work in short sections.
Using thin plywood for a seat
Thin craft board may flex or crack. Choose furniture-grade plywood appropriate for the tire’s span and intended use. A 3/4-inch disk is the safer choice when the ottoman may occasionally be used for seating.
Treating the ottoman like a step stool
A homemade tire ottoman is not a ladder, climbing platform, or certified child’s seat. Even a well-built version should not be used for standing. Check fasteners, feet, rope, and plywood periodically, especially if the piece is moved frequently.
Design Variations
Coastal rope ottoman
Use natural manila rope, pale wood feet, and a washable cream cushion. Add small rope handles on opposite sides for a nautical detail.
Modern black ottoman
Wrap the base in black or charcoal synthetic cord and top it with a smooth faux-leather cushion. Short tapered legs can make the profile feel lighter and more furniture-like.
Outdoor patio ottoman
Choose synthetic rope, exterior-grade plywood, corrosion-resistant hardware, outdoor cushion foam, and solution-dyed outdoor fabric. Keep the ottoman under cover when possible, and provide drainage rather than allowing water to collect inside the tire.
Storage ottoman
Construct a removable upholstered lid and leave the tire cavity accessible. The storage area works best for light, dry objects such as small throws, outdoor cushion covers, or pet toys. A washable fabric liner can keep stored items from touching the rubber directly.
Tray-top coffee table
Keep the plywood top firm and flat rather than cushioned. Add a removable wood or metal tray to create a stable surface for books and decorative objects. Do not place hot cookware or open flames on the rope-covered piece.
How to Care for the Finished Ottoman
Vacuum natural rope with a brush attachment and blot spills promptly rather than saturating the fibers. Clean synthetic rope with a lightly dampened cloth and mild soap. Follow the upholstery fabric’s cleaning code for a cushioned top.
Every few months, inspect the bottom, feet, screws, and final rope end. Repair loose sections before they unravel. Keep the ottoman away from fireplaces, heaters, candles, and other ignition sources. Tires are stable in ordinary use, but burning tire material can release hazardous compounds.
For outdoor versions, bring the ottoman into a dry storage area during severe weather. Even weather-resistant rope and plywood last longer when protected from standing water, prolonged moisture, and intense sunlight.
A Builder’s-Eye Experience: What This DIY Is Really Like
The experience of making a tire ottoman is less like assembling flat-pack furniture and more like completing three small projects that happen to share one tire. First comes the cleaning job, then a short woodworking session, and finally a long craft session involving enough rope to make you briefly question your life choices.
The messiest stage is usually the beginning. A used tire can appear reasonably clean until water reaches the tread and produces a stream the color of weak coffee. Scrubbing both sides, the bead, and the interior takes longer than expected. Letting the tire dry completely also tests the natural DIY urge to declare, “That is probably dry enough.” Waiting is worthwhile because moisture and residue are common reasons adhesive fails.
Cutting the plywood circles is often the most intimidating part for a beginner, but it becomes manageable once the workpiece is clamped securely. The first circle may need extra sanding. That is normal. After tracing the corrected disk onto the second piece, the pair usually matches closely enough that the finished rope covering hides minor imperfections.
The rope stage starts quickly and then slows down. The first small coils cover very little area, so progress appears dramatic. Near the outer edge, every revolution consumes much more rope. This is the moment many builders discover that the original coil was wildly optimistic. Buying extra rope at the start prevents an emergency shopping trip and reduces the risk of finishing with a slightly different color.
Gloves are helpful, but bulky work gloves make it difficult to position the rope accurately. A practical compromise is to wear close-fitting protective gloves and use a scrap block of wood to press freshly glued coils together. This keeps fingertips farther from hot adhesive without crushing the rope’s texture.
Another common experience is becoming too focused on the section directly in front of you. Ten rows may look perfectly straight from six inches away but drift noticeably when viewed from across the room. Rotating the ottoman regularly and checking it from standing height catches the problem early.
Adding a cushion changes the personality of the piece more than expected. A flat rope top feels rustic and works well with a tray. A padded lid immediately makes the project look softer and more like conventional furniture. It also introduces new decisions: foam thickness, fabric durability, removable versus permanent attachment, and whether the pattern should align with anything else in the room.
The most satisfying moment is not placing the last coil. It is setting the completed ottoman beside a chair and realizing the original tire is almost impossible to recognize. Visitors tend to inspect it twicefirst as furniture and then again after learning what is underneath. That small element of surprise is part of the project’s charm.
The main lesson from the process is that preparation determines whether the finished ottoman looks homemade in the best sense or homemade in the “please do not lean on that” sense. Clean rubber, accurately cut disks, mechanical fasteners, consistent rope tension, and full adhesive curing make the difference. None of those steps requires advanced craftsmanship. They simply require patience, which is unfortunate because patience remains the one tool the hardware store refuses to sell.
Conclusion
Turning a tire into an ottoman is a rewarding way to combine recycling, woodworking, upholstery, and home decorating in one manageable project. The tire provides a strong circular base, plywood creates stable surfaces, and rope transforms the rubber into an attractive piece of furniture.
For the best result, spend extra time cleaning and measuring, use mechanical fasteners for structural connections, and select adhesives that are compatible with every material involved. Add a cushion for comfort, a removable lid for storage, or furniture feet for a more refined finish.
The finished DIY tire ottoman may serve as a footrest, occasional seat, side table, or conversation starter. Just remember that it is still handmade furniture rather than a step stool. Treat it well, inspect it occasionally, and enjoy the fact that an object once headed for disposal is now holding your feet, your books, or perhaps the television remote that everyone claimed not to have lost.