If you have ever returned from a weekend trip to find your basil looking like it dramatically fainted on a Victorian sofa, this guide is for you. A wine bottle plant waterer is one of the simplest DIY garden hacks for keeping container plants, herbs, flowers, and some houseplants evenly moist without hovering over them like a nervous plant parent with a watering can.
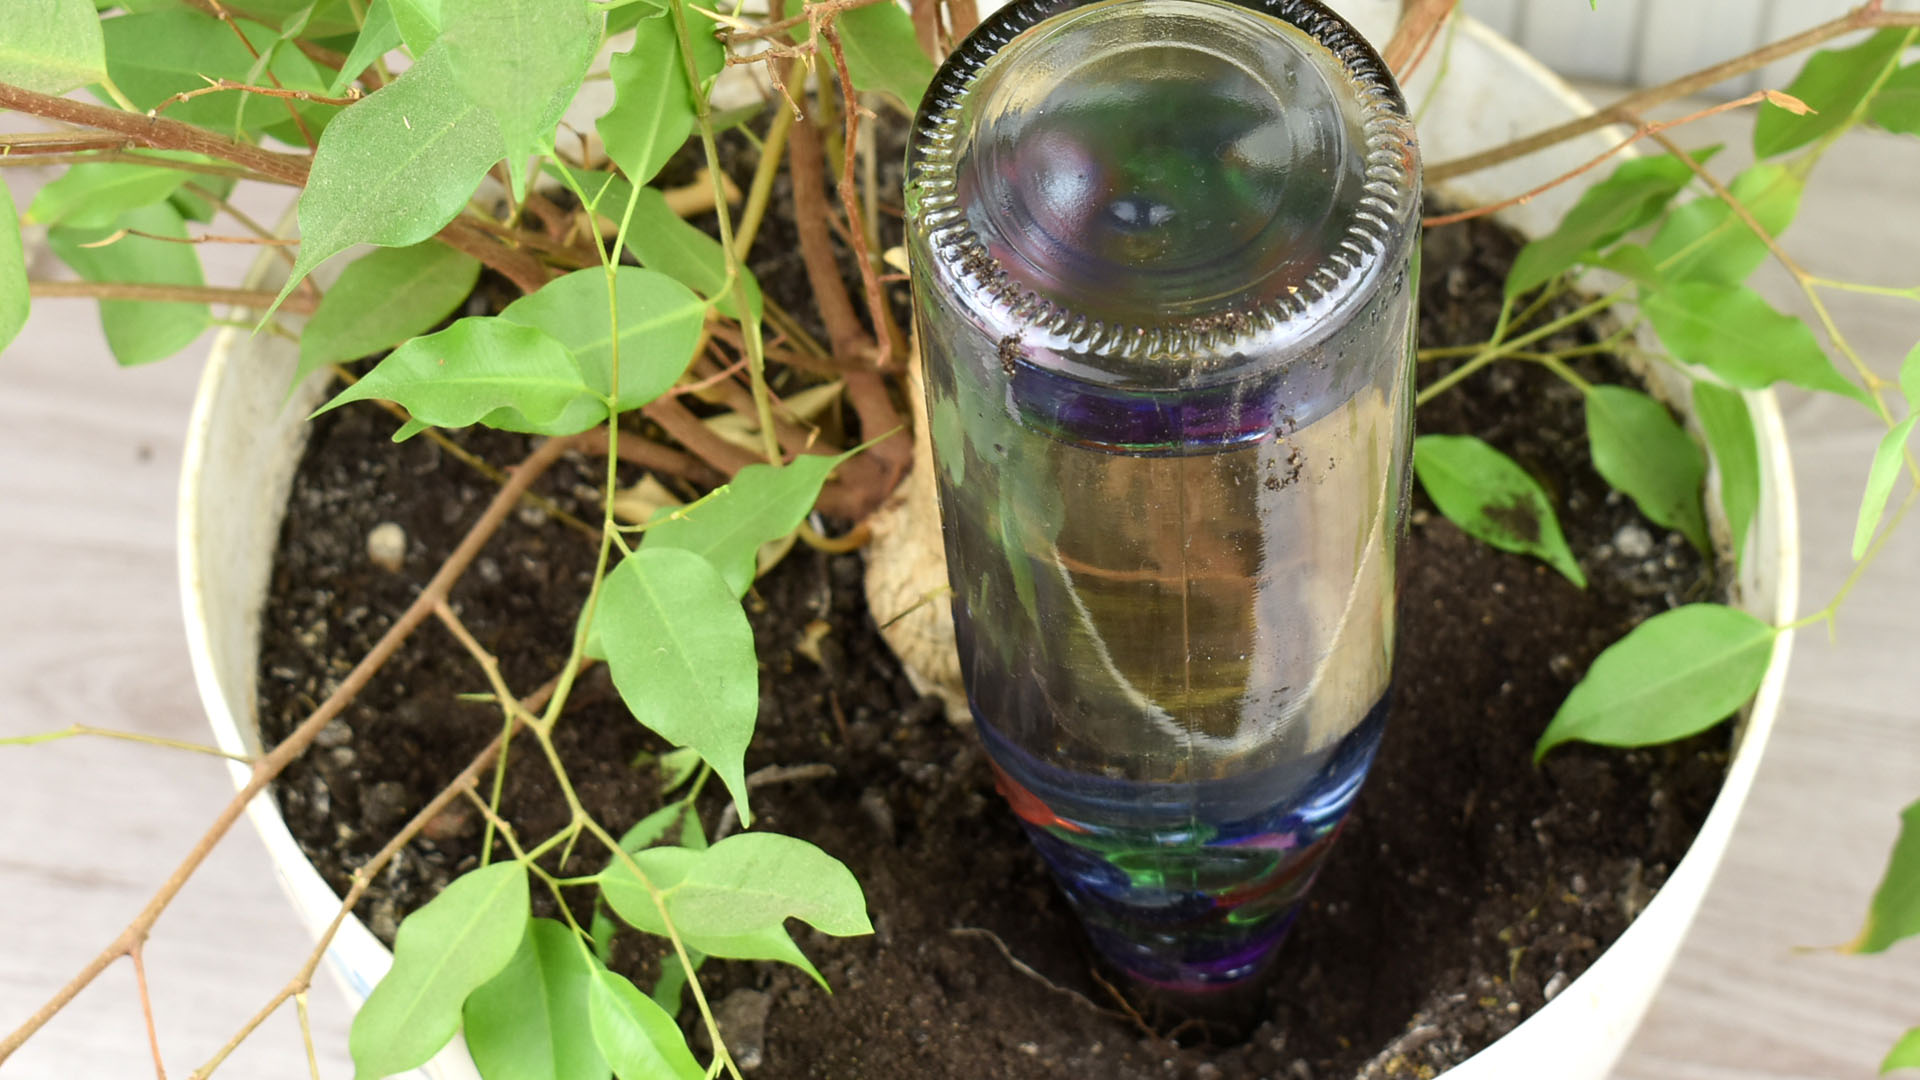
The idea is beautifully low-tech: clean an empty wine bottle, fill it with water, turn it upside down, and let gravity and soil moisture do the quiet work. As the soil dries, water slowly escapes from the bottle neck or through a watering spike. It is not a replacement for a full irrigation system, and it will not magically save a cactus that hates wet feet, but for many thirsty potted plants, it can be a charming, affordable, and surprisingly useful self-watering solution.
This article explains how to make a wine bottle plant waterer, how to control the drip rate, which plants benefit most, what mistakes to avoid, and how to make the finished bottle look less like “last night’s dinner evidence” and more like garden décor with a purpose.
What Is a Wine Bottle Plant Waterer?
A wine bottle plant waterer is a homemade slow-release watering device made from an empty glass bottle. The bottle acts as a water reservoir. Once filled and inverted into the soil, it releases water gradually near the plant’s root zone.
There are two common versions. The first is the direct-in-soil method, where the bottle neck is pushed directly into moist potting mix. The second uses a terracotta or plastic watering spike attached to the mouth of the bottle. Terracotta spikes are especially popular because porous clay allows water to seep out slowly and more evenly.
Think of it as a tiny hydration assistant. It does not ask for days off, never complains about humidity, and looks suspiciously elegant next to a tomato plant.
Why Use a Wine Bottle Waterer?
A DIY wine bottle watering system offers several practical benefits:
- It saves time: Great for busy weeks, short vacations, and forgetful mornings.
- It reuses glass bottles: Instead of tossing bottles into recycling immediately, you give them a second job.
- It waters near the roots: Water goes into the soil, not all over the leaves, patio, or your shoes.
- It reduces surface evaporation: Slow watering below the surface can help moisture last longer.
- It is inexpensive: You may already have most of the materials at home.
The biggest advantage is consistency. Many plants dislike the dramatic cycle of “bone dry on Tuesday, swamp monster on Wednesday.” A wine bottle plant waterer can help smooth out that pattern, especially in containers that dry quickly.
Best Plants for a Wine Bottle Plant Waterer
This DIY waterer works best for plants that prefer steady moisture but not soggy soil. Good candidates include:
- Tomatoes in large containers
- Basil, parsley, mint, and cilantro
- Petunias, impatiens, coleus, and other thirsty annuals
- Ferns in pots
- Peace lilies and pothos in well-draining containers
- Outdoor patio planters
- Large hanging baskets, if the bottle can be safely supported
Use caution with succulents, cacti, snake plants, ZZ plants, lavender, rosemary, and other plants that prefer drier conditions. These plants are not interested in spa-level hydration. They want drainage, restraint, and possibly a tiny desert soundtrack.
Materials You Will Need
To make a basic wine bottle plant waterer, gather the following supplies:
- One empty wine bottle
- Warm water and mild dish soap
- Small brush or bottle brush
- Water
- A plant in a pot with drainage holes
- Optional: terracotta watering spike
- Optional: cork, nail, hammer, or drill with small bit
- Optional: decorative paint, twine, waterproof labels, or glass-safe markers
A standard 750-milliliter wine bottle is ideal for medium to large containers. For smaller pots, use a smaller bottle, such as a split wine bottle, beer bottle, or narrow glass soda bottle. The goal is to water the plant, not recreate the Great Lakes in your living room.
Method 1: The Simple Upside-Down Wine Bottle Waterer
Step 1: Clean the Bottle Thoroughly
Rinse the wine bottle with warm water and a few drops of mild dish soap. Remove any wine residue, especially if the bottle held sweet wine. Plants appreciate water. They do not need leftover merlot syrup fermenting in their root zone.
Soak the bottle if the label is stubborn. A little baking soda paste or label remover can help clean the glass. Dry the outside if you plan to decorate it.
Step 2: Water the Plant First
Before inserting the bottle, water the plant normally until moisture reaches the root zone and excess water drains from the bottom of the pot. This step matters. If the soil is completely dry, it may pull water from the bottle too quickly, emptying the reservoir before it has a chance to perform its slow-release magic.
Step 3: Fill the Bottle With Water
Fill the clean bottle almost to the top with room-temperature water. Leave a small air gap so you can turn it over without creating a dramatic countertop fountain.
Step 4: Plug the Opening Temporarily
Place your thumb over the bottle opening. If you prefer less finger gymnastics, use a cork with a tiny hole, a watering spike, or a folded piece of clean mesh over the mouth. The temporary seal helps you flip the bottle without losing half the water before it reaches the plant.
Step 5: Insert the Bottle at an Angle
Turn the bottle upside down and push the neck into the soil at a slight angle, about 2 to 4 inches deep for small pots and deeper for large containers. Avoid stabbing the plant’s main stem or roots. The angle helps stabilize the bottle and can reduce clogging.
Step 6: Check the Flow
Watch the bottle for a few minutes. A few bubbles rising inside the bottle are normal. That means water is leaving and air is entering. If the bottle drains immediately, the opening is too large, the soil is too loose, or the bottle is not inserted deeply enough. If no water releases at all, the neck may be clogged with compacted soil.
Method 2: Wine Bottle Waterer With a Terracotta Spike
A terracotta spike is the easiest way to improve control. These cone-shaped devices fit over or around the neck of a bottle. The filled bottle sits upside down in the spike, and the porous clay slowly releases moisture into the soil.
How to Use a Terracotta Spike
- Soak the terracotta spike in water for 15 to 30 minutes before first use.
- Water the plant thoroughly and allow excess water to drain.
- Push the spike into the soil near the plant’s root zone.
- Fill the wine bottle with clean water.
- Turn the bottle upside down into the spike opening.
- Check the plant after 24 hours to see if the soil is too wet, too dry, or just right.
This method is more reliable for indoor plants because the terracotta controls the release better than an open bottle neck. It also keeps soil from plugging the bottle opening. In other words, it is the “adult supervision” version of the wine bottle hack.
Method 3: Cork-Controlled Wine Bottle Waterer
If you want a slower drip without buying a spike, use a cork. This works best with natural cork, not synthetic plastic corks.
Steps for the Cork Method
- Clean the bottle and cork.
- Use a small nail, awl, or drill bit to make one tiny hole through the cork.
- Fill the bottle with water.
- Push the cork firmly into the bottle opening.
- Turn the bottle upside down and insert it into moist soil.
- Test the drip rate over a sink before placing it in the plant.
Start with one small hole. You can always make the hole bigger, but you cannot make it smaller unless you enjoy cork surgery. If the bottle empties too fast, use a new cork with a smaller opening.
How Long Will a Wine Bottle Waterer Last?
A standard wine bottle may last anywhere from one day to more than a week, depending on the plant, pot size, soil mix, temperature, sunlight, humidity, and the size of the bottle opening. Outdoor containers in hot weather may drink the bottle quickly. Indoor plants in moderate light may use it slowly.
Do not assume one bottle equals one week for every plant. A thirsty patio tomato in July and a pothos in a shaded office are not playing the same sport.
How to Control the Water Flow
Flow control is the secret to making this DIY watering bottle useful instead of chaotic. Try these adjustments:
- Water the soil first: Dry soil can drain the bottle too quickly.
- Insert the neck deeper: More soil contact can slow the release.
- Use a cork with a small hole: This reduces the opening size.
- Choose a terracotta spike: Best for slow, steady watering.
- Use heavier potting mix: Very loose mixes may not hold the bottle securely.
- Add mulch: A thin layer of mulch on outdoor pots helps reduce evaporation.
After setup, check the soil after 12 to 24 hours. If it feels soggy and smells sour, remove the bottle. If it is still dry two inches down, the water is not reaching the root zone.
Where to Place the Bottle in the Pot
Place the bottle near the outer edge of the root zone rather than directly against the stem. For a round pot, insert the bottle halfway between the stem and the pot rim. For a rectangular planter, position one bottle near each thirsty plant or space bottles evenly along the row.
In large containers, one wine bottle may not be enough. A big tomato plant in a 15-gallon pot may need two bottles or a proper drip irrigation line during hot weather. The wine bottle waterer is clever, but it is not a municipal water department.
Indoor vs. Outdoor Use
Using Wine Bottle Waterers Indoors
For indoor plants, always use pots with drainage holes and saucers. Check the saucer after setup and empty standing water. Roots need oxygen, and constantly soggy soil can cause root rot, fungus gnats, and a smell best described as “forgotten swamp.”
Terracotta spikes are usually better indoors because they release water more gently. Avoid using oversized bottles in small houseplant pots. The bottle should be stable and proportional to the container.
Using Wine Bottle Waterers Outdoors
Outdoor containers dry faster because of sun, wind, and heat. Wine bottle plant waterers work well for patio planters, balcony herbs, hanging baskets, and decorative annuals. For best results, place the bottle in the pot after deep watering, then add mulch around the soil surface.
During heat waves, check daily. The bottle may empty quickly, and your plant may still need supplemental watering. A wine bottle helps, but it cannot negotiate with August.
Common Mistakes to Avoid
Using It in a Pot Without Drainage
Never use a slow-release waterer in a sealed pot. Without drainage, excess water collects at the bottom, where roots can suffocate and rot. If the pot has no drainage hole, either repot the plant or use the bottle only as decoration.
Starting With Bone-Dry Soil
Dry potting mix can repel water or pull it unevenly. Pre-water the plant first so the bottle maintains moisture rather than trying to rescue a desert emergency.
Using Dirty Bottles
Old wine residue, sugar, or debris can encourage mold and odors. Clean the bottle thoroughly before use and rinse it between refills.
Choosing the Wrong Plant
Succulents, cacti, and drought-tolerant herbs can suffer from too much moisture. Match the waterer to plants that actually want consistent hydration.
Ignoring the Test Run
Test the setup for a few days before relying on it during vacation. Plants prefer rehearsal. So do gardeners who do not enjoy coming home to crispy drama.
How to Decorate a Wine Bottle Plant Waterer
A plain bottle works fine, but decorating it can turn a practical tool into garden art. Try wrapping the neck with jute twine, painting the glass with outdoor-safe paint, adding waterproof plant labels, or using colored bottles for a stained-glass effect in sunny spots.
Dark green and amber bottles are especially attractive in herb gardens. Clear bottles make it easy to see the water level. If you paint the bottle, leave a vertical window unpainted so you can monitor how much water remains.
Safety Tips for Glass Bottles in the Garden
Glass is sturdy, reusable, and attractive, but it deserves respect. Use bottles only in stable pots where they will not tip over. Keep them away from walkways, pets that treat planters like obstacle courses, and children who may pull on them.
Do not force a bottle into compacted soil. Use a trowel, dibber, or wooden stake to make a pilot hole first. If the bottle cracks, discard it safely. A broken wine bottle plant waterer is no longer a plant hack; it is a tiny garden lawsuit waiting to sparkle.
Troubleshooting Your DIY Wine Bottle Waterer
The Bottle Empties Too Fast
The soil may have been too dry, the opening may be too large, or the bottle may not be inserted deeply enough. Try pre-watering, using a cork with a smaller hole, or switching to a terracotta spike.
The Bottle Does Not Drain at All
The neck may be clogged with soil, or the soil may already be saturated. Remove the bottle, rinse the opening, make a pilot hole, and reinsert it at a slight angle.
The Plant Looks Yellow
Yellow leaves can signal overwatering, poor drainage, low light, or other stress. Remove the bottle and check the soil. If it is wet for days, let the pot dry before watering again.
The Bottle Tips Over
The pot may be too small or the bottle too large. Use a smaller bottle, insert it deeper, or support it with a plant stake. Do not use a full-size wine bottle in a tiny herb pot unless you enjoy botanical slapstick.
When Not to Use a Wine Bottle Plant Waterer
Skip this method if the plant prefers dry soil, the pot has no drainage, the plant is already overwatered, or the container is too small to hold the bottle securely. Also avoid it for seedlings with delicate roots, recently repotted plants that have not settled, or plants showing signs of root rot.
For long trips, combine strategies. Move plants out of harsh sun, group containers together to reduce moisture loss, water thoroughly before leaving, and ask a friend to check high-value plants. A wine bottle waterer is helpful, but it is not a licensed plant nanny.
Real-World Experience: What I Learned Making Wine Bottle Plant Waterers
The first time I made a wine bottle plant waterer, I treated it like a five-minute miracle. I rinsed a bottle, filled it, flipped it into a pot of basil, and proudly walked away like I had invented agriculture. The next morning, the bottle was empty, the soil was soaked, and the basil looked confused but moisturized. Lesson one: pre-water the soil, control the opening, and do not assume gravity is polite.
My best results came from using terracotta spikes in medium and large containers. They slowed the release enough that the bottle acted like a steady reservoir instead of a dramatic waterfall. For indoor pothos and peace lilies, a spike with a standard wine bottle kept the soil lightly moist for several days. For outdoor basil in summer heat, the same setup lasted far less time, but it still helped prevent wilting between morning and evening watering.
I also learned that bottle size matters. A full wine bottle in a small six-inch pot looks funny for about twelve seconds, then becomes a tipping hazard. Smaller glass bottles work better for compact herbs, while full-size wine bottles belong in deeper containers. If the pot is lightweight plastic, the bottle can make it top-heavy, especially outdoors where wind likes to audition for chaos.
The cork method worked, but it required patience. One tiny hole was sometimes too slow. Two holes could be too fast. The sweet spot depended on the plant and soil mix. Potting mixes with lots of bark or perlite drained faster, while denser mixes held moisture longer. I started testing each bottle over the sink before putting it in a plant, which saved me from creating accidental indoor puddles. Highly recommended. Your floors will send a thank-you card.
Another useful discovery: clear bottles are practical, colored bottles are prettier. Green wine bottles look great in outdoor planters, but clear bottles make it easier to see the water level. My compromise was to decorate clear bottles with narrow strips of twine and leave most of the glass visible. It looked intentional, which is the secret sauce of many DIY projects. If anyone asks, it is rustic sustainable design, not “I forgot recycling day.”
The biggest mistake I made was using the waterer on plants that did not need it. Rosemary and succulents were not impressed. Their soil stayed damp too long, and the plants looked grumpy. On the other hand, basil, mint, coleus, and patio flowers loved the extra consistency. The lesson is simple: use the wine bottle plant waterer for thirsty plants, not plants that prefer dry conditions.
For vacations, I now test each bottle waterer at least three days before leaving. I check how fast the bottle drains, how the soil feels two inches down, and whether the plant shows any signs of stress. If everything looks balanced, I refill the bottle right before leaving. That little test run makes the difference between a clever self-watering setup and a leafy soap opera.
Overall, making a wine bottle plant waterer is one of those DIY projects that is easy enough for beginners but still benefits from a bit of observation. It is cheap, attractive, reusable, and genuinely useful when matched with the right plant. Plus, it gives empty wine bottles a noble second career. Not every bottle gets to retire as garden equipment, but the lucky ones do it with style.
Conclusion
A wine bottle plant waterer is a simple, budget-friendly way to keep many container plants hydrated between regular waterings. The best version depends on your plant and pot: use the direct bottle method for quick outdoor setups, a cork-controlled bottle for a low-cost drip, or a terracotta spike for the most consistent slow release.
The key is balance. Water the plant first, make sure the pot drains well, test the flow before relying on it, and match the method to plants that enjoy steady moisture. With a little trial and error, an empty wine bottle can become a stylish self-watering helper instead of just proof that pasta night went well.