There is a special category of household object that is too good to throw away but apparently too awkward to keep. An old drawer is a perfect example. Once separately important while collecting screws, dust, and one mysterious key nobody recognizes. Fortunately, that forgotten wooden box can become something far more useful: a chalkboard memo organizer from an old drawer.
This easy upcycling project combines a reusable writing surface, a shallow storage shelf, and vintage character in one compact wall organizer. Hang it in an entryway for reminders and keys, place it in a kitchen for grocery notes, or use it near a desk as a family command center. Better still, the project can be customized around the drawer you already have rather than forcing you to buy a perfectly coordinated collection of new organizing products.
The basic idea is simple: clean and repair the drawer, turn its interior back panel into a chalkboard, refresh the surrounding wood, add optional hooks or storage features, and mount the finished organizer securely. The details, however, make the difference between a charming piece of functional wall decor and a crooked wooden box that sheds chalk dust on the floor.
Why an Old Drawer Makes Such a Good Memo Organizer
A discarded drawer already has most of the structure needed for wall storage. It has a frame, a back or bottom panel, and enough depth to hold small objects. Mounted vertically with its open side facing forward, it becomes a ready-made shadow box. Mounted with one long side at the bottom, that same side acts as a small shelf for chalk, mail, sunglasses, or other lightweight essentials.
Repurposing existing furniture is also a practical way to create storage tailored to a specific space. Home organization projects frequently use vertical surfaces to move everyday items off desks and counters, while old furniture and household pieces can often be adapted into customized organizers instead of being discarded. awer itself also gives the finished project personality. A plain modern drawer can become a clean, minimalist organizer. A battered vintage drawer with an old brass pull can lean farmhouse, cottage, industrial, or eclectic. Even dents and worn edges can become part of the design rather than problems that must be erased.
Materials and Tools
The exact supply list depends on the condition and material of your drawer, but most versions of this DIY chalkboard organizer use the following:
- One old wooden drawer
- Screwdriver for removing or adjusting hardware
- Mild cleaner and clean cloths
- Sandpaper or sanding sponge
- Wood filler for unwanted holes or damaged areas
- Primer appropriate for the drawer surface, if needed
- Chalkboard paint
- Paint for the drawer frame, optional
- Small paintbrush and foam roller
- Painter’s tape
- Traditional chalk and an eraser or soft cloth
- Picture-hanging hardware, screws, wall anchors, or other suitable mounting hardware
- Optional hooks, knobs, label holders, clips, cork, or small containers
One important vocabulary warning can save a surprising amount of frustration: chalkboard paint and chalk-style furniture paint are not the same thing. Chalkboard paint is intended to create a writable, erasable surface. Decorative chalk or chalk-style paint is primarily a matte furniture finish. You can use decorative paint on the frame if you like the look, but use actual chalkboard paint on the area where you plan to write.
Step 1: Choose the Right Drawer
Almost any sturdy drawer can work, but inspect it before falling emotionally in love with its charmingly distressed corners.
Check the structure
The drawer should be strong enough to hang safely. Look for loose joints, cracked corners, separating veneer, water damage, and a weak bottom panel. Small cosmetic problems are easy to repair. Major structural damage may require rebuilding, which can turn a quick weekend project into a surprise apprenticeship in cabinetmaking.
Solid wood drawers are usually straightforward to sand, repair, and paint. Plywood can also work well. Particleboard or fiberboard requires more caution, particularly if it has swollen from moisture or has damaged veneer. Surface repairs should be completed and fully dried before sanding and refinishing. about the orientation
Place the drawer on a table and rotate it until the proportions look right. A wide drawer often works best in landscape orientation. A narrow drawer may make an attractive vertical message station. The original drawer pull can remain at the bottom as a decorative feature, serve as a place to hang lightweight items, or be removed entirely.
Step 2: Remove Hardware and Clean Thoroughly
Remove hardware that might interfere with cleaning, sanding, or painting. Save original screws in a small container because vintage hardware has a talent for requiring exactly the screw you just lost.
Clean the entire drawer before sanding. Old furniture can carry wax, furniture polish, cooking residue, dust, and grime that interfere with paint adhesion. Use a cleaner appropriate for the material, wipe away residue, and allow the drawer to dry completely.
Removing hardware and preparing the surface before painting makes it easier to achieve clean coverage and prevents paint from collecting around pulls and fasteners. Furniture-painting guidance also consistently emphasizes repairing defects and working from a clean, stable surface. 3: Repair and Sand the Drawer
Decide which imperfections add character and which simply look broken. A shallow nick in an old wood drawer may be worth keeping. A splinter that catches your sleeve every Tuesday morning is less charming.
Fill unwanted holes, cracks, or deep gouges with wood filler. Once the repair is dry, sand it flush. Lightly sand glossy painted or varnished surfaces so the next coating can bond properly. You generally do not need to attack the drawer like you are trying to erase its entire family history. The goal is usually to smooth rough areas and reduce excessive gloss.
After sanding, remove all dust with a vacuum, brush, or appropriate cloth. Paint applied over sanding dust may look fine for five minutes and then spend the rest of its life plotting an escape.
For many conventional furniture-painting systems, light sanding, cleaning, and appropriate priming help create a more reliable finish, especially on slick or unfamiliar surfaces. 4: Plan the Chalkboard Area
The simplest design uses the drawer’s entire interior back panel as the writing surface. This creates the largest possible memo board and leaves the drawer sides as a natural frame.
You can also create a smaller chalkboard rectangle surrounded by painted or exposed wood. Use painter’s tape to establish crisp boundaries. For a more decorative design, divide the space into zones such as:
- Today’s priorities
- Shopping list
- Appointments
- Messages for family members
- Weekly menu
- Things not to forget again
Chalkboard surfaces are widely used in kitchens, offices, entryways, and other organizing zones because they allow notes and lists to be changed without replacing paper. Combining a writable surface with vertical storage is particularly useful where counter or desktop space is limited. 5: Prime When the Surface Requires It
Whether primer is necessary depends on the existing finish, the material, and the paint system you choose. Bare wood, repaired areas, stained surfaces that may bleed through, and especially slick finishes may benefit from an appropriate primer.
Follow the instructions for the specific coating you are using rather than assuming every paint behaves the same way. Some decorative furniture paints advertise minimal preparation, while standard paint systems commonly rely on sanding and primer for dependable adhesion. The safest approach is to identify the drawer material and follow the coating manufacturer’s directions.
Apply primer in a thin, even layer and let it dry as directed. A small foam roller can create a smoother surface on broad flat areas, while a brush works well in corners.
Step 6: Apply the Chalkboard Paint
Stir the paint according to its instructions. Avoid treating vigorous shaking as an upper-body workout unless the manufacturer specifically recommends it, since bubbles are not a desirable design feature on a writing surface.
Apply a thin, even coat to the planned chalkboard area. A small foam roller often helps produce a smooth finish, although a quality brush can work on smaller surfaces. Allow the first coat to dry as directed before applying additional coats.
The number of coats and drying time vary by product, so the label on the container should outrank any universal internet rule. What matters is achieving complete, even coverage and allowing the surface adequate drying or curing time before writing on it.
Chalkboard-paint guidance from major paint and home-improvement sources emphasizes careful surface preparation, even application, sufficient drying, and conditioning the completed surface before regular use. 7: Paint or Refinish the Drawer Frame
While the chalkboard area dries, decide how much of the original drawer you want to preserve.
Keep the original wood
If the wood has attractive grain and the old finish is stable, simply cleaning and refreshing it may be enough. Natural wood surrounding a dark chalkboard creates a warm contrast and works especially well in rustic or traditional interiors.
Paint it a bold color
A bright frame can turn the organizer into an accent piece. Mustard, deep blue, green, red, or warm white can all work depending on the room. Use a finish appropriate for furniture and the amount of handling the frame will receive.
Create a deliberately aged finish
For a vintage look, paint the frame and lightly distress selected edges after the finish dries. Focus on areas where wear might naturally occur rather than sanding random patches like an enthusiastic raccoon.
Upcycling projects often succeed because paint, new hardware, and simple storage additions can completely change the function of outdated furniture while preserving some of its original character. 8: Add Useful Organizer Features
The chalkboard is only the beginning. A few carefully chosen additions can turn the drawer into a genuine household command center.
Add hooks
Small hooks can hold keys, a lightweight dog leash, reusable shopping bags, or other frequently misplaced items. Install them into solid wood and make sure the hardware is appropriate for the expected load.
Create a chalk holder
The lower inside edge of the drawer may already function as a narrow shelf. Place chalk in a small cup, repurposed tin, or attached container. A leather loop or small metal clip can hold an eraser cloth.
Add clips for paper reminders
Small binder clips, bulldog clips, or clothespins can hold coupons, appointment cards, invitations, and school notes. This creates a useful contrast between temporary chalk messages and papers that need to remain visible.
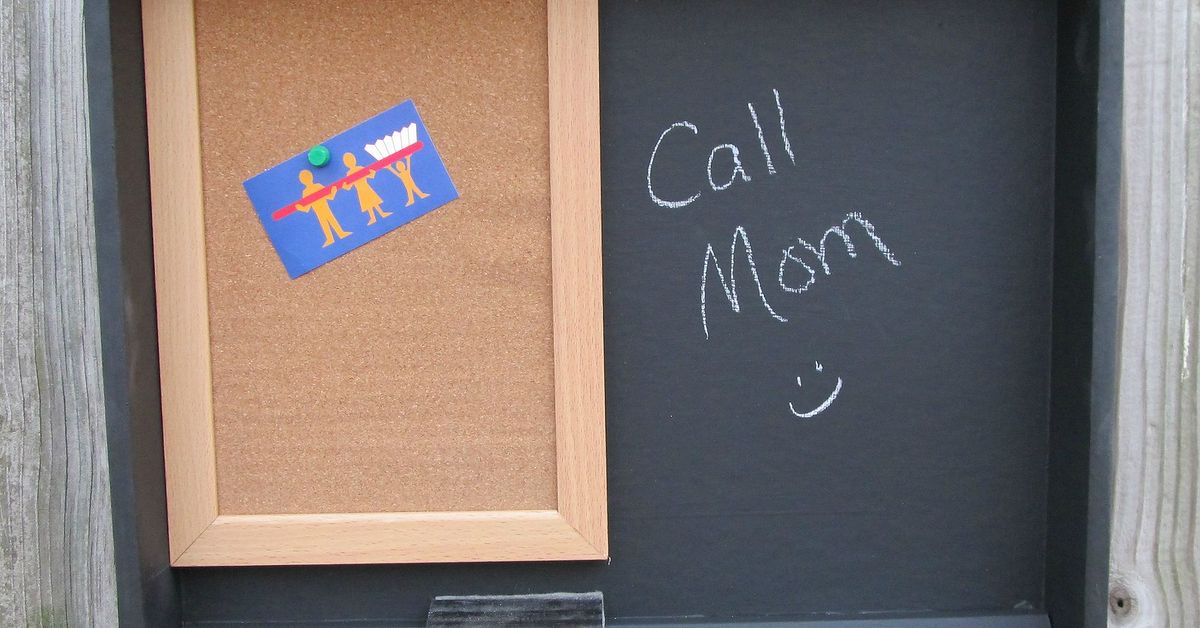
Combine chalkboard and cork
For a larger drawer, divide the backing into two sections: one chalkboard and one cork panel. The result becomes a compact bulletin board and memo station without occupying an entire wall.
The key is restraint. A memo organizer should reduce clutter, not become a museum dedicated to twelve different kinds of tiny storage attachment.
Step 9: Condition the Chalkboard Surface
After the chalkboard coating has dried or cured for the period specified by the manufacturer, many traditional chalkboard finishes should be conditioned before regular writing.
Typically, this involves rubbing the side of a piece of chalk over the entire writable surface and then erasing it. The light layer of chalk helps prepare the surface for repeated writing and can reduce the chance that the first message leaves a stubborn “ghost” behind. Follow the instructions for your particular paint because products can differ. e type of chalk recommended for the coating. Clean the surface gently rather than scrubbing it with aggressive abrasive cleaners.
Step 10: Mount the Organizer Securely
This is the step where enthusiasm must briefly make room for physics.
Consider the total loaded weight of the organizer, not merely the empty drawer. Add the expected weight of keys, mail, small containers, and anything else you plan to store.
Whenever practical, secure heavier wall-mounted organizers into wall studs using suitable screws and hanging hardware. When studs are not available in the required positions, choose wall anchors rated for the wall type and expected load, and follow the anchor manufacturer’s installation instructions.
Common hanging methods include D-rings, keyhole hangers, French cleats, or securely installed brackets. The drawer construction will influence the best option. Thin drawer backs may not be strong enough to support the entire load by themselves, so attach hanging hardware to substantial structural parts of the drawer.
Reliable shelving guidance recommends fastening to studs where possible and using appropriate hollow-wall anchors when necessary. The specific anchor type and capacity matter, so mounting hardware should be selected for the actual wall and load rather than by appearance alone. to Use Your Chalkboard Memo Organizer
In the entryway
Write reminders such as “Return library books” or “Take lunch,” while hooks hold keys and the lower ledge catches sunglasses. This is particularly useful for people who remember important tasks approximately seven seconds after leaving home.
In the kitchen
Use the chalkboard for grocery lists, meal ideas, or notes about leftovers. Keep the organizer away from excessive moisture, direct heat, and heavy grease unless the materials and finish are suitable for that environment.
In a home office
Turn it into a compact priority board. Use the shelf for chalk and small office supplies while the writing surface holds the day’s three most important tasks.
In a craft room
Use hooks for scissors or lightweight tools and write supply reminders directly on the board. The old drawer already looks at home among other creative materials, which is convenient because craft rooms tend to recognize their own.
In a family command center
Assign part of the board to each family member or divide it into categories for appointments, shopping, and reminders. Add clips for papers that cannot be reduced to three words in chalk.
Common Mistakes to Avoid
Confusing chalkboard paint with chalk-style paint
They serve different purposes. Make sure the actual writing area is coated with a product intended to function as a chalkboard.
Painting over dirt or glossy residue
Even the most fashionable paint color cannot negotiate successfully with furniture wax, grease, or loose finish. Clean and prepare the substrate first.
Rushing the drying time
Paint that feels dry to a fingertip may not be ready for another coat, hardware, chalk, or heavy handling. Follow product instructions.
Mounting through a weak drawer bottom
Many drawer bottoms are relatively thin. Attach hanging hardware to strong structural components rather than assuming the backing can support the organizer’s full loaded weight.
Adding too many accessories
A hook for every theoretical future possession is not organization. It is a hardware-store audition. Add only the features you genuinely expect to use.
Personal Experience: What This Old-Drawer Project Teaches You
The most useful lesson from making a chalkboard memo organizer is that the project almost never turns out exactly as imaginedand that is usually a good thing. An old drawer brings its own dimensions, holes, scratches, hardware, and occasional mystery stain to the workshop. Unlike building from new lumber, you are not starting with a blank page. You are negotiating with an object that has already lived a life.
The first practical surprise is often how much time preparation saves later. It is tempting to wipe the drawer once, open the paint, and charge forward with the confidence of a television makeover completed during a commercial break. In reality, a few extra minutes spent checking loose joints, cleaning corners, sanding rough patches, and testing the surface can prevent the most annoying failures. A tiny ridge that looks harmless before painting can become strangely dramatic under a smooth black chalkboard finish.
Another lesson is that perfection is not always the goal. On a new piece of furniture, a dent may look like damage. On a repurposed drawer, the same dent can look like history. The trick is deciding whether an imperfection contributes character or interferes with function. I would keep a worn edge, an old screw hole, or a slightly uneven patina. I would repair a loose corner, a sharp splinter, or anything that weakens the structure. That distinction makes the finished organizer feel intentionally vintage instead of accidentally broken.
Hardware can also change the entire personality of the project. An original brass cup pull might become the visual centerpiece. A simple wooden knob can be replaced with an iron handle for a more industrial look. Sometimes the best decision is to leave the original pull exactly where it is, even when it no longer serves its original purpose. It tells the viewer immediately that this organizer used to be something else, which is the whole point of upcycling.
The first attempt at organizing the finished piece may also reveal that fewer accessories work better. It is easy to imagine six hooks, three clips, a mail pocket, two chalk cups, a cork panel, a calendar, and possibly a small emergency snack compartment. Then you step back and realize the drawer has become a crowded convenience store.
A better approach is to live with the basic chalkboard organizer first. Notice what naturally collects near it. Do keys keep landing on the counter below? Add two hooks. Do school papers get tucked behind the drawer? Add a clip. Does the chalk disappear into another dimension? Attach a small holder. Let actual habits determine the organizer’s features.
The chalkboard itself changes how the piece gets used. A paper note can quickly become visual wallpaper that nobody notices. A chalk message invites rewriting. The board can say “Buy milk” in the morning, display a dinner menu in the afternoon, and carry an extremely important reminder about taking out the trash by evening. It is useful precisely because it is temporary.
There is also something satisfying about turning a horizontal storage object into vertical storage. A drawer that once consumed space inside a dresser now uses wall space and helps clear a counter. That simple shift in orientation is one of the most valuable habits in DIY upcycling: before discarding an object, rotate it, flip it, remove a part, or imagine it serving a completely different function.
Finally, the finished organizer usually becomes more meaningful than a mass-produced memo board because its oddities belong to your particular piece. The dimensions may be unconventional. The pull may be older than you are. One corner may refuse to become perfectly square despite polite encouragement. Those details make the project memorable.
And when somebody asks where you bought it, you get to say, “It used to be a drawer,” which is a much better story than, “A warehouse had a sale.”
Conclusion: Give That Lonely Drawer a New Job
A chalkboard memo organizer from an old drawer is a small project with an unusually useful result. It rescues an unwanted furniture component, creates customizable vertical storage, and adds a reusable place for reminders without demanding advanced woodworking skills.
The best version is not necessarily the most elaborate. Start with a sound drawer, prepare the surface carefully, use genuine chalkboard paint for the writing area, preserve whatever original character you like, and mount the finished organizer securely. Then add only the hooks, clips, shelves, or holders that support the way you actually live.
The result is part message board, part storage station, and part proof that an old drawer does not have to spend eternity in the garage protecting three rusty screws and a key to absolutely nothing.
Note: This article synthesizes established guidance on furniture upcycling, surface preparation, chalkboard finishes, household organization, and secure wall mounting from reputable U.S.-focused DIY, home-improvement, paint, and design resources, including Better Homes & Gardens, The Spruce, The Home Depot, This Old House, Bob Vila, HGTV, Family Handyman, Sherwin-Williams, Ace Hardware, and Lowe’s. e>