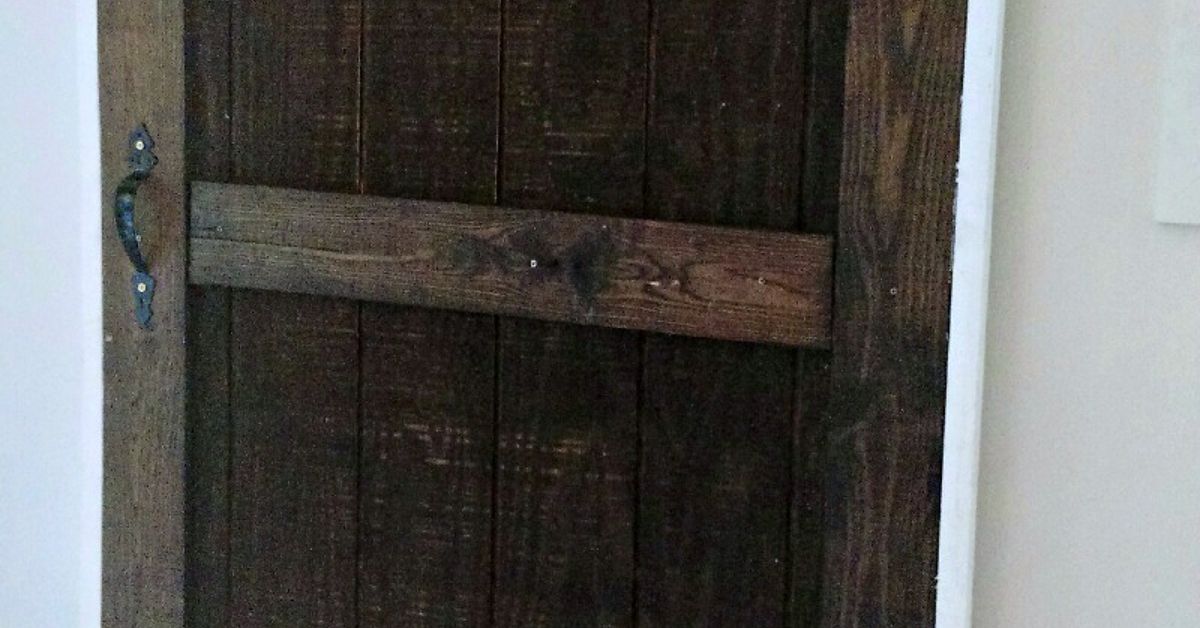
A DIY barn door using sheet siding is one of those projects that makes you feel suspiciously powerful. One day you are staring at a plain doorway, a closet opening, or a pantry that looks like it has been ignored since flip phones were cool. The next day, you are sliding a custom barn door across the wall like you own a boutique farmhouse hotel. The best part? You do not need to build the entire thing from individual planks unless you enjoy making sawdust as a lifestyle.
Sheet siding, such as plywood siding, T1-11-style panels, grooved wood siding, or similar engineered wood panels, gives you a wide, stable surface with built-in texture. Instead of lining up board after board and praying the last piece does not leave a weird skinny gap, you can create the door from a large panel, frame it with trim boards, paint or stain it, and hang it on sliding barn door hardware. It is efficient, affordable, and beginner-friendly enough for a confident weekend DIYer.
This guide walks through the full process: planning, measuring, choosing materials, cutting, framing, finishing, hanging hardware, and avoiding the kind of mistakes that make a project “memorable” in the wrong way. Grab your tape measure. We are about to make a door that looks custom without requiring a custom-door budget.
Why Use Sheet Siding for a DIY Barn Door?
Traditional barn doors are often made with individual wood boards joined together. That style looks beautiful, but it can also be heavier, more expensive, and more prone to shifting if the wood is not dry, straight, or properly supported. Sheet siding solves several of those problems at once.
A single sheet gives you a large, continuous surface. Many sheet siding panels are sold in standard 4-foot by 8-foot sizes, which makes them ideal for common interior door openings. The vertical grooves or textured face can mimic board-and-batten or rustic plank construction without forcing you to assemble every “plank” one at a time. That means fewer seams, fewer alignment headaches, and fewer opportunities for your door to look like it had a disagreement with geometry.
Sheet siding is especially useful for pantry doors, laundry room doors, closet doors, basement utility rooms, craft rooms, home offices, and other interior spaces where a swinging door may feel bulky. Because sliding barn doors move along the wall, they can save floor space and add visual character at the same time.
Best Places to Use a Sheet Siding Barn Door
A DIY barn door using sheet siding works best where privacy needs are moderate and wall space is available beside the opening. Barn doors are not airtight or soundproof like a properly sealed hinged door, so they may not be the top choice for every bathroom or bedroom. However, they are excellent for areas where style, function, and space-saving matter more than total acoustic privacy.
Great locations include:
- Kitchen pantries
- Laundry rooms
- Closets and linen storage
- Home office nooks
- Basement utility rooms
- Craft rooms or playrooms
- Wide openings between casual living areas
Before building, confirm that you have enough wall space on one side of the opening for the door to slide fully open. If your door is 38 inches wide, you generally need at least that much clear wall space beside the doorway, plus room for trim, stops, and hardware. Light switches, outlets, artwork, thermostats, and wall sconces can quickly become uninvited guests at the barn door party.
Tools and Materials You Will Need
The exact supply list depends on your opening size and design, but most DIY sheet siding barn doors use a similar collection of tools and materials. Choose hardware rated for the finished weight of your door, and always follow the instructions included with your specific kit.
Materials
- One sheet of plywood siding, T1-11-style siding, or grooved sheet siding
- 1×4 or 1×6 boards for the outer frame
- Optional 1×3 or 1×4 boards for cross braces or decorative trim
- Wood glue or construction adhesive suitable for interior wood projects
- Brad nails, finish nails, or screws
- Wood filler
- Sandpaper in medium and fine grits
- Primer and paint, or stain and protective topcoat
- Sliding barn door hardware kit
- Header board or backer board, usually a 1×4 or 1×6
- Door pull or handle
- Floor guide
Tools
- Tape measure
- Pencil
- Level
- Circular saw, table saw, or track saw
- Miter saw for trim boards
- Drill and bits
- Stud finder
- Clamps
- Square
- Sander or sanding block
- Paintbrush, roller, or sprayer
- Safety glasses, hearing protection, and dust mask
Planning the Door Size
Correct sizing is the difference between a barn door that looks intentional and one that looks like it borrowed its measurements from a raccoon with a clipboard. Start by measuring the width and height of the opening, including any trim you want to cover.
For most interior barn doors, the slab should be wider than the opening so it overlaps the sides. A common approach is to add about 2 inches to the total width, giving roughly 1 inch of overlap on each side. For more privacy, you may add a little extra. For the height, the door should be tall enough to cover the opening while leaving proper clearance at the floor and enough room above for rollers and track hardware.
Also measure the available wall space. The track usually needs to be at least twice the width of the door so the door can slide completely away from the opening. If your opening is 36 inches wide and you build a 40-inch door, a 78-inch or 80-inch rail may be suitable, depending on the kit. Always check the hardware manufacturer’s specifications before cutting anything.
Choosing the Right Sheet Siding
For an indoor barn door, you want a panel that is strong enough to stay flat but not so heavy that your hardware sighs dramatically every time you open it. Plywood siding and engineered wood siding are popular because they are easier to cut and finish than cement-based panels. Grooved panels are especially attractive because they create the appearance of vertical boards without requiring separate planks.
Thickness matters. A thin panel may flex unless it is well supported by trim and bracing. A very thick panel may become heavy. Many DIYers use a panel around 3/8 inch to 5/8 inch thick, then reinforce it with a wood frame. The frame adds structure, hides cut edges, and gives the door that chunky finished look people love in barn door designs.
If the sheet siding has a rough-sawn face, expect it to absorb primer, paint, or stain differently than smooth plywood. Test your finish on a scrap piece first. That little test patch can save you from discovering that your “warm rustic brown” stain looks more like “haunted barbecue sauce” on the actual panel.
Step-by-Step: How to Build a DIY Barn Door Using Sheet Siding
Step 1: Measure Twice, Then Measure Like You Do Not Trust Yourself
Measure the doorway width and height. Decide how much overlap you want on the sides and top. Write down your final door slab dimensions. Check the hardware kit for clearance requirements, including how far the top of the door should sit below the rail and how much space is needed between the door and wall.
Next, look around the opening. Is there baseboard trim where the door will slide? Is the wall flat? Is the casing extra thick? Will the handle hit anything? These details matter because a barn door moves across the face of the wall, not inside the frame like a pocket door.
Step 2: Cut the Sheet Siding Panel
Lay the sheet siding on a stable work surface. Use a straightedge or chalk line to mark your cut lines clearly. If you are using a circular saw, support the panel so the cut piece does not drop and tear the edge as you finish the cut.
Cut the panel to the final door size or slightly smaller if your trim frame will define the finished outer dimensions. For example, if you plan to add 1×4 boards around the edges and want the trim flush with the panel edges, cut the panel to the full door size. If you are building a frame around the panel like a picture frame, plan your measurements accordingly.
Step 3: Build the Outer Frame
Cut your top, bottom, and side frame boards. A simple design uses two vertical stiles and two horizontal rails. The boards can sit directly on top of the sheet siding, creating a classic framed barn door look. Use a square to make sure the corners are accurate before attaching anything permanently.
Apply wood glue or construction adhesive to the back of each trim board, then set it in place. Secure the boards with brad nails, finish nails, or screws. If you use screws, predrill to reduce splitting and consider filling the holes later for a cleaner finish.
Step 4: Add Decorative Bracing
Now comes the fun part: personality. You can keep the door clean and modern with only a border frame, or add a diagonal brace for a classic farmhouse look. A Z-brace uses one diagonal board running between the top and bottom rails. An X-brace uses two diagonals crossing in the center. A double-panel design can divide the door into upper and lower sections.
Dry-fit the decorative boards before cutting final angles. Mark the boards in place, cut carefully, and test again. Diagonal boards are where many DIYers discover that angles have a sense of humor. Go slowly, sneak up on the fit, and remember that caulk and wood filler are loyal friends.
Step 5: Reinforce the Back if Needed
If the door feels flexible, add reinforcement on the back. A simple rectangular frame on the rear side can help keep the panel flat. For taller or wider doors, additional horizontal bracing may reduce warping over time. The goal is to create a door that feels solid but is not needlessly heavy.
Check that any back-side bracing will not interfere with the wall, trim, floor guide, or handle hardware. Barn doors need a little space behind them to glide smoothly.
Step 6: Sand, Fill, and Prep
Fill nail holes, seams, and small gaps with wood filler. Once dry, sand the frame and edges smooth. For stain, sand in the direction of the grain and avoid over-sanding rough siding texture unless you want to reduce the rustic look. For paint, focus on smoothing trim boards, easing sharp edges, and removing splinters.
Wipe away dust thoroughly before finishing. Dust left on the surface can turn your paint job into a gritty reminder that shortcuts have consequences.
Step 7: Prime and Paint or Stain
For painted doors, prime the entire door, including edges. Sheet siding and raw wood can absorb paint unevenly, so primer helps create a more consistent finish. After primer dries, lightly sand rough spots, wipe clean, and apply two coats of paint. Semi-gloss or satin finishes are popular because they are easier to clean than flat paint.
For stained doors, test your stain first. Grooved siding may absorb stain more deeply in textured areas. Apply stain evenly, wipe off excess according to the product directions, and protect the surface with a clear topcoat if needed.
Do not forget the edges and back side. Sealing all sides helps reduce moisture imbalance, which can contribute to warping. Your future self will appreciate this step, possibly with snacks.
Step 8: Install the Header Board
A header board, also called a backer board, is often used behind barn door hardware. It spreads the load across wall studs and can help the rail clear door casing or trim. Use a stud finder to locate studs above the opening, then attach the header securely into framing members.
The header should be level. Not “looks level if I squint” level. Actually level. A crooked rail means the door may slide by itself, bump the stop, or slowly drift like it has somewhere better to be.
Step 9: Attach the Rail and Hangers
Follow the instructions for your barn door hardware kit. Mark the rail height carefully based on the door height, roller size, and required floor clearance. Predrill holes where recommended, then attach the rail with the supplied fasteners or fasteners approved for your wall condition.
Attach the hangers to the door. Measure from the door edges so both hangers are symmetrical. Drill clean holes, tighten the hardware securely, and avoid over-tightening to the point that you crush the wood fibers or damage the panel.
Step 10: Hang the Door and Add the Floor Guide
Lift the door onto the track with help. This is not the moment to prove independence. Barn doors are awkward, and gravity is famously undefeated. Once the rollers are on the rail, install anti-jump blocks or safety stops according to the kit instructions.
Next, install the floor guide. The guide keeps the bottom of the door from swinging away from the wall. Some guides fit into a groove cut into the bottom of the door, while others wrap around the bottom edge. Slide the door open and closed before final fastening to make sure the guide stays engaged through the full travel.
Design Ideas for Sheet Siding Barn Doors
The beauty of sheet siding is that it can lean rustic, modern, coastal, cottage, or industrial depending on how you finish it. A black-painted sheet siding barn door with simple rectangular trim can look clean and modern. A whitewashed grooved panel can feel relaxed and coastal. A warm stained panel with a diagonal brace brings classic farmhouse energy without requiring a chicken coop in the backyard.
Popular styles include:
- Modern farmhouse: White or charcoal paint, black hardware, and a simple X-brace.
- Rustic cabin: Medium brown stain, visible wood grain, and chunky trim.
- Minimal modern: Smooth reverse-side panel, flat trim, and a matte finish.
- Cottage style: Soft green, cream, or blue paint with vertical grooves.
- Industrial: Dark stain, steel-look hardware, and a large rectangular pull.
If your room already has strong wood tones, paint may be the better choice. If the surrounding space is mostly neutral, stain can add warmth. The door is large enough to act like a feature wall, so choose a finish that works with the whole room instead of only looking good on the workbench.
Common Mistakes to Avoid
Using a Door That Is Too Narrow
A barn door should overlap the opening. If it is the exact width of the doorway, gaps will be obvious from the sides. Add enough width to cover trim and improve privacy.
Skipping the Header Board
Mounting a heavy sliding door rail only into drywall is a bad idea wearing a tool belt. The rail must be secured into studs or solid blocking. A header board makes this easier and often helps the rail sit proud of thick casing.
Ignoring Door Weight
Sheet siding may seem light at first, but trim boards, braces, hardware, paint, and handles add weight. Check your hardware rating before building.
Forgetting the Floor Guide
Without a guide, the bottom of the door can swing, rattle, or bump the wall. A guide is small, inexpensive, and very good at preventing barn door drama.
Painting Only the Front
Finish both sides and all edges. Uneven sealing can allow one side to absorb moisture differently than the other, increasing the chance of cupping or warping.
Cost Considerations
A DIY barn door using sheet siding can be budget-friendly, especially compared with buying a finished custom barn door. Costs vary by region, hardware quality, wood species, and finish. The sheet siding panel, trim boards, screws, glue, primer, paint, and handle may be relatively affordable, while the barn door hardware kit often becomes the biggest single expense.
Do not automatically buy the cheapest hardware kit you can find. A sliding door depends on smooth rollers, strong stops, safe fasteners, and a rail that will not flex under load. Reliable hardware makes the door feel better every single day. Cheap hardware makes the door feel like a shopping cart with one bad wheel.
Maintenance Tips
Once installed, a sheet siding barn door needs only basic care. Keep the track clean, tighten hardware if anything loosens, and touch up paint or stain when needed. If the door begins to rub, check the floor guide, rail level, and hanger bolts. Homes shift slightly over time, and hardware may need minor adjustments.
For painted doors, wipe with a soft damp cloth. For stained doors, avoid harsh cleaners that can dull the protective finish. If the door is in a high-traffic area, choose a durable topcoat or washable paint from the beginning.
Real-World Experience: What I Learned Building a Barn Door from Sheet Siding
The first thing you learn when building a DIY barn door using sheet siding is that big panels have opinions. They look flat at the store, but once you get them home, lean them against the garage wall, and stare at them with a cup of coffee, you may notice a slight bow, a rough edge, or one corner that seems to have joined a rebellion. This is normal. The trick is to choose the straightest panel available, store it flat before building, and frame it well.
One helpful experience is to let the panel acclimate indoors before cutting and finishing. If the sheet has been sitting in a humid garage or outdoor lumber area, bringing it directly into a climate-controlled room and sealing one side immediately can cause movement. Letting the material rest for a short period gives it a chance to adjust. It is not glamorous, but neither is rebuilding a door because it curled like a potato chip.
Another lesson: the frame does more than make the door pretty. It gives the sheet siding stiffness. A plain panel may flex when you lift it, especially if it is thin. Once you add outer stiles, rails, and a diagonal or horizontal brace, the slab feels much stronger. I like to dry-fit every trim piece first, mark the back side, and number the pieces lightly in pencil. This keeps the assembly organized, especially if two boards are close in length but not exactly identical.
Finishing also takes longer than expected. Grooved siding has little channels that love to collect dust, primer, stain, and tiny brush marks. A small angled brush works better in grooves, while a roller can cover the flat areas quickly. If painting, primer is worth the extra step because raw panel siding can drink paint unevenly. If staining, test first. Some sheet siding faces are rough and absorb stain aggressively, so the color can become darker than expected.
Hardware installation is where patience pays off. The door may be homemade, but the track must be installed with professional-level accuracy. A tiny slope in the rail can make the door drift open or closed. Before tightening everything completely, use a long level and recheck your marks. Also, install the handle before hanging the door if possible. It is much easier to drill and attach hardware while the door is lying flat than while it is hanging and gently mocking your life choices.
The floor guide may seem like a minor detail, but it changes how the door feels. Without it, the bottom can swing outward when someone pulls the handle. With it, the door glides in a controlled path and feels more finished. If you do not want to cut a groove into the bottom edge, choose a guide designed to wrap around the door. Just make sure it fits your door thickness.
Finally, expect small imperfections and embrace them wisely. A DIY barn door is not supposed to look like it came from a sterile factory. The charm is in the texture, the handmade trim, the slightly rustic finish, and the satisfaction of saying, “Yes, I built that,” every time someone compliments it. Sheet siding makes the project faster and more forgiving, but careful measuring, solid framing, and patient finishing are what make it look intentional.
Conclusion
A DIY barn door using sheet siding is a practical, stylish, and budget-conscious way to upgrade an interior opening. By starting with a large siding panel, you reduce assembly time while still getting the look of vertical boards or rustic texture. Add a sturdy trim frame, seal the wood properly, mount the rail securely, and use a floor guide for smooth operation.
This project is ideal for homeowners who want a custom look without ordering a custom slab. It works beautifully for pantries, closets, laundry rooms, offices, and wide openings where a traditional swinging door feels inconvenient. The key is planning: measure carefully, choose hardware rated for your door, attach the rail into solid framing, and finish every side of the panel. Do that, and your sheet siding barn door will slide smoothly, look fantastic, and quietly make the rest of the room feel like it needs to dress better.