“`
Note: This Jack Skellington-inspired Sharpie mug is a fan craft for personal use, gifting, or seasonal home decor. Keep your design on the outside of the mug, away from the drinking rim and inside surface, and avoid selling character-based designs unless you have the proper rights.
Introduction: A Mug That Says “This Is Halloween” Before Coffee Does
If your morning coffee feels a little too normal, a DIY Jack Skellington Sharpie mug is the perfect tiny rebellion. It is spooky, cute, affordable, and delightfully dramaticbasically Jack Skellington in drinkware form. Best of all, you do not need a kiln, a pottery wheel, or the artistic confidence of someone who owns twelve sketchbooks and actually uses them.
This simple ceramic mug project uses a white mug, an oil-based black paint marker, and a home oven to create a bold Jack Skellington face inspired by The Nightmare Before Christmas. The design works beautifully because Jack’s face is iconic but simple: large hollow eyes, two tiny nostril marks, and a stitched smile that can look charming even if your hand shakes a little. Honestly, a slightly crooked grin just makes him more on-brand.
In this guide, you will learn how to make a simple DIY Jack Skellington Sharpie mug step by step, including what supplies to use, how to prep the ceramic surface, how to draw the face, how to bake the mug, and how to care for it so your spooky masterpiece lasts longer than a Halloween candy stash hidden from children.
Why a Jack Skellington Mug Is the Perfect Beginner DIY
Some craft projects begin with “easy” and end with you covered in glue, questioning your life choices. This one is different. A Jack Skellington mug is beginner-friendly because the design relies on contrast, not complicated detail. A white mug already gives you Jack’s pale skeleton face, so all you need to add is black linework.
The project also makes a great Halloween craft, Christmas craft, movie-night activity, teacher gift, office mug upgrade, or handmade present for someone who can quote half the film without being asked. It is inexpensive, customizable, and quick enough to complete in an afternoon, not counting drying and curing time.
Supplies You Will Need
Before you start, gather everything in one place. This prevents the classic crafting moment where your marker is uncapped, your mug is rolling away, and your paper towel has mysteriously joined another dimension.
- One plain white ceramic mug, preferably smooth and glossy
- Black oil-based Sharpie paint marker or another oil-based ceramic paint marker
- Pencil or washable marker for light planning, optional
- Rubbing alcohol
- Cotton pads, cotton swabs, or paper towels
- Painter’s tape, optional
- Printed Jack Skellington face reference, optional
- Baking sheet
- Home oven
- Dishwasher-safe Mod Podge or ceramic-safe sealer, optional
Choose the Right Marker: Regular Sharpie vs. Oil-Based Paint Marker
The most important rule is simple: do not use a regular black Sharpie if you want the design to last. Regular permanent markers may look great at first, but they often fade, smear, or wash away from glossy ceramic. For a more durable DIY Sharpie mug, use an oil-based paint marker. Oil-based paint markers create more opaque, glossy marks and adhere better to smooth surfaces such as ceramic, glass, metal, and stone.
A fine-point or medium-point black oil-based paint marker is ideal for Jack’s face. Fine point gives you better control for the stitched mouth, while medium point makes the eyes easier to fill. If you only buy one, choose medium point and use the tip carefully for thin details.
Step-by-Step: How to Make a Simple DIY Jack Skellington Sharpie Mug
Step 1: Wash and Dry the Mug
Start by washing the mug with warm, soapy water. Dry it completely with a lint-free towel. Even a clean-looking mug can have dust, oils, fingerprints, or store residue on the surface, and those tiny invisible troublemakers can stop paint from sticking well.
Step 2: Wipe the Surface With Rubbing Alcohol
Put a little rubbing alcohol on a cotton pad and wipe the area where you will draw Jack’s face. Let the mug air-dry for a few minutes. This step is small but powerful. Think of it as giving your mug a fresh canvas instead of asking paint to cling to old fingerprints and snack evidence.
Step 3: Plan the Face Placement
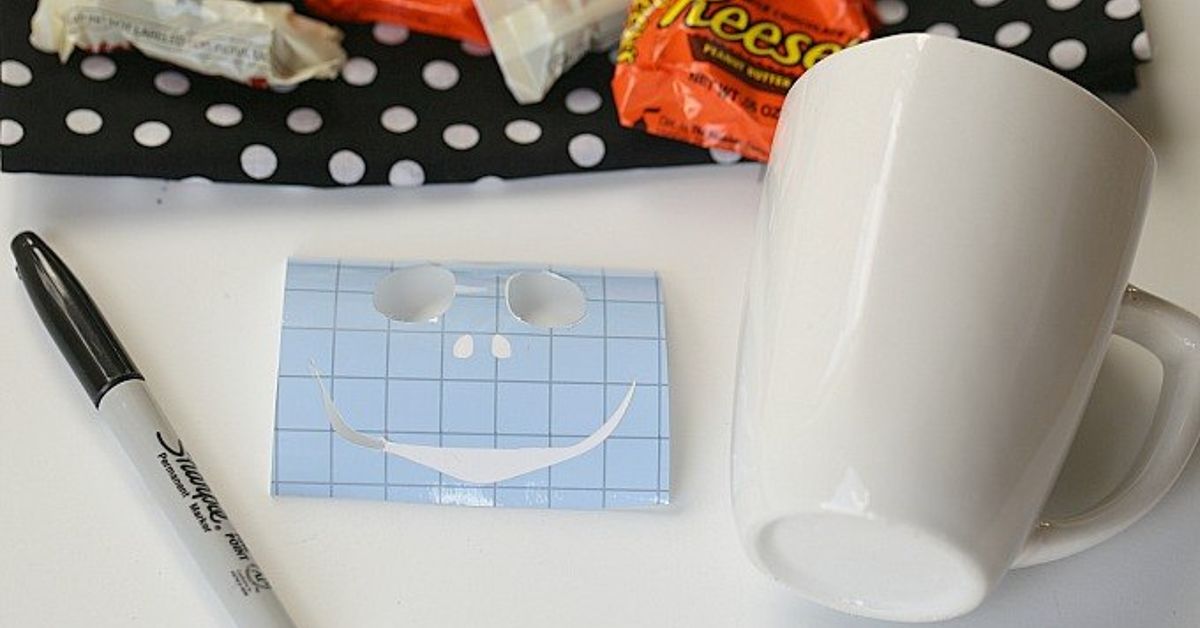
Place the mug in front of you with the handle turned away or slightly to the side. Decide whether you want Jack’s face centered on the front or angled for a playful look. If you are nervous, lightly mark the face area with tiny pencil dots or use painter’s tape to create a visual border.
A classic Jack Skellington face usually includes two large oval eyes, two small vertical nostril marks, and a long curved stitched smile. Leave at least half an inch of blank space below the top rim so the marker does not touch the area where your mouth will go when drinking.
Step 4: Draw the Eyes
Shake your oil-based paint marker according to the marker instructions, then press the tip on scrap paper until the paint flows smoothly. Draw two large uneven oval shapes for the eyes. They should look slightly droopy and hollow rather than perfectly round. Jack’s charm comes from that wonderfully theatrical “I have seen Christmas and I have questions” expression.
Fill in the eyes with black paint. Use slow strokes and avoid pressing too hard. If the paint looks streaky, let it dry and add another layer later rather than overworking wet paint.
Step 5: Add the Nose
Draw two short vertical nostril marks beneath the eyes. Keep them small. Jack’s nose is not the star of the show; it is more like a supporting actor who arrives, delivers two lines, and leaves with dignity.
Step 6: Create the Stitched Smile
Draw a long curved smile across the lower half of the mug. Then add short vertical stitch marks along the line. The stitches do not need to be identical. In fact, varied stitch lengths look more handmade and more faithful to the spooky stitched style.
For a friendlier Jack, make the smile wide and gently curved. For a moodier Jack, angle the curve slightly or make the eyes taller and narrower. For “I have had three espressos and may organize Halloween Town,” make the smile huge.
Step 7: Fix Mistakes Before Baking
If you make a mistake, do not panic. A cotton swab dipped in rubbing alcohol can remove many fresh paint marker errors before they dry fully. Wipe carefully, let the area dry, and redraw. This is why it is smart to work slowly and keep the rubbing alcohol nearby.
Step 8: Let the Mug Dry for 24 Hours
After drawing the design, let the mug sit untouched for at least 24 hours. This gives the paint time to settle onto the ceramic surface before heat curing. Do not rush this step. The mug may look dry after a few minutes, but “looks dry” and “ready to bake” are not always the same thing. Craft supplies are sneaky that way.
Step 9: Bake the Mug in a Cold Oven
Place the mug on a baking sheet and put it into a cold oven. Do not preheat the oven first. Sudden temperature changes can stress ceramic and may cause cracking, so the mug should warm gradually with the oven.
Set the oven to 350°F and bake the mug for 30 minutes after the oven reaches temperature. Some crafters use slightly higher or lower temperatures, but 350°F for 30 minutes is a common home method for curing paint marker mugs. When the time is up, turn off the oven and leave the mug inside until it cools completely.
Step 10: Wash Gently Before Use
Once the mug is fully cool, gently wash it by hand with mild soap and a soft sponge. Avoid abrasive scrubbers. The design is more durable after baking, but it is still handmade, not factory-fired ceramic. Treat it like a tiny piece of functional fan art, not a camping pot.
Design Variations for Your Jack Skellington Mug
Classic Jack Face
The classic version is the easiest: black eyes, black nostrils, and a stitched grin on a white mug. It is clean, recognizable, and perfect for beginners.
Jack With Pinstripes
Add thin black vertical lines around the lower half of the mug to echo Jack’s famous pinstriped suit. Keep the face area clear so the design does not look too busy.
Jack and Zero
If you want to add a small detail, draw Zero the ghost dog on the back of the mug. Use a light gray or black outline and add a tiny pumpkin nose. This is a sweet option for fans who want a little extra charm.
Halloween Town Border
Add simple bats, stars, spirals, pumpkins, or a curly hill silhouette near the bottom of the mug. These small accents make the mug feel more complete without requiring advanced drawing skills.
Important Safety Tips
Keep all marker designs on the outside of the mug. Do not draw inside the mug, on the inner lip, or directly on the drinking rim. Paint markers are craft products, not food-safe glazes. Even when baked, the ink should not be placed where it may contact drinks, food, or your mouth.
Use a mug that is oven-safe and free of cracks or chips. Avoid plastic, melamine, or travel mugs with rubber parts because they are not suitable for oven curing. If your mug has metallic trim, skip the baking method unless the manufacturer says it is oven-safe.
How to Make the Design Last Longer
Hand washing is the safest care method for a DIY Sharpie mug. Dishwashers use heat, detergent, pressure, and long water exposure, which can wear down handmade designs. If you want extra protection, you can apply a thin coat of dishwasher-safe sealer over the artwork, keeping it away from the rim. Follow the sealer instructions carefully, especially curing time. Some dishwasher-safe sealers require a full 28 days to cure properly.
For the longest life, do not soak the mug, scrub the design, or use harsh cleaners. Wash it gently, dry it by hand, and store it where other dishes will not scrape against the artwork.
Troubleshooting Common Problems
The Paint Looks Streaky
Let the first layer dry, then add a second layer. Do not keep dragging the marker through wet paint, or the surface may become uneven.
The Marker Will Not Flow
Shake the marker with the cap on, then press the tip on scrap paper until the paint appears. Never start pumping the marker directly on the mug unless you enjoy surprise paint puddles.
The Design Smudged
If the paint is still fresh, clean the mistake with rubbing alcohol. If it has dried, you may need to carefully scrape or wipe it, then clean the surface again before redrawing.
The Design Faded After Washing
This usually happens when regular Sharpie was used, the mug was not cleaned well, the paint was not allowed to dry before baking, or the mug went through the dishwasher. Use oil-based paint markers and hand wash only.
Creative Gift Ideas for a Jack Skellington Sharpie Mug
A handmade Jack Skellington mug makes a fun gift on its own, but you can turn it into a themed present with a few simple additions. Fill it with hot cocoa packets, candy canes, Halloween chocolates, black-and-white marshmallows, or a small bag of coffee. Add a tag that says “What’s this? It’s caffeine!” and you have a gift that is both useful and dramatically spooky.
For a cozy movie-night basket, pair the mug with popcorn, fuzzy socks, and a note inviting the recipient to watch The Nightmare Before Christmas. For an office gift, add tea bags or instant coffee sticks. For a Halloween party favor, make several mugs with slightly different expressions so each guest gets a unique Jack.
Experience Section: What Making a DIY Jack Skellington Sharpie Mug Is Really Like
The best part about making a DIY Jack Skellington Sharpie mug is that it feels impressive without being intimidating. Many craft projects require measuring, layering, sanding, sealing, waiting, re-waiting, and then discovering you glued something upside down. This mug is refreshingly straightforward. You clean, draw, dry, bake, and admire. There is something very satisfying about turning a plain white mug into a character piece with just a black marker and a little patience.
If this is your first time making a Sharpie mug, expect the first few marker strokes to feel more serious than they actually are. Drawing on ceramic feels permanent, even when you know rubbing alcohol can rescue small mistakes. The smooth surface can also make your hand glide faster than expected, so it helps to rest your wrist on the table and rotate the mug slowly instead of trying to draw the whole face in one heroic swoop.
The eyes are usually the moment when the mug starts to come alive. Before that, it is just a white cup with two black blobs. Then you add the nostrils and stitched grin, and suddenly Jack appears. It is a tiny Halloween miracle, minus the fog machine. The stitched mouth is especially forgiving because uneven lines look intentional. If one stitch is longer than the others, congratulationsyou have created personality.
Another real-world tip: make a practice face on paper first. You do not need a perfect sketch, just a rough idea of eye size and mouth placement. Many people draw the eyes too small on the first try. Jack’s face looks better when the eyes are bold and expressive, so do not be shy. A timid Jack Skellington face can look more like a surprised raisin than the Pumpkin King.
The drying time is where patience matters. It is tempting to bake the mug right away, especially when it already looks finished. Waiting 24 hours gives the paint a better chance to set before heat curing. During that time, place the mug somewhere safe. A curious cat, a swinging backpack, or one accidental sleeve can turn your clean Jack face into abstract Halloween jazz.
Baking the mug in a cold oven may feel strange if you are used to preheating for cookies, but gradual heating is kinder to ceramic. The cooling period is also important. Do not pull the mug out while it is still hot and place it on a cold counter. Let it cool inside the oven like a tiny ceramic vampire resting in its coffin.
Once finished, the mug feels personal in a way store-bought items rarely do. It may not be flawless, but that is the charm. Handmade mugs carry the little evidence of the person who made themthe slightly uneven smile, the extra stitch, the tiny correction no one else will notice. Whether you keep it for pumpkin spice coffee, use it as a Halloween pencil cup, or give it to a fellow fan, this DIY Jack Skellington Sharpie mug is a simple craft with a lot of character.
Conclusion
Making a simple DIY Jack Skellington Sharpie mug is one of those crafts that gives you maximum seasonal charm with minimum chaos. With a plain white ceramic mug, a black oil-based paint marker, careful cleaning, patient drying, and slow oven curing, you can create a spooky-cute mug that looks great on a desk, coffee bar, Halloween shelf, or movie-night tray.
The key is to use the right marker, keep the design away from food-contact areas, bake the mug gradually, and hand wash it gently. Once you understand those basics, you can customize the design with pinstripes, bats, pumpkins, Zero, or a dramatic stitched grin worthy of the Pumpkin King himself.
Simple, affordable, and just the right amount of eerie, this DIY Sharpie mug proves that handmade Halloween decor does not need to be complicated. Sometimes all it takes is a white mug, a black marker, and the confidence to draw two giant spooky eyes before your coffee kicks in.