A good pair of stackable sawhorses is like a loyal shop dog: always underfoot, always useful, and surprisingly strong for something that mostly sits there. Whether you are cutting boards, painting cabinet doors, assembling a tabletop, or pretending your garage is a professional workshop for the afternoon, stackable sawhorses make the job easier.
The best part? You do not need a cabinetmaker’s temple full of exotic tools. A simple stackable sawhorse design can be built from basic 2×4 lumber, screws, glue, and careful measuring. The goal is to create a pair of sturdy, repeatable supports that nest neatly together when not in use. That means more floor space, fewer tripping hazards, and no awkward wrestling match every time you need to store them.
This guide explains how to build stackable sawhorses with practical dimensions, clear steps, safety-focused advice, and real-world tips learned from DIY workshops, job sites, garages, and the occasional “why is this leg floating?” moment.
Why Build Stackable Sawhorses Instead of Buying Them?
Store-bought sawhorses are convenient, and some are excellent. But building your own stackable sawhorses gives you three big advantages: cost control, customization, and repairability. If the top gets chewed up by saw kerfs, paint, glue, or mysterious garage gunk, you can replace one board instead of throwing away the whole thing.
A DIY stackable sawhorse can also be sized for your work style. Want a lower set for breaking down plywood? Build them shorter. Want a taller pair for finishing projects without bending like a question mark? Adjust the legs. Need a workbench in a pinch? Add two long 2×4 rails across the pair and lay a sheet of plywood on top.
Recommended Design: Simple 2×4 Stackable Sawhorses
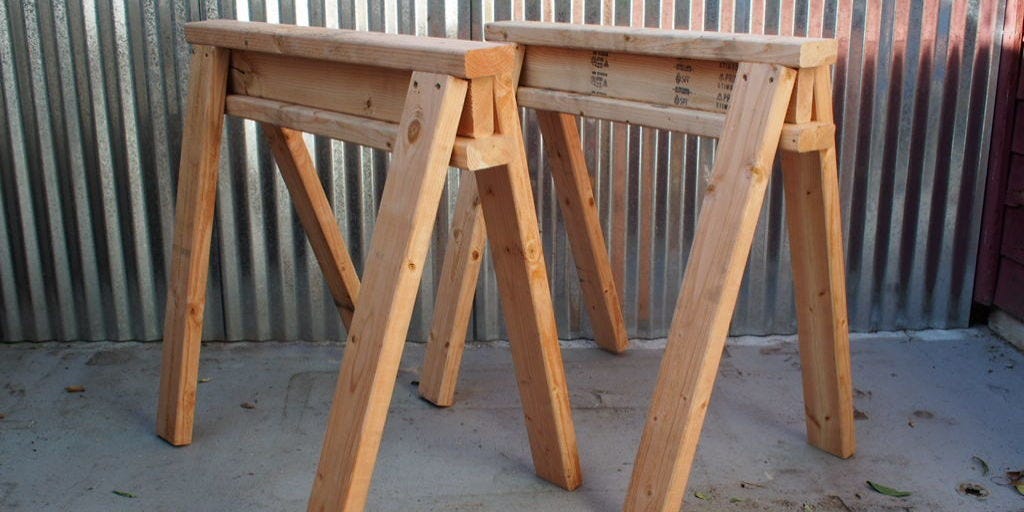
This project uses a practical I-beam-style top and angled legs. The I-beam creates a strong upper rail, while the angled legs give the sawhorse stability. When built consistently, multiple sawhorses can stack on top of each other because the legs nest around the body below.
Finished Size
A common finished height is about 30 to 32 inches, which is comfortable for general cutting, sanding, painting, and assembly. The top length can be around 32 inches, wide enough for stability but still compact enough for storage.
Materials for One Pair
- Five 2x4x8 boards, straight and dry
- Approximately 60 exterior or construction screws, 2 1/2 to 3 inches long
- Wood glue, optional but helpful
- Sandpaper or sanding block
- Paint, sealer, or wood finish, optional
Tools
- Tape measure
- Pencil
- Speed square or rafter square
- Drill or impact driver
- Clamps
- Saw suitable for cutting construction lumber
- Eye protection, hearing protection, and dust protection
For beginners, the safest and easiest option is to have lumber cut at the store or work with an experienced adult when using power tools. The project itself is simple, but simple does not mean careless. Wood has a charming habit of moving at the wrong moment, and sawdust goes everywhere except where you expect it.
Cut List for Two Stackable Sawhorses
The following cut list creates two sturdy sawhorses. Slight variations are fine as long as both sawhorses match each other.
- Four top rails: 32 inches long
- Two center web boards for the I-beams: 30 inches long
- Eight legs: about 30 inches long, with angled ends if desired
- Optional gussets or braces: cut from scrap 2×4 or plywood
The classic stackable version works well with 30-inch legs and a 32-inch top rail. A small overhang on each end of the top rail makes the sawhorse easier to clamp to and helps protect the supporting structure below.
Step 1: Choose Straight Lumber
Do not grab the first five boards from the pile and hope the woodworking gods are feeling generous. Sight down each 2×4 from one end. Avoid boards with dramatic twists, deep splits, large loose knots, or a curve that looks like it belongs in a fishing rod.
Straight lumber makes the build easier and the finished sawhorses more stable. If one leg is badly bowed, the sawhorse may rock. A rocking sawhorse is not a feature. It is a warning.
Step 2: Build the I-Beam Tops
Each sawhorse starts with an I-beam top. Lay one 30-inch 2×4 on edge. Center a 32-inch 2×4 flat on top of it, leaving about 1 inch of overhang at each end. Apply wood glue if you want extra rigidity, clamp the pieces, then drive screws through the top board into the center board.
Flip the assembly over and attach another 32-inch board to the opposite side. You now have a simple wooden I-beam: one vertical board sandwiched between two horizontal boards. Repeat the process for the second sawhorse.
Why the I-Beam Works
The I-beam shape resists bending better than a single flat board. It also gives the legs a solid place to attach. The top can take abuse from cutting, clamping, painting, and general workshop chaos, while the center web helps keep everything aligned.
Step 3: Mark and Attach the Legs
Place the I-beam upside down on a flat surface. Position two legs near one end, angled outward slightly. Repeat with two more legs at the other end. The exact angle can vary, but a moderate splay improves stability and helps the sawhorses stack.
Use a scrap block as a spacer so each leg sits in the same position. This is the secret to sawhorses that stack neatly instead of behaving like a pile of wooden elbows. Clamp each leg before fastening it. Drive screws through the leg and into the I-beam, using several screws per leg for strength.
Repeat the layout on the second sawhorse. Consistency matters more than perfection. If the first horse has legs set 4 inches from the end, make the second one the same way.
Step 4: Add Bracing for Strength
Basic stackable sawhorses can work without extra bracing, but braces make them stronger and more confident under load. Add small triangular gussets cut from plywood or scrap lumber between the legs and the I-beam. You can also add short horizontal stretchers near the lower portion of each leg pair, as long as they do not interfere with stacking.
For a shop that handles heavier work, gussets are worth the extra few minutes. They reduce wobble and help the legs resist twisting. Think of them as the sawhorse equivalent of core strength. Nobody sees it at first, but it keeps everything from collapsing during stressful moments.
Step 5: Test for Level and Stability
Stand the sawhorse upright on a flat floor. Press gently on the top from different directions. If it rocks, identify the high leg and trim or sand carefully until all legs make contact. Do not remove too much material at once. Sneak up on the fit.
Now stack one sawhorse on the other. The upper sawhorse should nest neatly without forcing. If the legs collide, adjust future builds by changing the leg placement slightly. The first pair teaches you what your second pair should improve.
Step 6: Sand the Edges
Round over sharp edges with sandpaper. Pay attention to the top rail, corners, and leg bottoms. This makes the sawhorses nicer to handle and less likely to splinter. It also gives them that “I meant to build this” look instead of the “I fought a lumber pile and survived” look.
If the sawhorses will live outside or in a damp garage, add exterior paint, deck stain, or a simple sealer. Construction lumber is tough, but moisture can still warp it over time.
Smart Customizations
Add a Sacrificial Top Strip
A sacrificial top strip is a replaceable board attached to the top of each sawhorse. If it gets cut, stained, drilled, or covered in glue, simply replace it. This is especially useful if you use sawhorses for circular saw work or messy finishing projects.
Add Carpet for Delicate Projects
If you plan to paint doors, refinish furniture, or work on finished panels, staple a strip of carpet or rubber padding to the top. This helps prevent scratches. Just remember: padded tops are not ideal when you are cutting because soft material can shift.
Add Clamp Clearance
Leave slight overhangs at the top ends so clamps can grab easily. A good sawhorse should not only support work; it should help hold work. Clamp-friendly ends are a small detail that makes a big difference.
Make a Temporary Worktable
Place two long 2x4s across a pair of sawhorses, then lay plywood on top. Suddenly, you have a temporary workbench. It may not impress a furniture master, but it will hold paint cans, tools, cabinet parts, and lunch. Preferably not all at once.
Safety Tips Before You Build or Use Sawhorses
Sawhorses are support tools, not magic platforms. Always place them on a flat, stable surface. Do not overload them beyond what your construction can safely support. Avoid standing on homemade sawhorses unless they were specifically engineered for that purpose. A pair of sawhorses can support a workpiece, but that does not automatically make them scaffolding.
Wear eye protection when cutting, drilling, or sanding. Use hearing protection with loud tools. Control dust with ventilation, cleanup, and a suitable mask or respirator when needed. Keep loose clothing, cords, and clutter away from the work area. If you are inexperienced with cutting tools, get help from a skilled adult or use pre-cut lumber.
Common Mistakes to Avoid
Using Twisted Lumber
Twisted boards create twisted results. If your lumber starts out looking like a propeller, your sawhorse may end up with the personality of a wobbly café table.
Skipping Clamps During Assembly
Clamps keep pieces from drifting while screws are driven. Without clamps, the parts may shift, and the finished horse can end up crooked.
Making Every Sawhorse Slightly Different
Stackable sawhorses depend on repeatability. Use the first leg layout as a template for the next. Mark carefully, measure twice, and resist the urge to “eyeball it” unless your eyeballs have a calibration certificate.
Forgetting Storage Space
The entire point of stackable sawhorses is compact storage. Before adding lower braces, shelves, hooks, or fancy accessories, check whether the horses still nest together.
How to Use Stackable Sawhorses Around the Workshop
Stackable sawhorses are useful for much more than cutting boards. Use them as a finishing station for cabinet doors, a base for sanding long trim, a support for breaking down sheet goods, or a temporary table during garage projects. Add a sheet of plywood, and they become a portable assembly bench. Add foam insulation board on top, and they can support plywood while helping protect your blade during cuts.
They are also perfect for small spaces. When the work is done, stack them against a wall, under a bench, or in a corner. A good pair of DIY sawhorses earns its keep because it appears when needed and disappears when not.
Maintenance: Keep Them Working for Years
Every few months, check the screws and joints. Tighten loose fasteners. Replace damaged top boards. Sand splintered areas. If the legs absorb moisture from a garage floor, seal the ends or add small rubber feet.
Do not be precious about them. Sawhorses are supposed to work. They will get paint freckles, pencil marks, scratches, dents, and maybe one suspicious coffee ring. That is not damage; that is character. Replace parts when needed and keep building.
Extra Experience Notes: What I Learned Building and Using Stackable Sawhorses
The first lesson of building stackable sawhorses is that “simple” projects still reward patience. The design may look like a handful of 2x4s screwed together, but the difference between a sturdy shop helper and a wobbly wooden giraffe comes down to layout. When the leg angles match and the I-beams are assembled square, the sawhorses feel solid immediately. When the parts are rushed, the wobble shows up before the first project even starts.
One practical habit is to build both sawhorses at the same time instead of completing one and then starting the other. Cut matching parts together, mark matching legs together, and use the same spacer blocks for each assembly. This keeps the pair identical. Identical sawhorses are easier to use with long boards because the workpiece sits evenly across both supports. They also stack more cleanly, which is the whole point of this design.
Another useful experience is to think about the top board as a consumable part. Beginners often try to keep their new sawhorses spotless. That dream lasts about twelve minutes. The top rail will eventually get saw marks, screw holes, glue drops, stain, primer, and maybe a footprint from that one time you tried to reach something you should have grabbed with a ladder. Instead of worrying about it, design the top so it can be replaced. A sacrificial top strip turns damage into maintenance.
Height also matters more than people expect. A tall sawhorse can be comfortable for painting and assembly, but awkward for cutting thick material. A lower sawhorse is excellent for breaking down plywood but may force you to bend during sanding. If your workshop handles mixed tasks, a general height around 30 inches is a useful compromise. If you build a second pair later, make it a different height. Suddenly, you have options, and options make a small shop feel bigger.
Storage is another lesson learned the hard way. Some DIYers add shelves, hooks, braces, and clever attachments until the sawhorses no longer stack. Accessories are tempting, but compact storage should stay the priority. If you want add-ons, make them removable. A removable plywood top, clamp-on stop block, or loose support rail gives you flexibility without ruining the nesting design.
Finally, stackable sawhorses become more valuable the more you use them. They are not glamorous, but they solve problems constantly. Need to paint trim? Set up the sawhorses. Need to cut a long board? Bring out the sawhorses. Need a temporary table for sorting hardware? Sawhorses again. They are the quiet background crew of DIY work: not flashy, rarely praised, and absolutely necessary when the project starts getting serious.
Conclusion
Learning how to build stackable sawhorses is one of the most useful beginner-friendly woodworking projects you can tackle. With basic lumber, careful measuring, solid fastening, and a design that nests neatly, you can create a pair of strong supports for cutting, sanding, painting, assembly, and temporary worktables.
The beauty of DIY stackable sawhorses is their practicality. They do not need to be fancy. They need to be square, strong, stable, and easy to store. Build them well, treat the top as replaceable, and they will support project after project without complaining. Which is more than can be said for most people helping you move plywood.
Note: This article is original, rewritten for web publishing, and intended for safe, practical DIY education. Beginners should use pre-cut lumber or work with experienced supervision when cutting or drilling materials.