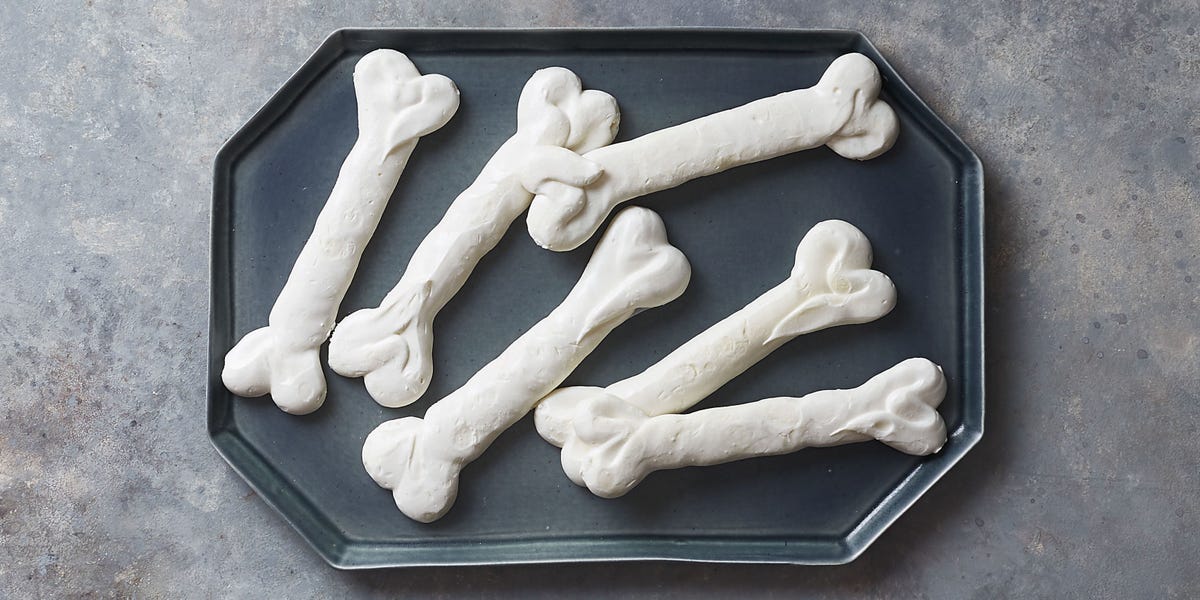
If Halloween had a dessert mascot that was both adorable and mildly alarming, it would be these Scary-Simple Meringue Bones. They are crisp, sweet, snowy-white, and shaped like tiny skeleton snacksbasically the most charming way to say, “Welcome to my haunted kitchen, please enjoy a crunchy femur.”
This Scary-Simple Meringue Bones recipe is designed for home bakers who want a Halloween dessert that looks clever without requiring advanced pastry-school sorcery. You need only a few pantry ingredients: egg whites, sugar, cream of tartar, a pinch of salt, and vanilla. The magic happens when those ingredients whip into a glossy cloud, get piped into bone shapes, and dry slowly in a low oven until light, crisp, and delightfully spooky.
These Halloween meringue cookies are perfect for party trays, haunted dessert boards, classroom treats, monster-movie nights, cupcake toppers, and dramatic snack bowls labeled “spare parts.” They are naturally gluten-free, easy to make ahead, and much less messy than frosting a dozen complicated cookies while dressed as a vampire.
Why You’ll Love These Scary-Simple Meringue Bones
The best Halloween recipes are festive, low-stress, and memorable. These meringue bones check every box. They are crisp enough to snap, light enough to melt on the tongue, and cute enough to make guests pause before immediately eating three.
They Look Impressive but Stay Easy
Meringue has a fancy reputation, but this recipe uses a straightforward French meringue method: whip egg whites, slowly add sugar, pipe, and bake low and slow. No candy thermometer, no boiling syrup, no dramatic kitchen soundtrack required.
They Use Simple Ingredients
Most of what you need may already be in your kitchen. Cream of tartar helps stabilize the whipped egg whites, sugar gives structure and sweetness, and vanilla adds that familiar cookie-shop aroma. The result is a crisp Halloween treat with very little fuss.
They’re Perfect for Halloween Decorating
Serve the bones on a black platter, pile them around chocolate cupcakes, tuck them into a graveyard cake, or pair them with strawberry jam “blood dip.” They bring instant Halloween energy without requiring orange food coloring, candy eyeballs, or a full committee meeting.
Ingredients for Meringue Bones
- 3 large egg whites, room temperature: Cleanly separated egg whites whip into the airy base of the meringue.
- 1/4 teaspoon cream of tartar: This acidic powder helps the meringue become stable, glossy, and easier to pipe.
- 1/8 teaspoon fine salt: Salt balances the sweetness and sharpens the vanilla flavor.
- 3/4 cup superfine or granulated sugar: Superfine sugar dissolves fastest, but regular granulated sugar works if added slowly.
- 1/2 teaspoon pure vanilla extract: Adds warm flavor without darkening the bones too much.
- Optional: seedless raspberry or strawberry jam: Use as a spooky red dipping sauce for a “bloody bones” effect.
Equipment You’ll Need
You do not need a professional bakery setup, but a few tools make this Halloween meringue bones recipe much easier:
- Stand mixer or electric hand mixer
- Clean glass, stainless steel, or ceramic mixing bowl
- Parchment paper
- Two baking sheets
- Piping bag or zip-top plastic bag
- Round piping tip, about 1/2 inch wide, or a snipped bag corner
- Pencil for drawing optional bone templates
How to Make Scary-Simple Meringue Bones
Step 1: Prep the Oven and Baking Sheets
Preheat the oven to 200°F. Line two baking sheets with parchment paper. If you want uniform bones, draw 3- to 4-inch bone outlines on the underside of the parchment, then flip the paper over so the pencil marks do not touch the meringue.
A simple bone shape is easiest: pipe one small bulb, drag a line, then pipe another small bulb at the opposite end. Repeat the same shape beside it if you want a more cartoonish bone with double knobs on both ends.
Step 2: Separate the Egg Whites Carefully
Separate the eggs while they are cold, because chilled yolks are less likely to break. Place each white in a small bowl first, then transfer it to your mixing bowl after confirming there is no yolk. One sneaky drop of yolk can make the meringue slower to whip, and nobody invited yolk drama to the Halloween party.
Let the egg whites sit for about 20 to 30 minutes, until they are closer to room temperature. Room-temperature whites generally whip with better volume, which helps the bones hold their shape.
Step 3: Start Whipping Low and Slow
Add the egg whites, cream of tartar, and salt to a very clean mixing bowl. Beat on low speed until the whites look foamy. This gentle start helps create smaller, more stable air bubbles instead of a fragile foam that collapses faster than a haunted house made of cardboard.
Step 4: Add Sugar Gradually
Increase the mixer speed to medium. Add the sugar one tablespoon at a time, waiting several seconds between additions. This is the most important step for smooth, crisp meringue cookies. Dumping all the sugar in at once can leave the mixture gritty and heavy.
Continue beating until the meringue is thick, glossy, and holds stiff peaks. When you lift the whisk, the peak should stand upright instead of drooping. Rub a tiny bit of meringue between your fingers. If it feels gritty, keep beating until the sugar dissolves more completely.
Step 5: Add Vanilla
Beat in the vanilla just until combined. Do not overmix after the meringue reaches stiff peaks. The goal is shiny and strong, not dry and clumpy. Overbeaten meringue loses its smooth texture and becomes harder to pipe neatly.
Step 6: Pipe the Bone Shapes
Spoon the meringue into a piping bag fitted with a round tip. Hold the bag straight above the parchment. Pipe a small round knob, pull the meringue into a short line, then finish with another knob. To make the bones extra cute, pipe two touching dots at each end and connect them with a narrow center line.
Keep the shapes about the same size so they bake evenly. If some bones look a little crooked, congratulations: you have created realistic haunted archaeology.
Step 7: Bake Low and Slow
Bake the meringue bones for about 1 hour, rotating the pans halfway through if your oven has hot spots. The bones should look dry and feel set, but they should remain pale. Browning is great on toast, not on skeleton cookies.
Step 8: Let Them Dry in the Oven
Turn off the oven and leave the meringues inside for another 1 hour, with the door closed. This drying time helps the centers finish crisping and reduces cracking from sudden temperature changes.
Step 9: Cool and Serve
Once completely cool, gently peel the meringue bones from the parchment. Serve them plain, dusted with a whisper of cocoa powder for an “ancient bones” look, or with a bowl of warm seedless raspberry jam for dipping.
Recipe Card: Scary-Simple Meringue Bones
Prep Time
30 minutes
Bake Time
1 hour
Drying Time
1 hour
Total Time
2 hours 30 minutes
Yield
About 16 to 24 meringue bones, depending on size
Ingredients
- 3 large egg whites, room temperature
- 1/4 teaspoon cream of tartar
- 1/8 teaspoon fine salt
- 3/4 cup superfine or granulated sugar
- 1/2 teaspoon pure vanilla extract
- Optional: seedless raspberry or strawberry jam, for serving
Directions
- Preheat oven to 200°F. Line two baking sheets with parchment paper.
- Add egg whites, cream of tartar, and salt to a clean mixing bowl.
- Beat on low speed until foamy, then increase to medium speed.
- Add sugar gradually, one tablespoon at a time, beating until glossy stiff peaks form.
- Beat in vanilla just until combined.
- Transfer meringue to a piping bag fitted with a round tip.
- Pipe bone shapes onto the prepared baking sheets.
- Bake for 1 hour, then turn off the oven and let meringues dry inside for 1 more hour.
- Cool completely before removing from parchment. Serve plain or with jam dip.
Tips for Perfect Halloween Meringue Bones
Use a Spotless Bowl
Fat is the enemy of fluffy meringue. Wash and dry your bowl and beaters thoroughly before starting. Glass, stainless steel, or ceramic bowls are best because they are less likely to hold oily residue than plastic.
Add Sugar Slowly
Slow sugar addition gives the crystals time to dissolve into the egg foam. This creates a meringue that is smoother, shinier, and better at holding those spooky little bone shapes.
Do Not Rush the Bake
Meringue cookies do not bake like regular cookies. They dry. A low oven removes moisture gently so the bones become crisp without turning tan. If your oven runs hot, reduce the temperature slightly and give them more time.
Avoid Humid Days When Possible
Meringues love dry air. Humidity can make them sticky or chewy because sugar pulls moisture from the air. If your kitchen feels damp, bake them earlier in the day, cool them completely, and store them immediately in an airtight container.
Common Meringue Bones Problems and Fixes
Why Are My Meringue Bones Sticky?
Sticky meringues usually need more drying time or better storage. Return them to a 200°F oven for 15 to 20 minutes, then cool them in the turned-off oven. Store in an airtight container as soon as they are fully cool.
Why Did My Meringue Collapse?
The meringue may have been under-whipped, over-whipped, or mixed with sugar too quickly. Aim for glossy stiff peaks and add sugar gradually. Also make sure your bowl and beaters are clean and dry.
Why Did the Bones Crack?
A few cracks are normal and honestly make the bones look more haunted. Large cracks may come from oven heat that is too high or cooling that happens too quickly. Letting them rest in the turned-off oven helps.
Why Are My Bones Beige Instead of White?
The oven may be too hot, or the meringues may have baked too long at direct heat. Keep the temperature low and use the center racks. A pale ivory color is fine, but deep browning means the sugar is caramelizing.
Fun Variations
Bloody Meringue Bones
Serve with warmed seedless raspberry jam or strawberry jam. Add a tiny squeeze of lemon juice to brighten the flavor and make the red color pop.
Chocolate-Dipped Bone Ends
Dip one end of each cooled meringue bone into melted dark chocolate. Let them set on parchment. The result is less “museum skeleton” and more “dessert with a dramatic backstory.”
Cookies-and-Scream Bones
Crush chocolate sandwich cookies into fine crumbs and sprinkle just a little over the finished serving platter. Place the white bones on top so they look like they were discovered in edible graveyard dirt.
Peppermint Meringue Bones
Replace vanilla with a few drops of peppermint extract. Use a light hand because peppermint can go from festive to toothpaste faster than a ghost through a wall.
How to Store Meringue Bones
Store cooled meringue bones in an airtight container at room temperature for up to 4 days. Place parchment between layers to protect the shapes. Do not refrigerate them; the refrigerator adds moisture and can make crisp meringues sticky.
If you need to make them ahead for a Halloween party, bake them one or two days in advance. Keep them sealed until serving time. For the best texture, avoid placing them near steamy foods, uncovered fruit, or warm dips.
Serving Ideas for a Halloween Party
These scary-simple meringue bones are surprisingly flexible. Arrange them in a black bowl with candy spiders, place them across frosted brownies, or stand them upright in chocolate mousse cups like tiny graveyard decorations. They also look fantastic beside pumpkin cupcakes, red velvet cake, or a dark chocolate tart.
For a kid-friendly Halloween dessert board, pair them with marshmallow ghosts, chocolate pretzels, candy corn, orange slices, popcorn, and mini cookies. For an adult party, serve them with espresso, hot chocolate, or a dessert cocktail. Their crisp sweetness balances rich chocolate and creamy desserts beautifully.
Food Safety Note
Because meringue begins with egg whites, use clean equipment, keep eggs refrigerated before baking, and avoid tasting raw meringue. These bones are baked and dried, which makes them different from uncooked egg-white desserts. If serving people who are pregnant, elderly, very young, or immunocompromised, consider using pasteurized shell eggs or pasteurized egg products labeled suitable for whipping.
My Kitchen Experience Making Scary-Simple Meringue Bones
The first time I made meringue bones, I expected them to be fussy. Meringue has that reputation: glossy, delicate, slightly dramatic, like it might refuse to cooperate unless classical music is playing. But these bones turned out to be one of the most forgiving Halloween treats I have made. The trick was not rushing. Once I slowed down, added the sugar gradually, and let the oven do its quiet drying work, the recipe felt almost relaxing.
The piping part is where the fun begins. At first, my bones looked less like skeleton pieces and more like tiny cartoon dumbbells. Then I realized that was actually perfect. Halloween food does not need to look laboratory-precise. In fact, slightly uneven bones look better on a spooky dessert table. Some were long and skinny, some were short and chunky, and one looked suspiciously like a dog treat. Nobody complained. In fact, that one disappeared first.
One helpful experience is to practice a few shapes on the parchment before committing to a whole tray. Meringue is soft enough that you can scoop a mistake back into the piping bag if needed. I like making two small dots at one end, dragging the bag forward to create the center, and finishing with two more dots. After five or six tries, the rhythm becomes easy. It is oddly satisfying, like drawing with marshmallow cloud foam.
I also learned that the drying time matters more than impatience wants to admit. Pulling the meringues out too early can leave the centers tacky. Leaving them in the turned-off oven gives them that crisp, airy texture that makes people say, “Wait, you made these?” which is the baker’s version of applause. If the weather is humid, I give them extra time and store them quickly. Meringues are basically sugar sculptures, and sugar loves moisture a little too much.
For parties, my favorite presentation is a “bone pile” platter. I spread crushed chocolate cookies on a tray, stack the meringue bones on top, and add a small bowl of raspberry jam in the center. The jam looks spooky, tastes bright, and cuts through the sweetness. Kids love the drama, adults love the crunch, and the host gets to enjoy a dessert that can be made ahead instead of assembled in a panic while the doorbell rings.
The biggest lesson? Scary-simple really means simple, as long as you respect the meringue basics: clean bowl, room-temperature whites, slow sugar, low oven, dry storage. Follow those rules and these Halloween meringue bones become a reliable annual tradition. They are playful, inexpensive, photogenic, and just creepy enough to earn their place beside the jack-o’-lanterns. Also, they make an excellent midnight snack, though eating a handful of bones in a dark kitchen does feel like something a cartoon villain would do.
Conclusion
This Best Scary-Simple Meringue Bones Recipe proves that a Halloween dessert can be festive, funny, and genuinely easy. With a handful of ingredients and a little patience, egg whites transform into crisp, bone-shaped meringue cookies that look fantastic on any spooky spread. They are light, sweet, make-ahead friendly, and endlessly customizable with jam dip, chocolate, cookie crumbs, or peppermint flavor.
If you want a Halloween recipe that delivers maximum haunted-house charm with minimal kitchen chaos, these meringue bones deserve a spot on your party menu. They are scary-simple, scary-cute, and scary likely to vanish before the last guest takes off their witch hat.