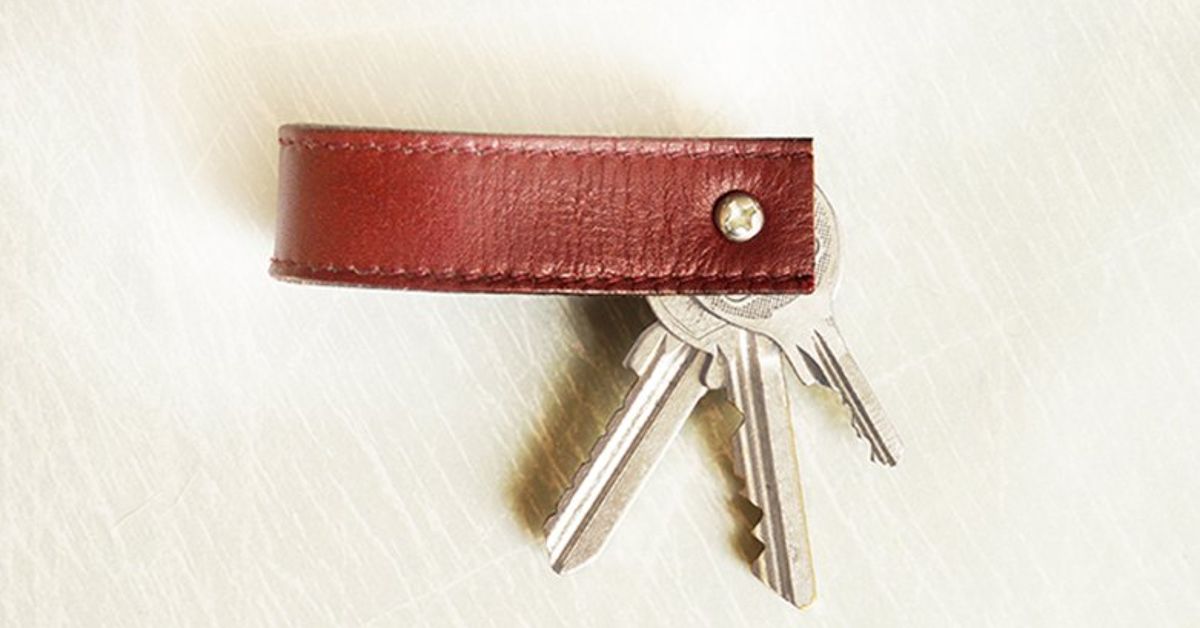
An old belt may no longer hold up your jeans, but that does not mean its working days are over. With a few basic tools, a metal key ring, and roughly the amount of patience required to toast a bagel, you can turn a worn leather belt into a sturdy, good-looking key chain.
Why Turn an Old Belt Into a Key Chain?
Belts are almost suspiciously well suited for repurposing. They are already cut into consistent strips, finished on both sides, and designed to survive years of bending, pulling, and accidental encounters with coffee. Even when the buckle fails or the belt no longer fits, much of the strap may remain perfectly usable.
A repurposed belt key chain gives that durable material a second life. It also keeps a usable item out of the trash, reduces the need to buy new leather, and creates something more personal than a mass-produced plastic key fob.
This is an excellent beginner leathercraft project because it requires no complicated pattern and can be completed with inexpensive hardware. The finished key chain can be rustic, polished, minimalist, colorful, or decorated with initials. In other words, the belt does most of the hard work before you even begin.
A Small Project With Practical Benefits
A leather loop is easier to grab than a bare key ring, especially when you are digging through a crowded bag. It can also hang from a hook, clip to a carabiner, or help you identify one set of keys among several nearly identical collections of tiny metal objects.
Because belts are available in many textures and finishes, every project looks a little different. A distressed brown belt creates a rugged key fob, while smooth black leather produces a more modern result. Embossed western belts, woven straps, and brightly colored synthetic belts offer even more possibilities.
Choose the Right Belt for the Project
Not every retired belt should immediately be promoted to key-chain duty. Inspect the material before cutting it. Look for a section that bends without cracking and feels firm enough to support keys without stretching excessively.
Full-grain and top-grain leather belts generally work especially well because they are durable and develop an attractive patina. Bonded leather can also be used, although old bonded material may separate into layers around punched holes. Faux leather, canvas, woven fabric, and seat-belt-style webbing can work too, but they may require different cutting and fastening methods.
Signs That the Belt Is Still Usable
- The strap bends without producing deep cracks.
- The layers remain firmly attached to one another.
- The chosen section is not badly stretched or torn.
- The material is thick enough to hold a rivet or screw securely.
- There is no strong mildew odor or visible mold.
Minor scratches are not necessarily a problem. In fact, they can make the finished key chain look pleasantly weathered. Deep cuts near the edges, however, may continue to spread once the fob is placed under daily stress.
Where to Cut the Belt
The section near the buckle often experiences the least bending, but it may contain stitching, folded layers, or hardware. The middle section usually provides the cleanest and most consistent material. Avoid the heavily used adjustment holes unless you plan to incorporate one of them into the design.
Before making the first cut, flex several sections and compare them. The best piece is firm but not brittle. Think “reliable old hiking boot,” not “potato chip left in the sun.”
Tools and Materials
The basic version requires only a short strip of belt, one split key ring, and a fastener. Most of the tools may already be hiding in a drawer, pretending they have not seen daylight since your last ambitious weekend project.
Essential Supplies
- An old leather, faux-leather, canvas, or webbing belt
- A sturdy split key ring
- One double-cap rivet, Chicago screw, snap, or small bolt
- A utility knife, leather shears, or heavy-duty scissors
- A ruler or measuring tape
- A pencil, chalk marker, or scratch awl
- A leather hole punch or rotary punch
- A cutting mat or scrap wooden board
Optional Finishing Tools
- Fine-grit sandpaper
- An edge beveler
- A wood or plastic edge slicker
- Beeswax, leather balm, or edge-finishing compound
- A rivet setter and anvil
- A rawhide, wood, or rubber mallet
- Alphabet stamps or decorative leather stamps
- Leather dye, acrylic leather paint, or metallic marker
A proper cutting surface protects both your table and your blade. A sharp blade is generally easier to control than a dull one, which may drag, slip, or require excessive force. Always direct cuts away from your body and keep fingers outside the cutting path.
How to Make a Repurposed Belt Key Chain
Step 1: Clean the Belt
Wipe the chosen section with a slightly damp cloth to remove dust and surface grime. For genuine leather, use a cleaner intended for leather if deeper cleaning is necessary. Avoid soaking the strap because excess water can cause certain leathers to stiffen, discolor, or warp.
Allow the belt to dry completely before marking or cutting it. This is also a good time to remove the buckle and save it for another project. Old buckles can become drawer pulls, bag hardware, decorative accents, or mysterious objects that remain in a workshop jar for the next twelve years.
Step 2: Decide on the Length
For a compact loop key chain, cut a belt strip approximately 5 to 7 inches long. Once folded around the key ring, it will create a finished fob measuring roughly 2 to 3 inches from the fastener to the folded end.
A shorter strip creates a pocket-friendly key fob. A longer strip works better as a wrist loop or grab handle. Test the size by folding the belt around the ring before cutting. Remember to leave enough material beyond the fastener holes so the ends will not tear.
Step 3: Mark a Straight Cut
Use a ruler to mark the cut line across the belt. A square end is the easiest option, but a rounded, pointed, or angled end can add personality. If the belt already has an attractive finished tip, consider using that end as the visible front of the key chain.
Place the belt flat on a cutting mat. Make several controlled passes with a utility knife instead of trying to force the blade through in one heroic swipe. Heavy-duty shears may work better for thin leather, fabric, or synthetic straps.
Step 4: Smooth the Cut Edge
Freshly cut leather may have a fuzzy or uneven edge. Lightly sand it with fine-grit sandpaper until the shape looks consistent. For a more finished appearance, slightly round the sharp corners.
Genuine leather edges can be burnished by applying a small amount of water, beeswax, gum tragacanth, or a commercial edge compound and rubbing briskly with a slicker or smooth cloth. Burnishing compresses loose fibers and gives the edge a cleaner, darker appearance.
Do not apply large amounts of conditioner or finish. Too much product may leave the key chain greasy, attract dust, or rub off inside a pocket.
Step 5: Position the Key Ring
Slide the strip through the split key ring and fold it in half. Align the ends carefully. For a traditional loop design, the finished side of the belt should face outward while the underside remains hidden inside the fold.
You may keep the ends perfectly even or offset the front end slightly to reveal part of the lower layer. An offset design can look intentional and makes thick leather easier to fasten.
Step 6: Mark the Fastener Hole
Measure approximately 1/2 to 3/4 inch from the open ends and place a centered mark. The hole should be far enough from the edge to prevent tearing but not so far inward that the ring becomes trapped in an oversized loop.
Hold the folded strap together and check that the ring can move freely. Then punch through both layers. If the leather is very thick, mark both layers from the first hole and punch them separately. This usually produces a cleaner result than wrestling the punch through a small leather sandwich.
Step 7: Install the Fastener
A double-cap rivet provides a neat appearance on both sides. Select a post length that passes through the folded leather with a small amount of the post remaining above the surface. A post that is too short may not lock properly, while one that is too long can bend or set unevenly.
Insert the rivet post through the holes, attach the cap, and place the assembly on an anvil or solid surface. Use the matching setter and a mallet to secure it with firm, controlled taps. Check that the cap sits straight and does not spin.
A Chicago screw is a good alternative because it can be installed with a screwdriver and removed later. Apply a tiny amount of removable thread-locking compound if the screw tends to loosen. Snaps can also be used when you want the key chain to open and attach around a belt loop or bag handle.
Step 8: Test the Finished Key Chain
Pull firmly on the ring and leather loop. Flex the fold several times and inspect the fastener. The hardware should remain tight, and no cracks should spread from the punched holes.
Add a few keys and carry the fob for a day. A successful repurposed belt key chain should feel comfortable in the hand, fit easily in a pocket, and survive a reasonable tug without becoming an accidental key-distribution system.
Fastener Options Compared
Double-Cap Rivets
Rivets are inexpensive, permanent, and visually clean. They are ideal for a simple leather loop. Installation is easiest with a matching setter and a firm work surface. The post length must suit the combined thickness of the folded belt.
Chicago Screws
Chicago screws, sometimes called screw posts, create a strong mechanical connection and allow the key chain to be disassembled. They are useful when you want to replace the ring, add a decorative plate, or experiment with different strap lengths.
Line Snaps
A snap turns the key chain into a removable loop. It can wrap around a purse handle, backpack strap, or belt loop. Choose hardware intended for the thickness of your material and test the snap before trusting it with important keys.
Hand Stitching
The folded ends can be secured with waxed thread instead of metal hardware. Use evenly spaced stitching holes and a strong saddle stitch. Stitching creates a handcrafted look, although it requires more time and careful hole placement.
Small Bolts and Locknuts
A compact bolt with a smooth head can work for an industrial-style key fob. Use a locking nut so vibration does not gradually loosen the connection. Make sure no sharp threads are exposed where they can scratch hands or snag clothing.
Ways to Personalize the Key Chain
A basic leather loop is useful, but customization turns it into a gift, keepsake, or small product suitable for a craft booth. The original belt may already feature tooling, stitching, embossing, or unusual wear marks worth preserving.
Add Initials or a Short Word
Stamp initials into vegetable-tanned leather before folding and fastening the strip. Keep the design simple because the available surface is small. Names, dates, coordinates, and short words such as “HOME,” “RIDE,” or “KEYS” work well.
Use Contrasting Hardware
Brass hardware complements warm brown leather, while nickel or stainless-colored pieces suit black and gray belts. Matte black hardware creates a modern appearance. Matching the key ring to the rivet makes even a five-minute project look surprisingly deliberate.
Preserve an Original Belt Detail
Cut the key fob around an existing stamped pattern, decorative stitch line, painted flower, or western motif. One section of an ornate belt can become several distinctive key chains, each with a different part of the original design.
Add a Second Layer
Bond or stitch a narrow contrasting strip onto the front before assembly. A tan belt layered over black leather, for example, creates a polished two-tone effect. Keep the total thickness in mind when selecting rivets.
Create a Wristlet
Use a longer strip and size it loosely around the hand. A wristlet key chain is convenient for errands, dog walking, or carrying keys while moving boxes. It should slide over the hand comfortably without being so large that it falls off whenever you wave at someone.
Common Mistakes and How to Avoid Them
Using Brittle Leather
A cracked belt may look charmingly vintage, but severe cracking around the fold or fastener can cause sudden failure. Cut into a healthier section or reinforce the material with a second layer.
Punching Too Close to the End
Leather needs enough material around the hole to resist tearing. Leave a reasonable margin between the fastener and every edge. Rounded corners can also reduce stress concentration at the ends.
Choosing the Wrong Rivet Length
A short rivet will barely connect, while an overly long post may collapse sideways. Measure the folded thickness and choose hardware designed for that range. Testing one fastener on a scrap section can prevent a crooked final result.
Using Excessive Hammer Force
Rivet setting is not a carnival strength test. Extremely hard blows can dent the cap, damage the leather, or bend the post. Start with controlled taps and inspect the fastener as it tightens.
Skipping the Pull Test
A key chain is only useful when it keeps the keys attached. Test the completed loop before adding house, vehicle, office, or secret treasure-chest keys. If the fastener rotates, separates, or feels loose, reset or replace it.
Care and Maintenance
Leather key chains usually require little maintenance. Wipe away dirt with a dry or slightly damp cloth. If the leather becomes dry, apply a very small amount of suitable conditioner and buff away the excess.
Avoid leaving genuine leather soaked in water. If it becomes wet, let it dry naturally at room temperature rather than placing it against a heater. Direct heat can make leather stiff and brittle.
Check the fastener occasionally, especially when using a Chicago screw or bolt. Tighten loose hardware promptly. Replace a split ring that has become stretched because even the finest leather loop cannot compensate for a ring behaving like an open gate.
More Projects for the Remaining Belt
One belt can produce several small projects. After cutting the key chain, save the remaining strap, buckle, keeper loop, and hardware. Useful scraps can become:
- Cabinet and drawer pulls
- Napkin rings
- Cord organizers
- Luggage tags
- Plant hangers
- Tool loops
- Bookmark tabs
- Bag handles
- Camera or wrist straps
- Leather labels for baskets and storage bins
These projects are especially satisfying because the belt arrives with finished edges and a consistent width. Repurposing it is less like starting with raw material and more like hiring a very experienced assistant who has already completed half the job.
My Experience Making Key Chains From Old Belts
The first belt key chain I made began with a thick brown leather belt that had survived years of daily use but finally cracked near its favorite adjustment hole. The buckle was still solid, and most of the strap looked better than many new pieces of craft leather. Throwing it away seemed unnecessarily dramatic, so I cut a short section from the undamaged middle.
My original plan was to create a perfectly polished key fob in about ten minutes. This confidence lasted until I tried cutting the belt with old household scissors. The blades chewed at the edge, the leather resisted, and the supposedly straight line developed the geographic outline of an unfamiliar coastline.
I trimmed the end again using a sharp utility knife and a metal ruler. Several light passes produced a much cleaner cut than one forceful attempt. That small lesson changed how I approached later projects: leather rewards control, not enthusiasm expressed through upper-body strength.
The belt was nearly 1 1/2 inches wide, which felt bulky when folded. I reduced the width to approximately 1 inch and rounded the corners with a coin as a guide. Sanding the edges removed the rough fibers, but they still looked pale compared with the dark surface. A small amount of beeswax and vigorous rubbing with a scrap of canvas darkened and smoothed them.
For the first fastener, I used a double-cap rivet selected entirely by optimism. The post turned out to be too long. When struck with the setter, it leaned sideways and left the cap sitting at an angle. The key chain technically held together, but it looked as though the rivet had been installed during an earthquake.
I drilled out the damaged rivet, measured the folded leather, and installed a shorter one. The second rivet seated evenly with only a few controlled mallet taps. The improvement was immediate. The loop felt rigid near the fastener but flexible around the ring, which is exactly what a practical key fob needs.
After carrying it for several weeks, I noticed that the natural scratches became less obvious as the leather developed additional wear. Instead of looking damaged, the surface looked richer. The old belt already had a history, and daily use simply continued the story in a smaller format.
A later project involved a narrow black dress belt made from bonded leather. It looked smooth, but punching the fastener hole revealed that the material consisted of several compressed layers. The first hole was placed too close to the cut end, and a thin crack appeared during the pull test. I shortened the strip, moved the hole farther inward, and added a small washer beneath a Chicago screw. That version held better, although it never felt as durable as the full-grain leather fob.
Canvas belts created a different challenge. The cut ends began to fray, so I folded the raw edge inward before fastening it. On synthetic webbing, carefully sealing the fibers can help, but any heat-based method requires ventilation, caution, and knowledge of the material. For an unknown fabric, folding and stitching the edge is a safer approach than introducing a flame.
The most successful gift version came from an embossed western belt. I positioned each cut so the visible loop contained a different part of the floral pattern. Brass rings and matching rivets complemented the warm leather. No two key chains looked identical, even though they came from the same belt.
Personalization also proved easier than expected. Initials stamped into firm leather looked clean, while deeply textured or soft leather produced less consistent impressions. Testing stamps on an unused scrap prevented several spelling and spacing disasters. Leather is patient, but it does not offer an undo button.
One practical improvement was to place the fastener closer to the ring without making the loop tight. A large empty loop allowed the ring to swing and twist more than necessary. Leaving just enough space for movement made the key chain feel compact and controlled.
I also learned to test every piece of hardware. One inexpensive split ring had a weak opening that remained slightly separated after keys were added. Replacing it with a thicker ring mattered more than adding another decorative feature. A key chain should be attractive, but its first responsibility is preventing your keys from beginning an independent life somewhere beneath a grocery-store cart.
These projects changed the way I look at worn belts in thrift stores and donation boxes. A belt with a damaged buckle may still contain several feet of useful material. Scratches, old stitching, and faded dye are not always defects; they can become design features that make the final item feel authentic.
The greatest advantage is accessibility. You do not need an elaborate leather shop to make a dependable key fob. A sound piece of belt, a strong ring, a suitable fastener, and careful measurements are enough. Better tools improve consistency, but attention matters more than equipment.
Each completed key chain is modest, useful, and difficult to duplicate exactly. It turns an item associated with wear and disposal into something carried every day. That is the appeal of repurposing at its best: the result does not merely avoid waste. It becomes a genuinely useful object with more character than the original material had when it was new.
Conclusion
Turning a repurposed belt into a key chain is a simple introduction to upcycling and leathercraft. The belt already provides durable, finished material, so the project mainly involves choosing a sound section, cutting it cleanly, folding it around a ring, and installing reliable hardware.
Careful measurements and a proper fastener make the difference between a decorative experiment and a key chain that survives daily use. Add initials, contrasting hardware, original belt details, or a longer wrist loop to make the design your own.
The next time a belt breaks, stretches, or falls out of fashion, inspect the strap before throwing it away. Somewhere between the buckle and the last adjustment hole may be a durable new key chain waiting for a very small promotion.
Note: Always inspect old material and hardware before use. Do not trust cracked leather, separating synthetic layers, loose fasteners, or damaged key rings with important keys.