Thule locks are small, tidy, and easy to ignoreright up until you need to swap a roof box, move a bike carrier, replace a missing key, or remove a lock cylinder that refuses to cooperate. The good news? If you have the correct key and the proper Thule change key, using and removing a Thule lock is usually a quick, low-drama job. The bad news? If you try to force it, you can turn a two-minute task into a Saturday afternoon starring pliers, frustration, and words your neighbor’s children should not hear.
This guide explains how to use a Thule lock, how to remove a Thule lock cylinder safely, how the Thule One-Key System works, what to do when you lose a key, and how to keep your roof rack, cargo box, ski carrier, kayak rack, or bike rack secure without overcomplicating your keychain. It is written for legitimate Thule owners who want to maintain, replace, or reorganize their own lock cylindersnot bypass someone else’s equipment.
What Is a Thule Lock?
A Thule lock is usually a removable lock cylinder designed to fit compatible Thule products, including roof rack feet, cargo boxes, bike racks, ski and snowboard carriers, kayak carriers, locking straps, and some hitch accessories. The lock cylinder is the small round metal core where your key goes. Once installed, it helps secure the product to your vehicle, secure gear to the carrier, or both.
Many Thule products use the Thule One-Key System. As the name politely suggests, the goal is to let one key operate multiple Thule locks. Instead of carrying one key for the roof rack, another for the bike tray, another for the cargo box, and a mystery key you found in the glove box in 2019, you can match your Thule lock cylinders so they all work with the same key.
Common Places You’ll Find Thule Locks
- Roof rack feet and towers
- Roof cargo boxes
- Roof-mounted bike carriers
- Hitch-mounted bike racks
- Ski and snowboard racks
- Kayak and canoe racks
- Locking straps and receiver locks
The exact lock location varies by product. On a roof rack foot, it may be on the outer cover. On a cargo box, it is usually part of the lid-latching system. On a bike rack, one lock may secure the bike to the carrier while another secures the carrier to the vehicle.
Thule One-Key System: Why It Matters
The Thule One-Key System is useful because it reduces key clutter and makes lock replacement easier. You can buy lock cylinders in multi-packs, install them in compatible Thule products, and use one matching key for the set. This is especially helpful if you own several Thule accessories and want everything keyed alike.
For example, imagine you have four roof rack feet, two bike carriers, and one cargo box. Without matching locks, you might need several different keys. With a matched Thule One-Key setup, one key can operate all of those compatible lock cylinders. Your keychain gets lighter, your morning gets smoother, and you stop playing “which tiny silver key opens this expensive thing?”
Regular Key vs. Change Key
Thule lock work usually involves two different keys:
- Regular Thule key: This is the everyday key that locks and unlocks your rack, box, or carrier.
- Thule change key: This special key is used to install or remove a compatible lock cylinder. It may also be called an installation key, control key, universal change key, or master key.
The regular key operates the lock. The change key removes or installs the lock core. They are not the same tool, and mixing them up is a classic “why won’t this work?” moment.
Before You Start: Tools and Preparation
Before using or removing a Thule lock cylinder, gather the right items. This keeps the process clean and helps prevent damage to the lock housing.
You May Need
- Your matching Thule key
- A Thule change key or installation key
- Replacement Thule lock cylinders, if you are swapping cores
- A soft cloth for cleaning dirt around the lock
- Lock-safe de-icer if the lock is frozen
- Your product manual, especially for cargo boxes or older rack models
Do not use random screwdrivers, heavy pliers, drill bits, or heroic force. A Thule lock cylinder is small, but the housing around it matters. If you damage the housing, replacing the lock may no longer solve the problem.
Important Safety Note
Only remove a Thule lock from equipment you own or are authorized to service. If the lock is stuck, the key is missing, or the cylinder is damaged, contact Thule support, an authorized Thule dealer, or a professional locksmith. Forcing a lock can damage the rack or create security issues.
How to Use a Thule Lock Correctly
Using a Thule lock is simple, but a few careful habits make it last longer.
Step 1: Insert the Key Fully
Push the key all the way into the lock cylinder. If the key is only halfway inserted, it may not turn smoothly. Do not wiggle it aggressively. If it resists, remove it, check for dirt, and try again gently.
Step 2: Turn the Key in the Correct Direction
Depending on the product, you may turn the key clockwise or counterclockwise to lock or unlock. Some Thule cargo boxes and carriers have built-in indicators or mechanisms that only allow locking when the lid, clamp, or carrier arm is properly closed.
Step 3: Confirm the Product Is Actually Secured
Locking the cylinder is not the same as verifying the whole system is secure. After turning the key, gently test the cover, lid, clamp, knob, or carrier arm. It should not open freely. If something still moves, the product may not be seated or latched correctly.
Step 4: Remove the Key and Store It Smartly
Once the lock is secure, remove the key and store it somewhere predictable. Keep a spare key at home, not inside the roof box you are trying to open. That sounds obvious, but many outdoor adventures have been humbled by obvious things.
How to Install a Thule Lock Cylinder
If your Thule product is lock-compatible but currently has a plastic plug or empty lock socket, you can usually install a Thule One-Key lock cylinder. Always check your specific product manual first, because designs vary.
Step-by-Step Installation
- Confirm compatibility. Make sure your Thule product accepts One-Key lock cylinders.
- Remove the plastic plug if present. Some new rack feet or carriers ship with removable plastic blanks where the lock cylinders go.
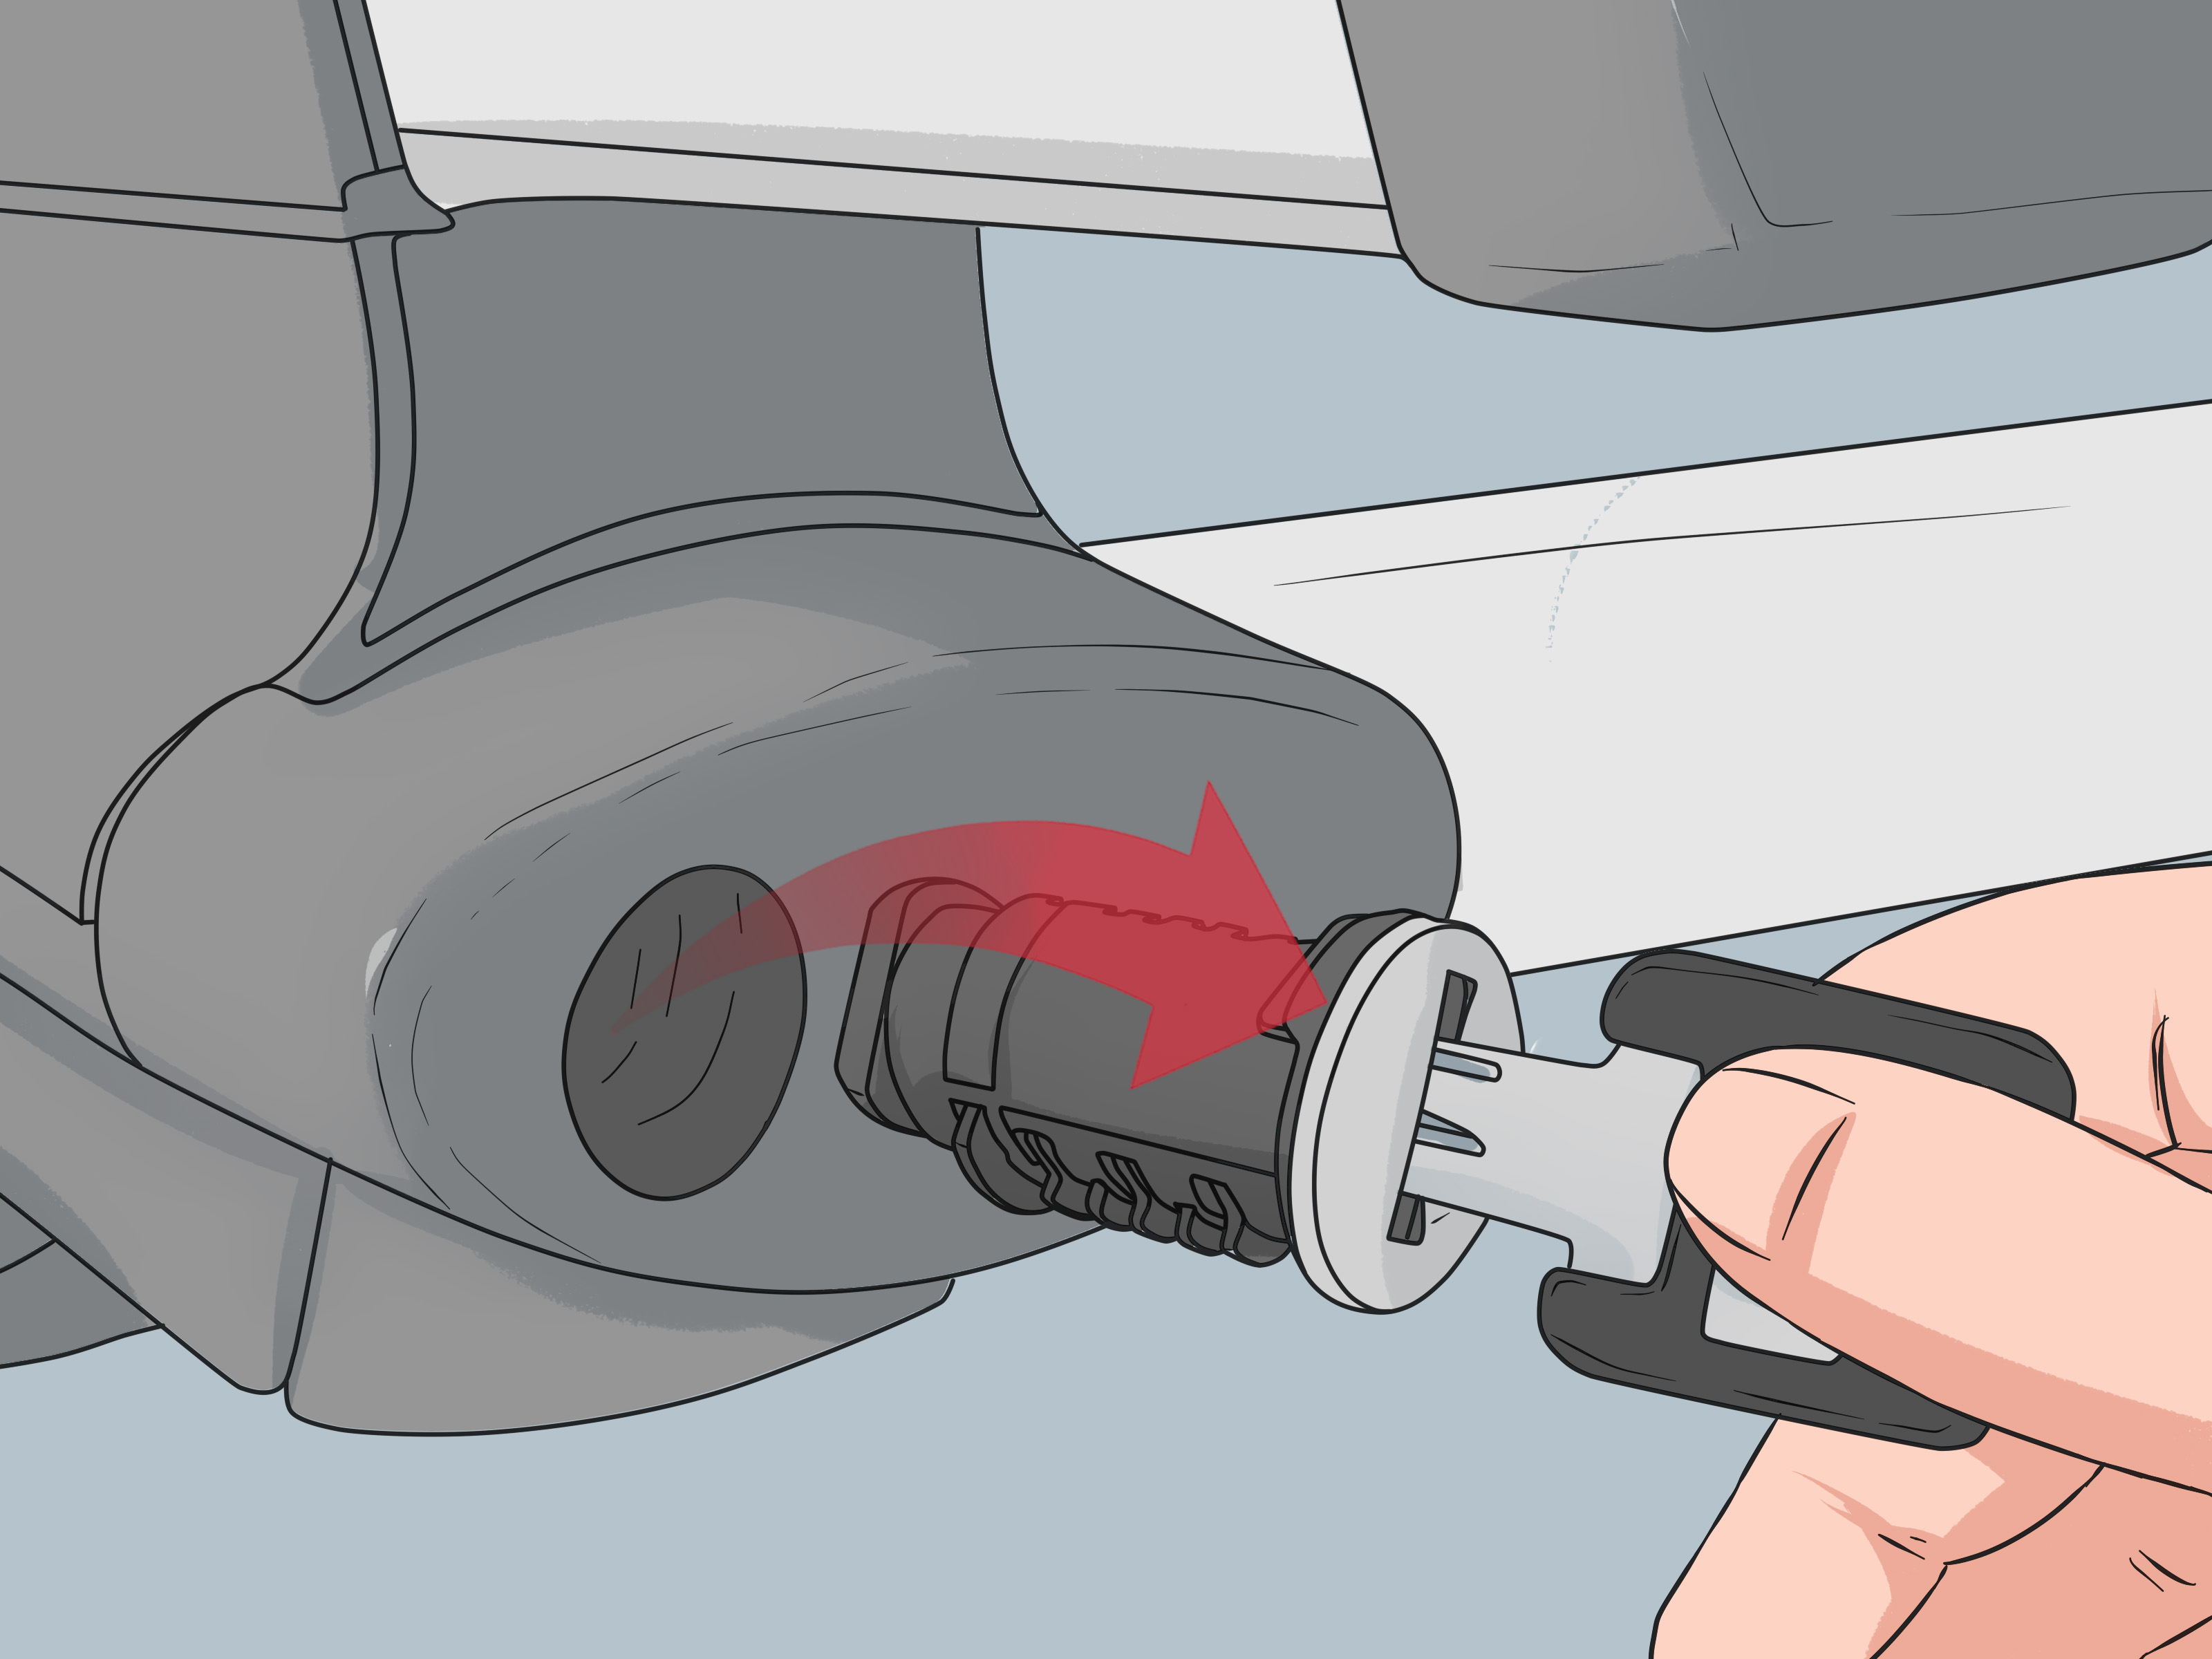
- Insert the change key into the new lock cylinder. The change key holds the cylinder’s internal tabs in position for installation.
- Align the cylinder with the lock opening. The lock core must slide into the housing straight, not tilted.
- Push the cylinder into place. Use steady finger pressure until it seats fully.
- Hold the cylinder face and pull out the change key. This leaves the lock core installed in the housing.
- Test with the regular key. Insert the matching regular key, turn it, and make sure the lock operates smoothly.
If the cylinder does not seat correctly, stop and realign it. A properly installed Thule lock cylinder should feel snug and clean, not crunchy, crooked, or dramatic.
How to Remove a Thule Lock Cylinder
Removing a Thule lock cylinder usually requires the matching regular key and the Thule change key. The key detail is this: the lock generally needs to be unlocked before the change key can remove the cylinder. A locked core is meant to stay put.
Step-by-Step Removal
- Unlock the Thule lock with the matching regular key. Turn the lock to the unlocked position.
- Remove the regular key. The lock cylinder should remain in the correct unlocked position.
- Insert the Thule change key fully. Push it in gently until it seats.
- Pull the lock cylinder out using the change key. A light wiggle may help, but do not yank violently.
- Support the housing if possible. If the back of the lock is accessible, gentle pressure from behind may help the cylinder slide out.
- Store or replace the cylinder. Keep old cores and keys labeled by key number if you plan to reuse them.
Some roof cargo boxes may require a specific halfway or removal angle before the cylinder can come out. If the lock does not release with the standard method, consult the product manual instead of forcing it.
What If the Change Key Does Not Pull the Cylinder Out?
First, confirm the lock is unlocked. Second, confirm you are using a Thule change key, not the regular key. Third, check whether the cylinder is dirty, frozen, or under pressure from a latch mechanism. If the cargo box lid, rack cover, or bike rack arm is not positioned correctly, the lock may feel stuck even though the cylinder itself is fine.
How to Replace Thule Locks So Everything Uses One Key
Re-keying compatible Thule products is one of the most common reasons to remove a lock cylinder. The process is simple: remove each old unlocked cylinder with the change key, then install the new matched cylinders from your One-Key set.
Example: Matching Four Roof Rack Locks
Let’s say your roof rack has four feet, and each foot has a lock core. You want all four to use one key. Buy a compatible four-pack of Thule One-Key lock cylinders. Unlock the first old cylinder with its current key, remove it using the change key, install the new cylinder with the change key, and test it with the new regular key. Repeat for the remaining three feet.
When finished, label your spare key and store it somewhere safe. If your new set includes two regular keys, keep one with your vehicle keys and one at home. Do not keep both in the same glove compartment unless you enjoy high-stakes irony.
Can You Match a New Lock to an Existing Thule Key?
In many cases, replacement keys and specific replacement lock cylinders are identified by a code, often beginning with the letter “N” followed by numbers. If you want a replacement key, look for the code on your existing key or lock cylinder. If you want a new lock cylinder that matches your existing key, you may need to order the cylinder by that same key number when available.
What to Do If You Lost Your Thule Key
Losing a Thule key is annoying, but it is not automatically a disaster. Start by looking for the key number. On many Thule keys, the number is stamped into the key. On some lock cylinders, the code may be visible on the face or barrel. That code helps you order the correct replacement key.
Lost Key Checklist
- Check your spare key first.
- Look for the key code on your remaining key.
- Look for the lock code on the cylinder if visible.
- Search Thule’s replacement key options using the code.
- Contact Thule support or an authorized dealer if no code is visible.
- Call a professional locksmith if the lock must be opened urgently and you cannot verify the key code.
Avoid internet “tricks” that promise to remove a locked cylinder without the proper key. Those methods can damage your equipment, void support options, and create obvious security concerns.
Common Thule Lock Problems and Fixes
The Lock Is Frozen
If the lock is frozen, use a commercial lock de-icer suitable for small lock cylinders. Do not pour boiling water on the lock. Water can refreeze, and sudden temperature changes are not kind to plastic housings, seals, or your patience.
The Key Will Not Turn
Make sure the key is fully inserted. Check whether the product is under tension. For example, a cargo box lid that is not fully closed may prevent the lock from turning. A bike rack arm or roof rack cover that is misaligned can create the same problem.
The Cylinder Spins or Feels Loose
A loose cylinder may not be seated correctly, or the housing may be worn. Remove and reinstall the cylinder only if you can unlock it and use the change key properly. If it still feels loose, contact Thule support or a rack specialist.
The Key Broke
If part of the key breaks in the lock, do not push it deeper. Stop using the lock and contact a locksmith or Thule dealer. Trying to dig it out with random tools can damage the tumblers and turn a key replacement into a lock replacement.
Security Tips for Thule Locks
Thule locks are designed to reduce theft risk, secure accessories, and discourage casual tampering. They are not magic force fields. A determined thief with tools and time can defeat many consumer lock systems, so smart habits matter.
- Remove expensive gear when leaving the vehicle overnight.
- Park in visible, well-lit areas when carrying bikes, skis, or cargo.
- Use additional cable locks for high-value bikes or long stops.
- Check locks after long drives, rough roads, or heavy vibration.
- Keep your key code recorded somewhere secure.
- Do not leave spare keys inside the locked cargo box.
Think of Thule locks as part of a security plan, not the entire plan. They help keep honest people honest and slow down opportunistic theft, which is often exactly what you need at a trailhead, ski resort, campsite, or hotel parking lot.
Maintenance: How to Keep a Thule Lock Working Smoothly
A little maintenance goes a long way. Most Thule locks live outside, where they meet rain, road salt, dust, snow, and whatever mysterious grime the highway throws upward at 70 mph.
Simple Maintenance Habits
- Wipe dirt from the lock face before inserting the key.
- Keep the key clean and straight.
- Use lock de-icer in freezing conditions when needed.
- Operate the lock occasionally, even in the off-season.
- Remove roof accessories when not needed for long periods.
- Store unused lock cylinders and keys in labeled bags.
If you drive in snow country, rinse road salt from racks and carriers when practical. Salt is wonderful on fries and less wonderful inside precision lock parts.
When You Should Not Remove a Thule Lock Yourself
You should pause and get help if the lock is locked and you do not have the matching key, the key is broken inside, the cylinder is damaged, the housing is cracked, or the product is stuck closed with valuable gear inside. In those cases, professional help is cheaper than accidentally destroying a cargo box, rack foot, or hitch accessory.
Also, if you bought used Thule equipment and it came without keys, try to identify the key code and order the correct replacement before attempting lock removal. Used racks are great. Mystery locks are less great.
Experience Notes: Real-World Tips for Using and Removing a Thule Lock
After you have worked with a few Thule locks, one lesson becomes obvious: the lock is rarely the hardest part. The real challenge is usually preparation. People get stuck because they start the job with one key missing, the wrong change key, a frozen cylinder, or a rack component that is still under tension. Before touching the lock, make sure the rack, box, or carrier is relaxed, aligned, and fully accessible. Open the cargo box lid, release pressure from the bike arm, or remove gear weight if needed. A lock cylinder that feels “jammed” may simply be holding back a latch that is not sitting in its happy place.
Another useful habit is to photograph your key codes and store them somewhere secure. Do this the day you buy the Thule product, not the day before a road trip when one key has disappeared into the couch dimension. A clear photo of the key number can save you time when ordering replacements. If you own several Thule accessories, label your spare keys with small tags. Even if you use the One-Key System, labeling helps you remember which set belongs to which vehicle or rack setup.
When installing new lock cylinders, do the first one slowly. Insert the change key, line up the lock cylinder, press it into the housing, hold the face with your thumb, and then remove the change key. After that, test the regular key several times before moving to the next lock. Do not install all eight cylinders and then discover you misunderstood the orientation. That is not a disaster, but it is the kind of tiny inconvenience that somehow feels personal.
For roof boxes, be extra patient. Cargo boxes often combine lid alignment, latch engagement, and lock function into one system. If the lid is not closed evenly on both sides, the key may resist turning. Press the lid down gently near the latch points, check that nothing inside is blocking the lid, and try again. Overstuffed cargo boxes are a common cause of lock frustration. If your sleeping bag, camp chair, or puffy jacket is fighting the lid from inside, the lock is not the villain.
For winter users, keep de-icer handy. Ski racks and roof boxes live in exactly the conditions locks dislike: cold air, moisture, slush, and road salt. If the lock freezes, treat it gently and give the de-icer time to work. Forcing a frozen key can bend or break it. Once the lock opens, clean and dry the area when possible.
Finally, make Thule lock checks part of your loading routine. Before driving, confirm the rack is tight, the gear is secured, and the locks are engaged. At fuel stops, trailheads, hotels, and ski areas, give the locks a quick glance. It takes five seconds and can prevent an expensive surprise. A Thule lock is a small piece of hardware, but when it is installed correctly, used gently, and maintained well, it quietly does its job trip after trip.
Conclusion
Learning how to use and remove a Thule lock is mostly about using the right key at the right time. Your regular Thule key locks and unlocks the product. The Thule change key installs and removes compatible lock cylinders, usually only when the lock is already unlocked. Keep your key code, store a spare key, avoid forcing stuck locks, and replace mismatched cylinders with a One-Key set if you want a cleaner, simpler setup.
Whether you are securing a bike rack, swapping roof rack locks, replacing a cargo box cylinder, or organizing a fleet of Thule accessories, the process is straightforward when you slow down and follow the proper sequence. Treat the lock like a precision part, not a stubborn jar lid, and it will usually reward you by working exactly as intended.
SEO Tags
Note: This article is intended for lawful Thule owners replacing, maintaining, or re-keying their own equipment. If a lock is damaged, locked without a key, or attached to equipment you do not own, contact Thule support, an authorized dealer, or a professional locksmith.