Research synthesis: framing and installation guidance from Lowe’s, The Home Depot, This Old House, and HGTV.
Design ideas and makeover techniques informed by Better Homes & Gardens, The Spruce, Apartment Therapy, Real Simple, and Architectural Digest.
Moisture, paint, lighting, and budget-upgrade guidance informed by Benjamin Moore, ENERGY STAR, Bob Vila, and Houzz.
A large, frameless bathroom mirror can be wonderfully practical and spectacularly boring. It reflects your face, your towels, and occasionally the expression you make after discovering someone left toothpaste in the sink again. What it may not reflect is your personal style.
Fortunately, you do not have to pry a heavy sheet of glass off the wall to give it a designer-worthy makeover. Removing an attached mirror can damage drywall, crack the glass, disturb tile, and turn a Saturday decorating project into an unexpected home-renovation documentary. Instead, you can work with the mirror already in place.
From custom trim and removable decals to flattering lighting and built-in storage, these bathroom mirror makeover ideas can transform a plain fixture without demolition. Most can be adapted for modern, farmhouse, coastal, traditional, vintage, or renter-friendly bathrooms. The key is choosing materials that tolerate humidity and installing them without interfering with clips, outlets, faucets, or lighting.
Before You Begin Your Bathroom Mirror Makeover
Start by inspecting the mirror carefully. Look for loose clips, sharp edges, cracks, darkened areas around the perimeter, and gaps between the glass and wall. Decorative trim can hide minor cosmetic discoloration, but it should never be used to disguise loose glass or an unresolved moisture problem.
Measure More Than Once
Measure the mirror’s width and height in several places because walls, vanities, and builder-grade mirrors are not always perfectly square. Record the location of every mirror clip, outlet, light fixture, backsplash edge, and nearby cabinet door. A frame that blocks a cabinet by half an inch is still a frame that blocks a cabinet.
Choose Bathroom-Friendly Materials
Bathrooms regularly produce steam and condensation, so untreated fiberboard, absorbent fabric, and unsealed wood may swell or deteriorate. Seal wood on the front, back, ends, and cut edges. For painted pieces, use a durable coating intended for humid interiors and let every layer cure fully before installation.
When an adhesive will touch the mirror, select a product labeled safe for mirrors. Some general-purpose adhesives can affect the reflective backing. Clean the glass with a residue-free cleaner, allow it to dry, and follow the adhesive manufacturer’s instructions for surface preparation and curing time.
1. Add a Classic Wood Overlay Frame
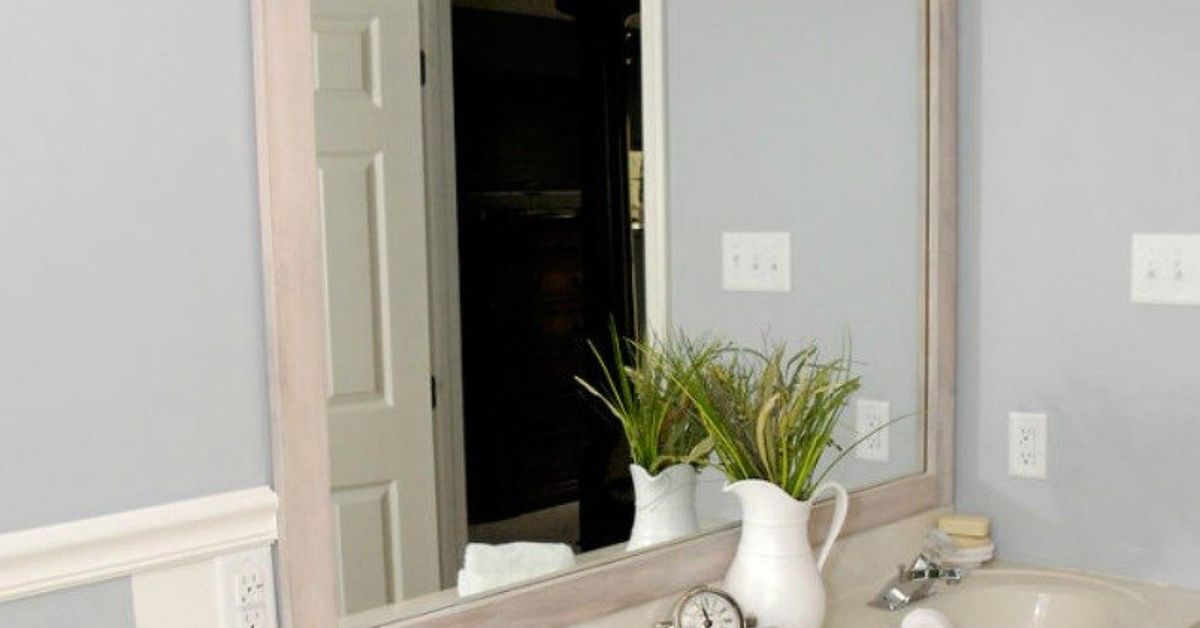
A wood overlay frame is the most dramatic way to upgrade a large frameless bathroom mirror without removing it. It creates the appearance of a custom framed mirror while preserving the existing glass and wall attachment.
Use flat boards, decorative molding, or a combination of both. Mitered corners provide a traditional picture-frame appearance, while square butt joints feel simpler and more contemporary. Paint the frame black for crisp contrast, match the vanity for a built-in look, or stain it to introduce natural warmth.
Dry-fit every piece before attaching it. If the mirror has plastic clips, notch the back of the trim so it sits flat rather than forcing the clips underneath. Paint or stain the inner edges before installation because reflections may reveal unfinished wood that would otherwise remain hidden.
2. Apply a Peel-and-Stick Mirror Frame Kit
A prefabricated mirror frame kit is ideal when you want a polished result without operating a miter saw before coffee. These kits generally consist of lightweight trim pieces that assemble over the existing mirror with adhesive strips, clips, or a manufacturer-specified mounting system.
Styles range from clean white profiles and faux wood grain to metallic, traditional, and modern black finishes. Because the pieces are lightweight, they can be easier to handle than solid lumber around a wide vanity mirror.
Surface preparation makes the difference between a frame that stays put and one that begins wandering south during a hot shower. Remove soap film, hairspray, dust, and oily residue. Let the glass dry completely, mark placement with low-tack painter’s tape, and avoid repositioning adhesive-backed parts repeatedly.
3. Paint a Graphic Border Around the Mirror
You can create the illusion of a frame without attaching anything to the glass. Paint a border on the wall immediately surrounding the mirror, using straight lines, scallops, arches, waves, or an oversized color block.
A narrow black outline delivers a modern look, while a wide terracotta arch can bring warmth to a plain white bathroom. Scallops are playful in a children’s bath, and an asymmetrical painted shape can make a small powder room feel more artistic.
Trace the design lightly in pencil, use a level for straight sections, and protect the mirror with painter’s tape. Select bathroom-appropriate paint that resists moisture and cleaning. This method is especially helpful when the mirror sits too close to a wall, backsplash, or light fixture for a thick physical frame.
4. Create a Fluted or Reeded Trim Detail
Fluted surfaces add architectural texture without requiring ornate decoration. Attach narrow half-round molding, pole-wrap strips, or slender wood dowels to a lightweight backing frame that fits over the mirror’s perimeter.
Vertical fluting can make a low, wide mirror appear taller, while horizontal detailing emphasizes its width. Paint the trim the same color as the wall for a subtle custom effect, or use a contrasting finish to make the mirror a focal point.
Keep the profile relatively shallow near faucets and medicine-cabinet doors. Seal each component before assembly, especially the ends of dowels and grooves where moisture can collect. A consistent gap between pieces looks intentional; random spacing looks like the measuring tape took the afternoon off.
5. Build a Tile or Mosaic Border
A tile border can connect the bathroom mirror to the backsplash, shower niche, flooring, or other hard finishes in the room. Glass mosaics bring shimmer, marble pieces add classic elegance, and small geometric tiles create a lively contemporary edge.
For a nonpermanent approach, arrange lightweight tile sheets on a removable backing frame rather than adhering them directly to the wall or mirror. This allows you to construct the border on a work surface, control the spacing, and install the completed piece as one unit.
Choose an adhesive and grout system appropriate for the tile material and bathroom environment. Keep the finished surface easy to wipe down because detailed mosaics near a sink tend to collect water spots, cosmetic powder, and mysterious flecks that nobody in the household will admit creating.
6. Add LED Backlighting
Backlighting can make an ordinary bathroom mirror look like a floating feature in a boutique hotel. Flexible LED tape or a purpose-made mirror lighting kit can be concealed behind a shallow overlay frame, allowing light to wash across the wall around the existing glass.
For practical grooming, look for a neutral or adjustable white light rather than an intense blue or amber glow. Dimmable lighting is useful because the brightness needed for shaving or applying makeup may feel excessive during a quiet midnight visit.
Use products approved for the intended indoor location, protect connections from moisture, and keep drivers or transformers accessible according to the manufacturer’s instructions. Hardwired installations should be completed by a qualified electrician. Do not run cords where they can contact water or create a tripping hazard.
7. Upgrade the Lighting Around the Mirror
Sometimes the mirror is not the actual problem. Harsh overhead lighting can make even an attractive mirror look flat, dated, and slightly interrogational. Updating the fixture above the glass or adding sconces beside it can transform the entire vanity wall.
Side lighting generally distributes illumination across the face more evenly than a single strong source above the head. Where wall space is limited, consider slim vertical sconces, small globe fixtures, or a decorative fixture positioned above the existing mirror.
Coordinate the fixture finish with at least one other bathroom element, such as the faucet, cabinet hardware, towel ring, or frame accent. The metals do not have to match perfectly, but repeating a finish helps the room feel deliberate instead of assembled from the clearance aisle during three unrelated decades.
8. Install a Slim Shelf or Ledge Across the Bottom
A shallow ledge beneath the mirror adds visual weight, storage, and an architectural stopping point. It can hold frequently used toiletries, perfume bottles, a small plant, or a framed print without crowding the vanity countertop.
Build the ledge from sealed wood, moisture-resistant composite material, stone, or metal. Make it deep enough to be useful but shallow enough that people do not bump into it while leaning over the sink. Mount it into wall studs or suitable anchors rather than attaching a loaded shelf directly to the mirror.
For a unified design, match the ledge to the vanity top or mirror frame. In a small bathroom, use it sparingly. Three attractive objects look curated; seventeen bottles, two toothbrush chargers, and a lonely hair tie look like the shelf has become a tiny open-plan storage unit.
9. Apply Frosted Film, Vinyl Decals, or Etched-Look Details
Removable vinyl is one of the easiest renter-friendly bathroom mirror makeover ideas. Use frosted strips, metallic lines, botanical decals, geometric corner motifs, or a thin border to add detail while leaving most of the reflective surface clear.
A frosted pattern can also disguise minor edge wear or create a little privacy where a mirror reflects an inconvenient sightline. Keep decorative elements away from the central area used for grooming. A beautiful leafy pattern becomes less charming when it appears to be growing directly from your eyebrow.
Clean the mirror thoroughly, mist the surface if the film instructions recommend a wet application, and smooth out air bubbles with a plastic applicator. Test one small section first. Select products designed for glass and humid interiors, particularly if the mirror receives frequent condensation.
10. Add Corner Brackets, Appliqués, or Metallic Accents
You do not always need a full frame. Decorative corner brackets, lightweight appliqués, metal-look strips, or narrow pieces of molding can give a plain mirror character with less material and less visual weight.
Minimal black corner caps create an industrial effect. Gold appliqués can produce a vintage or Art Deco mood, while curved wood ornaments bring traditional detail. Paint inexpensive embellishments in one finish before attaching them so unrelated materials appear to belong together.
Lay out the complete design with removable tape first and view it from the bathroom doorway. Small accents often look farther apart on the floor than they do on the wall. Symmetry is usually safest, but an intentionally asymmetrical cluster can work in an eclectic powder room when it is balanced by lighting or accessories elsewhere.
Experience-Based Lessons From Bathroom Mirror Makeovers
The most common lesson from a bathroom mirror makeover is that preparation takes longer than the glamorous portion shown in finished photographs. Cutting trim may require only a few minutes, but measuring a slightly uneven wall, accounting for clips, sanding edges, sealing the back, and waiting for paint to cure can occupy most of the project. Rushing those steps typically creates visible gaps or adhesive failures later.
One particularly useful habit is to create a full-size mock-up with painter’s tape. Tape the proposed outer edge of the frame directly on the mirror or wall, then live with it for a day. Check it from the doorway, while standing at the sink, and while opening nearby cabinets. A four-inch frame may look luxurious in a close-up photograph but feel bulky in a narrow bathroom. A two-inch profile may provide the same visual improvement without overwhelming the vanity.
DIYers also discover that the inside edge matters as much as the front. Mirrors reflect the back side of anything installed on top of them. A beautifully stained frame with an unfinished pale edge can produce a distracting stripe in the reflection. Painting or staining the inner edges before installation prevents this surprisingly common disappointment.
Humidity is another patient but determined critic. A frame may look perfect for the first week and begin showing swollen joints after repeated showers if the cut ends were left unsealed. Applying finish to every side of a wood component, allowing adequate drying time, and running the bathroom exhaust fan can greatly improve durability. Decorative work should begin only after leaks, persistent condensation, or mildew have been addressed.
Lighting upgrades often produce the biggest functional improvement. A stylish frame is satisfying, but balanced illumination changes how the vanity works every morning. Homeowners frequently prefer adjustable LEDs because warm light creates a relaxing atmosphere while neutral light provides a clearer view for grooming. Extremely cool light can make finishes and skin tones appear harsher than they do elsewhere in the home.
Another practical lesson is to choose reversibility according to the household. Renters generally benefit from removable vinyl, lightweight frame kits, or designs mounted to the surrounding wall. Homeowners planning a long-term update may prefer sealed wood trim, tile, or integrated lighting. Families with young children should avoid loosely attached embellishments, sharp projections, and shelves positioned at eye level.
Finally, successful makeovers usually repeat something already present in the room. A wood frame can echo the vanity, a brass accent can repeat the faucet, and a painted border can borrow color from the shower curtain. This repetition makes an inexpensive project look intentional. The goal is not to make the mirror wear every decorative idea at once. It is a mirror, not a contestant in a home-improvement talent show.
How to Choose the Right Mirror Transformation
Choose a classic overlay frame when you want the largest visual change. Select peel-and-stick trim or vinyl when reversibility matters. Use lighting when the vanity is difficult to use, and add a ledge when countertop clutter is the bigger problem. Painted borders and partial embellishments are excellent when space around the mirror is limited.
Before buying materials, compare the proposed finish with the vanity, faucet, wall color, and lighting. A successful bathroom mirror makeover should improve the whole vanity area rather than behaving like a separate craft project that accidentally wandered into the room.