Note: This beginner-friendly DIY guide is written for crafters who want to turn leftover fabric scraps into cheerful handmade wall decor without needing fancy tools, expensive supplies, or a craft room that looks like a magazine spread.
Turn That Scrap Pile Into Something Adorable
If you sew, quilt, craft, alter clothes, or simply cannot throw away “perfectly useful” two-inch pieces of fabric, you probably have a scrap pile with its own ZIP code. Good news: those colorful leftovers are exactly what you need to make a cute braided fabric sign. This project is charming, affordable, beginner-friendly, and wonderfully forgiving. A crooked braid? Rustic. A frayed edge? Texture. A wild mix of prints? Personality.
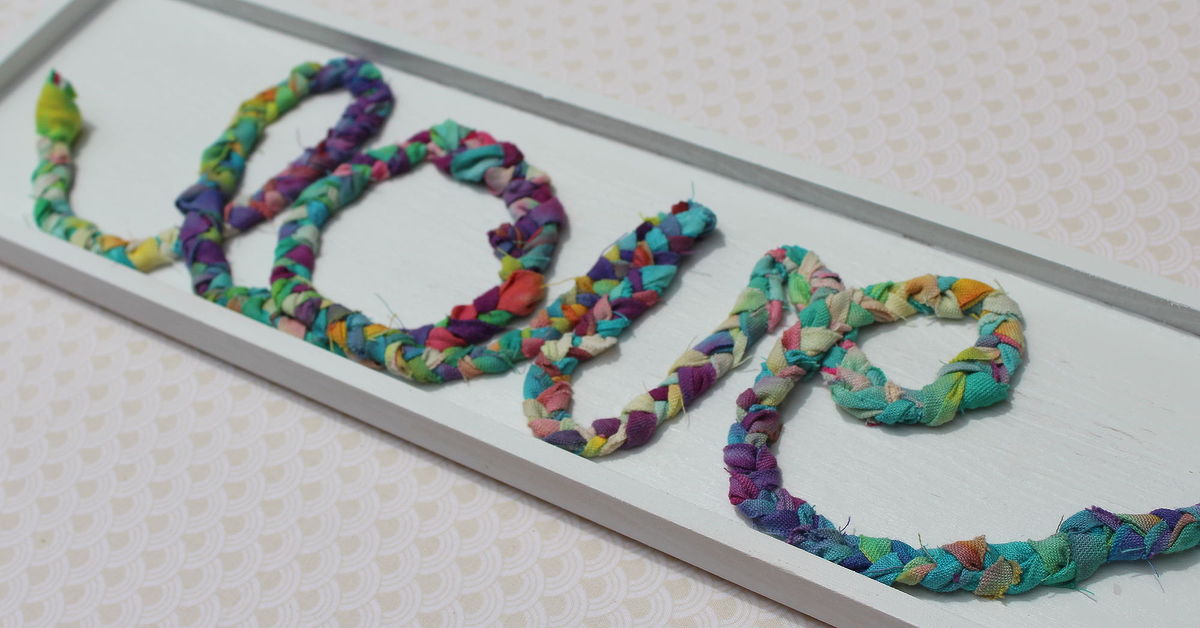
A braided fabric sign is a decorative wall sign made by cutting fabric scraps into strips, braiding them together, and shaping or attaching the braid onto a base such as wood, canvas, cardboard, embroidery hoop, or a framed backing. You can spell a word, outline a heart, create a border, make a monogram, or design a seasonal decoration. It is part fabric scrap craft, part upcycled home decor, and part therapy session for anyone who has been emotionally held hostage by a basket of leftover quilting cotton.
The best part is that you do not need perfect fabric. Cotton, linen blends, flannel, old shirts, denim, ribbon, and even thin upholstery remnants can work. The secret is choosing pieces that braid well, trimming them into manageable strips, and attaching them securely so your sign looks intentionally handmadenot like a laundry accident with ambition.
Why a Braided Fabric Sign Is the Perfect Scrap-Busting Project
Fabric scraps are small, but they can be surprisingly powerful in DIY home decor. A braided sign lets you use different colors and patterns in one project without needing large pieces of fabric. It also gives dimension to flat signage, making the finished piece feel soft, cozy, and handmade.
It Is Budget-Friendly
Most of the supplies can come from things you already own: leftover fabric, a scrap of wood, an old frame, cardboard from a shipping box, or a canvas you bought during a craft-store sale and then bravely ignored for two years. The only extras you may need are hot glue, fabric glue, scissors, or a rotary cutter.
It Works With Many Decor Styles
Use ticking stripes, linen, and faded florals for farmhouse decor. Try bold solids and graphic prints for modern craft-room wall art. Choose red, white, and blue scraps for patriotic decor, orange and plaid for fall, or velvet and metallic ribbon for holiday sparkle. A braided fabric sign can be cute, rustic, boho, vintage, whimsical, or polished depending on the colors and base you choose.
It Is Beginner-Friendly
You do not need to sew unless you want to. Braiding fabric strips is simple, and attaching the braid with hot glue or fabric glue makes the project accessible for adults, teens, and supervised older kids. If you can braid hair, friendship bracelets, or the extension cord you promised yourself you would organize, you can braid fabric.
Supplies You Will Need
Gather your materials before you start. This keeps the project fun and prevents the classic crafter’s cardio workout: walking from table to drawer to closet to table 47 times.
- Fabric scraps in coordinating colors or patterns
- Sharp fabric scissors or a rotary cutter and cutting mat
- Ruler or measuring tape
- Hot glue gun and glue sticks, or strong fabric glue
- Wood board, canvas, cardboard, embroidery hoop, or picture frame backing
- Pencil or washable marking pen
- Binder clips, clothespins, or tape to hold braid ends
- Optional: paint, stain, stencil, ribbon, buttons, beads, faux greenery, or twine
- Optional: hanging hardware, sawtooth hanger, jute cord, or command strips
For the fabric, lightweight to medium-weight cotton is easiest. Quilting cotton, old pillowcases, button-down shirts, and cotton remnants braid smoothly and hold shape well. Thicker fabrics like denim can look beautiful but may be bulky, so use narrower strips. Stretchy knits can work, especially from old T-shirts, but they may curl as you braid. That curl can be cute, as long as you are expecting it and not accusing the fabric of betrayal.
Step-by-Step: How to Make a Cute Braided Fabric Sign
Step 1: Choose Your Sign Design
Start with a simple idea. Popular designs include words like “home,” “love,” “gather,” “hello,” “joy,” or “create.” You can also make a shape such as a heart, pumpkin, rainbow, star, wreath, flower, or initial. If this is your first braided fabric sign, choose a design with gentle curves and limited sharp corners. A heart, monogram, or border is easier than a tiny cursive quote that looks innocent until you try to glue fabric around every loop.
Sketch your design lightly on the base with pencil. If you are not confident drawing freehand, print a large letter or shape, cut it out, and trace around it. Keep the lines bold. Braided fabric has thickness, so very thin details may disappear.
Step 2: Prepare the Base
Your base gives the sign structure. A wood board creates a sturdy farmhouse-style sign. Canvas gives a soft gallery look. Cardboard is lightweight and great for temporary seasonal decor. An embroidery hoop works beautifully for round signs, especially nursery decor, craft-room signs, or handmade gifts.
If you want a painted background, apply paint before adding the braid. White, cream, charcoal, sage green, navy, and natural wood tones all pair well with fabric. Let paint dry completely. Glue does not love damp paint, and damp paint does not love being bossed around by impatient crafters.
Step 3: Cut Fabric Into Strips
Cut three strips of fabric for each braid. For most signs, strips that are 1 to 1.5 inches wide work well. The length depends on your design, but longer strips are easier to braid continuously. If your scraps are short, do not panic. You can join strips by knotting them, sewing them, or overlapping the ends with a dot of glue.
For a neat look, cut strips with a rotary cutter and ruler. For a rustic look, scissors are fine. You can even tear cotton strips by snipping one end and ripping along the grain. Torn edges create charming fray, which is perfect for shabby-chic or farmhouse signs.
Step 4: Create a Balanced Fabric Mix
Lay your strips side by side before braiding. A good braid usually has contrast: one small print, one larger print, and one solid or subtle texture. Too many busy prints can blur together. Too many pale fabrics may disappear against a light background. Think of it like putting together a tiny outfit for your sign. It needs a star, a supporting actor, and one calm friend who keeps everyone from yelling.
Step 5: Secure the Top and Start Braiding
Stack three fabric strips together and secure one end with a knot, clip, or a few stitches. Tape the end to your table or clip it to a clipboard. Braid the strips just as you would braid hair: right strip over center, left strip over center, repeat. Keep the tension even but not too tight. A slightly loose braid is easier to bend into shapes and letters.
As you braid, smooth the fabric so the prettiest side faces outward. If raw edges show, that is fine. The sign should look handmade, not factory-pressed into emotional silence.
Step 6: Extend the Braid If Needed
If one strip runs out, overlap a new strip with the old one by about an inch and secure with a small dab of glue. Continue braiding. Try to stagger joins so all three strips do not end in the same place. This keeps the braid from developing one bulky lump that says, “Something dramatic happened here.”
Step 7: Dry-Fit the Braid on the Sign
Before gluing, place the braid along your pencil design. This is the moment to adjust curves, trim extra length, and decide whether the braid is thick enough. For words, start at the beginning of the first letter and follow the line slowly. For shapes, begin at the least noticeable point, such as the bottom of a heart or the lower edge of a wreath.
Step 8: Glue the Braid in Sections
Work in small sections. Add a thin line of hot glue or fabric glue to the base, press the braid into place, and hold for a few seconds. Do not cover the entire design with glue at once unless you enjoy racing against drying adhesive like you are on a craft-themed game show.
For sharp turns, pinch the braid gently and glue the inside curve first. For letters, use small dots of glue around loops and corners. If the braid wants to lift, hold it down with clips until dry.
Step 9: Finish the Ends Cleanly
When your design is complete, tuck the end of the braid under the starting point if possible. You can also wrap the end with thread, tie it with twine, or cover it with a button, bow, fabric flower, or small wood cutout. The goal is to make the ending look intentional. Crafting is often just the art of hiding the evidence attractively.
Step 10: Add Final Decorations
Now personalize your sign. Add a tiny bow to a monogram, faux eucalyptus to a hoop sign, wood beads to a hanger, or painted lettering beneath the braided design. Keep embellishments balanced. The braid should remain the star of the project, not the opening act for a glitter avalanche.
Creative Design Ideas for Your Braided Fabric Sign
Farmhouse “Home” Sign
Use neutral scraps such as ticking stripe, gingham, linen, muslin, and faded florals. Attach the braided word “home” to a stained wood board. Add a small fabric rosette or greenery sprig near the corner for a cozy entryway piece.
Nursery Name Sign
Choose soft cotton scraps in pastel colors and braid the first letter of a child’s name onto a canvas. Add felt stars, tiny fabric hearts, or a ribbon hanger. This makes a thoughtful handmade baby shower gift that feels personal without requiring a full quilt and three emotional support coffees.
Holiday Wall Decor
For Christmas, braid red plaid, cream cotton, and green fabric into the word “joy.” For Halloween, use black, orange, purple, and a little striped fabric to create a pumpkin outline. For Valentine’s Day, shape pink and red braids into a heart. The same technique can carry you through the whole year.
Craft Room Sign
Make a sign that says “create” using your happiest scraps. This is especially satisfying because it uses leftovers from past projects to decorate the place where future projects will also create leftovers. The circle of craft life continues.
Tips for a Better-Looking Fabric Braid
A cute braided fabric sign does not require perfection, but a few small details can make the finished piece look polished.
- Use similar fabric weights. Mixing thin cotton with heavy denim can create an uneven braid.
- Press wrinkled scraps first. Ironed strips braid more smoothly and sit flatter on the sign.
- Keep strip widths consistent. The braid will look cleaner if all three strips are close in width.
- Do not pull too tightly. Tight braids are harder to curve into letters and shapes.
- Trim loose threads after gluing. A little fray is charming; a thread jungle is distracting.
- Test glue on fabric first. Some thin fabrics may show glue marks, especially with hot glue.
If your braid feels too flat, fluff it gently with your fingers after it is attached. If it looks too bulky, use narrower strips next time. Fabric crafting is wonderfully experimental. Every project teaches you something, even if the lesson is “do not braid velvet while eating crackers.”
No-Sew vs. Sewn: Which Method Is Better?
A no-sew braided fabric sign is faster and easier. Hot glue works well for wall decor that will not be washed or handled often. Fabric glue is another good option, especially when you want a cleaner finish or more working time. It usually dries slower than hot glue but can be easier to control.
A sewn braid is stronger. You can stitch the ends of strips together, sew joins instead of gluing them, or hand-stitch the braid to a fabric-covered base. This method is ideal if you are making a sign for a child’s room, classroom, or high-traffic area where curious hands may tug on it.
For most decorative wall signs, no-sew construction is perfectly practical. For heirloom-style pieces, sewing adds durability. Choose the method that fits your patience level, available tools, and tolerance for threading needles after sunset.
Common Mistakes and How to Fix Them
The Braid Looks Lumpy
Lumps usually happen when fabric strips are different widths or when multiple joins land in the same spot. Fix it by trimming bulky seams, spacing out joins, and using lighter fabrics. If the lump is already glued down, cover it with a bow, button, or fabric flower. This is not cheating. This is advanced decorative problem-solving.
The Design Looks Messy
If your sign feels chaotic, the fabric colors may be competing. Add a solid-colored braid, paint the background a calmer shade, or simplify the embellishments. Busy fabrics look best when they have a quiet background.
The Braid Will Not Stay Glued
Dust, glossy paint, heavy fabric, or too little glue can cause lifting. Wipe the base clean, use stronger adhesive, and press the braid firmly while the glue sets. On wood, a slightly rough surface can help glue grip better.
The Letters Are Hard to Read
Use thicker lines, larger letters, or a contrasting background. Cursive words are cute, but block letters or simple script are often easier to read in braided fabric. When in doubt, size up. Tiny fabric lettering is where good intentions go to ask for a magnifying glass.
How to Style and Display Your Finished Sign
A braided fabric sign looks lovely in entryways, nurseries, craft rooms, laundry rooms, gallery walls, classrooms, and seasonal mantels. Pair it with natural textures like wood, wicker, jute, ceramic, or greenery. Because fabric adds softness, it balances harder surfaces such as painted signs, metal hooks, and framed prints.
For hanging, attach a sawtooth hanger to a wood board, staple ribbon to the back of a canvas, or tie jute cord around an embroidery hoop. Lightweight cardboard signs can hang with removable strips. If the sign is seasonal, store it flat in a box so the braid does not get crushed.
You can also make mini versions as gift tags, ornaments, party signs, classroom labels, or craft fair products. A small braided heart on kraft paper packaging instantly makes a handmade gift feel extra special.
Eco-Friendly Benefits of Using Fabric Scraps
Using fabric scraps for DIY decor is not just cute; it is also a simple way to reduce waste. Textile leftovers often come from sewing projects, clothing alterations, quilting, upholstery, and old garments. Instead of tossing those remnants, you can turn them into something useful and decorative.
This project also encourages mindful crafting. You begin to see scraps by color, texture, memory, and possibility. A strip from an old shirt can become part of a Father’s Day sign. A piece from a baby blanket project can decorate a nursery initial. Leftover holiday fabric can become yearly decor. The finished sign carries a small story in every strip.
Extra Experience: Real-Life Lessons From Making Braided Fabric Signs
The first thing you learn when making a braided fabric sign is that your scrap basket has opinions. You may begin with a clean planthree matching fabrics, one neat braid, one tasteful signand then a tiny floral scrap will leap into the design and somehow become the whole personality of the project. Let that happen. The beauty of this craft is that it rewards flexibility.
One helpful experience is to sort scraps by mood before cutting. Instead of starting with exact measurements, make small piles: soft neutrals, cheerful brights, seasonal colors, vintage florals, denim and chambray, or kid-friendly prints. This makes design decisions faster. If you are creating a farmhouse sign, pull from the neutral pile. If you are making a birthday sign, grab the cheerful brights. The project feels easier when the scraps are already auditioning in the correct category.
Another lesson: always make more braid than you think you need. Fabric braids shorten as they twist together, and curves use more length than straight lines. Nothing interrupts the creative mood like reaching the final curve of a heart and realizing your braid ends half an inch too soon. Yes, you can patch it. Yes, you can hide the join. But future you will be happier if present you braids a little extra.
It also helps to practice shaping the braid before gluing. Lay it along your pencil line and step back. Look at it from across the room. A sign that looks readable from six inches away may become mysterious wall spaghetti from six feet away. This is especially true with words. Large shapes and bold letters usually work better than delicate details.
Glue control matters more than people expect. Hot glue is fast, but thick blobs can show between braid loops. Use a thin line or small dots, then press the braid gently. Keep a scrap piece of cardboard nearby to catch glue strings. Those strings appear out of nowhere, like craft-room cobwebs with excellent timing.
If you are working with sentimental fabric, slow down. Old baby clothes, wedding fabric, a grandparent’s shirt, or remnants from a meaningful quilt can turn a simple sign into a keepsake. In that case, use a stronger base and consider stitching the braid in place. The process takes longer, but the finished piece feels more permanent.
For group crafting, prepare strips ahead of time. Braiding is relaxing, but cutting dozens of strips while people wait can drain the fun from the room. Precut fabric, set out clips, and provide sample signs for inspiration. This project works beautifully for craft nights because each person can use the same technique and still leave with a completely different design.
Finally, do not over-polish the charm out of the project. A braided fabric sign should look warm, textured, and handmade. Slight fraying, varied colors, and gentle unevenness are part of its appeal. The goal is not to make fabric behave like plastic. The goal is to turn leftovers into something joyful enough to hang on a wall and say, “Look, I made this from the scraps I almost threw away.” That is a small creative victory, and frankly, the scrap basket needed the attitude adjustment.
Conclusion
A cute braided fabric sign is one of the best ways to use fabric scraps because it is simple, affordable, customizable, and full of personality. With a handful of strips, a basic braid, and a sturdy base, you can create wall decor that feels cozy, colorful, and completely original. Whether you make a farmhouse “home” sign, a nursery monogram, a seasonal wreath, or a craft-room reminder to keep creating, this project proves that small scraps can make a big decorative impact.
Start with easy fabrics, choose a bold design, braid with relaxed tension, and glue slowly in sections. Add embellishments only where they support the design, and let the fabric itself do most of the talking. Your finished sign will not just decorate a wall; it will tell a story of saved remnants, creative reuse, and the delightful truth that sometimes the cutest projects come from the pieces left behind.