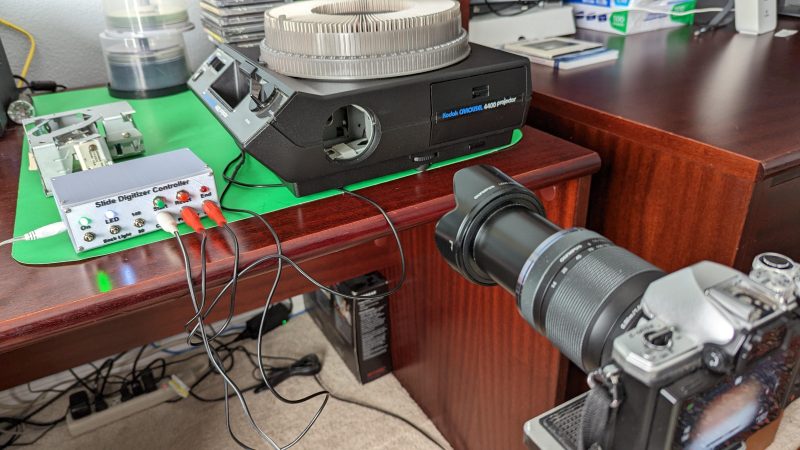
Somewhere in a closet, attic, basement, or suspiciously overstuffed shoebox, millions of 35mm slides are waiting for their comeback tour. They have survived family moves, questionable humidity, thumbprints, dust, and at least one relative who insisted, “We’ll organize these someday.” The problem is simple: slides are wonderful, but slide projectors are not exactly the streaming platforms of the modern era. That is where an automated digitizer for 35mm slides becomes both a clever engineering project and a practical rescue mission.
An automated 35mm slide digitizer is a system that advances slides one by one, lights them evenly, captures each image with a camera or scanner, and saves the result as a digital file. Instead of manually loading, aligning, clicking, and repeating until your soul leaves your body, the machine handles the rhythm. For anyone with hundreds or thousands of mounted slides, automation changes the project from “a lifelong punishment” into “a weekend with snacks.”
The best automated slide scanner setups borrow from three worlds: vintage projection hardware, modern digital photography, and archival digitization practice. A classic Kodak carousel projector can supply the mechanical slide transport. A DSLR, mirrorless camera, or dedicated imaging sensor can capture the frame. A microcontroller such as an Arduino or Raspberry Pi can trigger the shutter and advance the tray. Add clean backlighting, careful focus, consistent exposure, and a sensible file-management workflow, and suddenly those faded vacation slides from 1978 are ready for cloud storage, family sharing, and maybe a dramatic “Who wore those pants?” slideshow.
What Is an Automated 35mm Slide Digitizer?
At its core, an automated digitizer for 35mm slides is a repeatable capture machine. A mounted slide is moved into position, illuminated from behind, photographed, and then advanced out of the gate so the next slide can take its place. The concept sounds simple because, mechanically speaking, slide projectors were built to do half the job already. They move mounted transparencies with surprisingly dependable timing. The digitizer simply replaces the audience and projection screen with a camera and computer.
Traditional scanning usually relies on a flatbed film scanner, a dedicated film scanner, or a commercial digitizing service. These options can produce excellent results, but they may be slow, costly, or labor-intensive for large collections. A DIY automated slide digitizer is especially appealing when the slides are already stored in trays. Instead of removing every slide, placing it in a holder, previewing, cropping, scanning, saving, and reloading, the system can process a whole carousel in sequence.
That does not mean automation magically guarantees perfect images. It simply removes repetitive handling. Image quality still depends on the lens, sensor, alignment, illumination, cleanliness, exposure, and post-processing. In other words, the robot can push the buttons, but it cannot yet tell Uncle Gary that his 1972 Grand Canyon photo is tilted by six degrees.
Why Digitize 35mm Slides in the First Place?
35mm slides were designed to be viewed by transmitted light, usually through a projector. When fresh and well stored, slide film can look stunning: rich color, sharp detail, and a glowing quality that prints often struggle to match. But slides are physical objects, and physical objects are needy. They can fade, gather dust, grow mold, warp, scratch, or vanish into a storage bin labeled “miscellaneous.”
Digitizing old slides protects the image content from everyday risk. A digital file can be backed up, copied, edited, shared, printed, and organized. It also makes the collection searchable when paired with descriptive file names and metadata. Instead of dragging out a projector, screen, and extension cord, your family can view the images on a phone, TV, laptop, or digital photo frame.
There is also a storytelling advantage. Slides often hold family history that never made it into albums: road trips, birthdays, military service, local neighborhoods, old cars, vanished buildings, and the kind of interior design choices that prove orange shag carpet was not a rumor. Digitization turns those frozen moments into accessible records.
How the Automated Slide Digitizer Works
1. The Slide Transport System
The mechanical heart of many DIY systems is a vintage slide projector. Kodak carousel projectors are popular because their trays hold a large number of mounted 35mm slides and advance reliably. Other straight-tray or magazine-style projectors can also work. The key is consistency: the slide must land in the same position each time, or the digital captures will drift, crop unevenly, or require tedious correction later.
In a typical build, the projector’s original projection lens may be removed or bypassed. The slide is no longer being thrown across a room; it is being captured up close. The camera faces the slide gate directly. The projector’s advance mechanism moves the next slide into place, and the controller waits long enough for vibration to settle before triggering the camera.
2. The Light Source
Old projectors were designed to blast light through slides onto a screen, often using hot lamps. For digitizing, that can be too bright, too warm, and too risky for long automated runs. Many builders replace the original lamp with LED strips or a controlled LED panel. The goal is even, stable, color-neutral illumination. A diffuser helps prevent hotspots, harsh falloff, and visible lighting patterns.
Color quality matters. A cheap LED may look white to the eye but produce weird color shifts in the capture. A high-CRI light source, a proper diffuser, and manual white balance can save hours of correction. Think of the light as the copy machine’s personality. If it is unstable, every scan will have a slightly different mood, and nobody needs a moody scanner.
3. The Camera or Sensor
A DSLR or mirrorless camera with a macro-capable lens is a strong choice for 35mm slide digitization. A camera-based setup can be extremely fast because it captures the frame in a fraction of a second. It can also produce high-resolution files when the slide is flat, the lens is sharp, and the camera is aligned squarely with the film plane.
Some builds use a Raspberry Pi Camera Module or another compact camera sensor. These can be inexpensive and easy to automate, although focusing, dynamic range, and color control may be more limited than with a dedicated camera. A dedicated film scanner can deliver controlled results but may be slower and harder to integrate with a projector tray.
The practical rule is this: choose the capture device based on the final use. For family archiving and online sharing, a solid camera setup may be more than enough. For museum-grade preservation or large exhibition prints, you will want stricter standards, calibrated workflow, and possibly professional scanning equipment.
4. The Controller
Automation usually requires a small controller. An Arduino Nano, Arduino Uno, Raspberry Pi, or similar board can coordinate the sequence: turn on or stabilize the light, trigger the camera, wait, advance the slide, count the frame, and stop at the end of the tray. Some systems hack a camera shutter release remote, while others use USB tethering, GPIO pins, relays, or camera-control software.
The controller is less about complexity and more about timing. A typical cycle might look like this: capture image, pause half a second, activate projector advance, wait two seconds for the slide to settle, repeat. Add frame counting and error handling, and the machine can run unattended for a tray at a time. Do not wander too far, though. Vintage projectors have personalities, and some of them enjoy drama.
Image Quality: Resolution, Focus, and Color
35mm slides are small, roughly the size of a postage stamp with ambition. Because the film area is small, resolution matters. Many serious film-scanning workflows aim around 3000 to 4000 pixels per inch for high-quality 35mm captures. That range can create files suitable for archiving, editing, and reasonably large prints. Lower-resolution captures may be fine for web sharing, but they leave less room for cropping and restoration.
Focus is the great villain of DIY slide digitization. A slide may not sit perfectly flat in its mount. The camera may be slightly angled. The lens may be sharp in the center but soft at the edges. Autofocus can work, but for repeatable results, many users prefer careful manual focus and a fixed setup. Once focus is locked, test several slides from different trays. If one corner is consistently soft, the camera and slide plane may not be parallel.
Exposure should also be manual. Automatic exposure can be fooled by dark night scenes, snow scenes, sunsets, or slides with large black borders. Set a stable exposure that protects highlights while preserving shadow detail. Shooting RAW gives more flexibility for color correction, dust cleanup, and contrast adjustments. JPEG is convenient, but RAW plus exported JPEGs or TIFFs gives a better master-and-access workflow.
Cleaning and Handling Slides Before Scanning
Automation is fantastic until it automates dirt. Dust on a slide becomes dust in every digital copy. Before loading a tray, inspect the slides under light. Use a rocket blower or anti-static brush to remove loose particles. Avoid aggressive cleaning unless you know the film type and condition. Some old mounts are fragile, and some emulsions are easier to damage than they look.
Wear clean cotton or nitrile gloves if you are handling slides directly. Hold them by the mount, not the film window. Keep food and drinks away from the scanning table. Yes, coffee is an essential archival tool emotionally, but not chemically.
It is also wise to separate problem slides before running a batch. Warped mounts, broken mounts, sticky slides, and unusually thick cardboard frames can jam a projector. A single bad slide can stop an automated run or, worse, scrape the next few images. Automation rewards preparation.
File Formats and Organization
A good digitization project does not end when the shutter clicks. The files must be organized, named, backed up, and made understandable to future humans. Use simple, consistent file names. Avoid spaces and strange punctuation. A practical naming system might look like this: smith_family_1976_yellowstone_tray03_0042.tif. That tells you the collection, date, event, tray, and frame number without opening the file.
For archival masters, TIFF is widely used because it can store high-quality image data without the repeated compression losses associated with editing and resaving JPEGs. RAW files are also valuable if your workflow supports them. JPEG is excellent for sharing and everyday viewing, but it should not be your only copy if you care about long-term editing flexibility.
Metadata is the secret ingredient that turns a folder of images into a usable archive. Add names, locations, dates, events, and notes when known. Even basic information such as “Grandma Helen, Lake Tahoe, summer 1968” can make the difference between a meaningful historical photo and “unknown people standing near water.”
DIY Automated Digitizer vs. Commercial Slide Scanner
A DIY automated digitizer shines when you have a large slide collection, enjoy tinkering, and want control over the workflow. It can be fast, affordable, customizable, and oddly satisfying. There is something beautiful about turning a retired projector into a tiny archival robot.
Commercial slide scanners, however, offer convenience. Dedicated film scanners may include dust-reduction technology, controlled film holders, scanning software, and established color workflows. Professional services can handle huge collections without requiring you to solder anything, write scripts, or argue with a projector from the Nixon administration.
The tradeoff is cost, speed, and control. A service may be the best option if your slides are rare, fragile, or emotionally priceless and you do not want to risk DIY mistakes. A homemade automated slide scanner is ideal for people who have enough technical confidence to test, refine, and supervise the process.
Common Problems and Practical Fixes
Uneven Brightness
If the center of the image is brighter than the edges, improve the diffuser or increase the distance between the LED and the slide. Check that the light source fills the entire frame evenly.
Soft Corners
Softness in one corner usually means alignment trouble. Make the camera sensor parallel to the slide. Use a good macro lens, stop down moderately, and test with a detailed slide.
Color Casts
Set a custom white balance using the light source. Shoot RAW when possible. If the LED has poor color rendering, replace it with a better source before trying to fix hundreds of files later.
Jams and Misfeeds
Inspect mounts before batching. Remove warped, broken, or swollen slides. Clean the projector’s slide path carefully. Run a short test tray before trusting the system with a full carousel.
Overexposure
Slides can have dense shadows and bright highlights. Use manual exposure, check the histogram, and reduce light intensity if needed. If using a projector lamp, consider neutral-density material or a cooler LED conversion.
Building a Sensible Workflow
Start small. Do not begin with the box labeled “Only photos of Mom’s childhood.” Begin with a test tray of low-risk slides. Capture ten images, review them at full size, and look for focus, dust, exposure, color, cropping, and file-name problems. Fix the workflow before scaling up.
Once the system behaves, create a repeatable routine. Clean the tray, load it, confirm camera settings, start the script, monitor the first few slides, and check the output folder. At the end of each tray, back up the files immediately. A good backup rule is simple: keep at least three copies, on at least two different types of storage, with one copy stored separately. Your future self will send flowers.
After capture, sort the images into masters and edited copies. Keep the original RAW or TIFF files untouched. Make corrected JPEGs for sharing. Crop, rotate, remove dust, adjust faded color, and add metadata in a non-destructive workflow when possible.
Experiences From the Workbench: What Digitizing Slides Actually Feels Like
The first experience with an automated digitizer for 35mm slides is usually a mix of triumph and comedy. You line up the camera, set the light, connect the controller, press start, and watch the first slide advance into place. The shutter fires. The file appears on the computer. For one glorious second, you feel like you have personally defeated time.
Then the second slide is slightly crooked.
That is the real lesson of slide digitizing: the machine can be automated, but patience cannot. A good setup improves through tiny adjustments. You move the camera a millimeter. You add diffusion. You tighten a mount. You discover that one tray advances beautifully while another behaves like it was assembled by raccoons. Eventually, the system settles into a rhythm, and that rhythm is deeply satisfying.
One of the most useful habits is keeping a notebook or spreadsheet during the project. Record each tray number, date range, subject, capture settings, and any problems. If tray 12 has a jam at slide 63, write it down. If tray 18 contains faded Ektachrome that needs warmer correction, note that too. This turns the scanning process into a manageable archive rather than a digital haystack.
Another experience worth mentioning is emotional whiplash. Slide collections are unpredictable. One minute you are scanning blurry pictures of a hotel parking lot. The next minute you find a crystal-clear portrait of someone long gone, smiling in perfect afternoon light. That is when the project stops being technical and becomes personal. The scanner is no longer just a gadget. It is a bridge.
The best results often come from treating the process like meal prep. Do the boring work first: sort slides, clean trays, test settings, name folders, and prepare storage. Once the system runs, you can process batches steadily. Do not chase perfection on every frame during capture. Get clean, sharp, well-exposed masters first. Later, you can lovingly restore the important images and politely ignore the twelve duplicate shots of a shrub.
Expect some failures. A few slides will be too dark, too faded, too dusty, or too damaged. Some will need manual scanning or special handling. That is normal. An automated slide digitizer is not a magic wand; it is a highly efficient assistant. It does the repetitive work so you can focus on decisions that require human judgment.
The most rewarding moment comes when the first full tray is finished and backed up. You open the folder, scroll through images that may not have been seen in decades, and realize the project is working. The old projector is clicking again, not to show slides on a living-room wall, but to carry them into the future. That little mechanical clack suddenly sounds less like outdated technology and more like applause.
Conclusion
An automated digitizer for 35mm slides is one of those rare projects that makes practical, technical, and emotional sense at the same time. It rescues aging images, saves countless hours of manual work, and gives old equipment a clever second life. Whether you build around a Kodak carousel projector, a Raspberry Pi, an Arduino, a DSLR, or a dedicated camera module, the goal is the same: create sharp, consistent, well-organized digital copies of memories trapped in tiny cardboard windows.
The winning formula is not complicated: stable transport, even light, accurate focus, manual exposure, clean handling, smart file naming, and reliable backups. Get those right, and your automated 35mm slide scanner can turn a dusty inheritance into a searchable, shareable digital archive. And yes, it may also reveal that your family owned more plaid clothing than previously admitted.
For small collections, a simple camera adapter or commercial scanning service may be enough. For large collections, automation can be a game changer. The best setup is the one that matches your budget, patience, quality expectations, and tolerance for vintage machinery making mysterious noises at midnight.