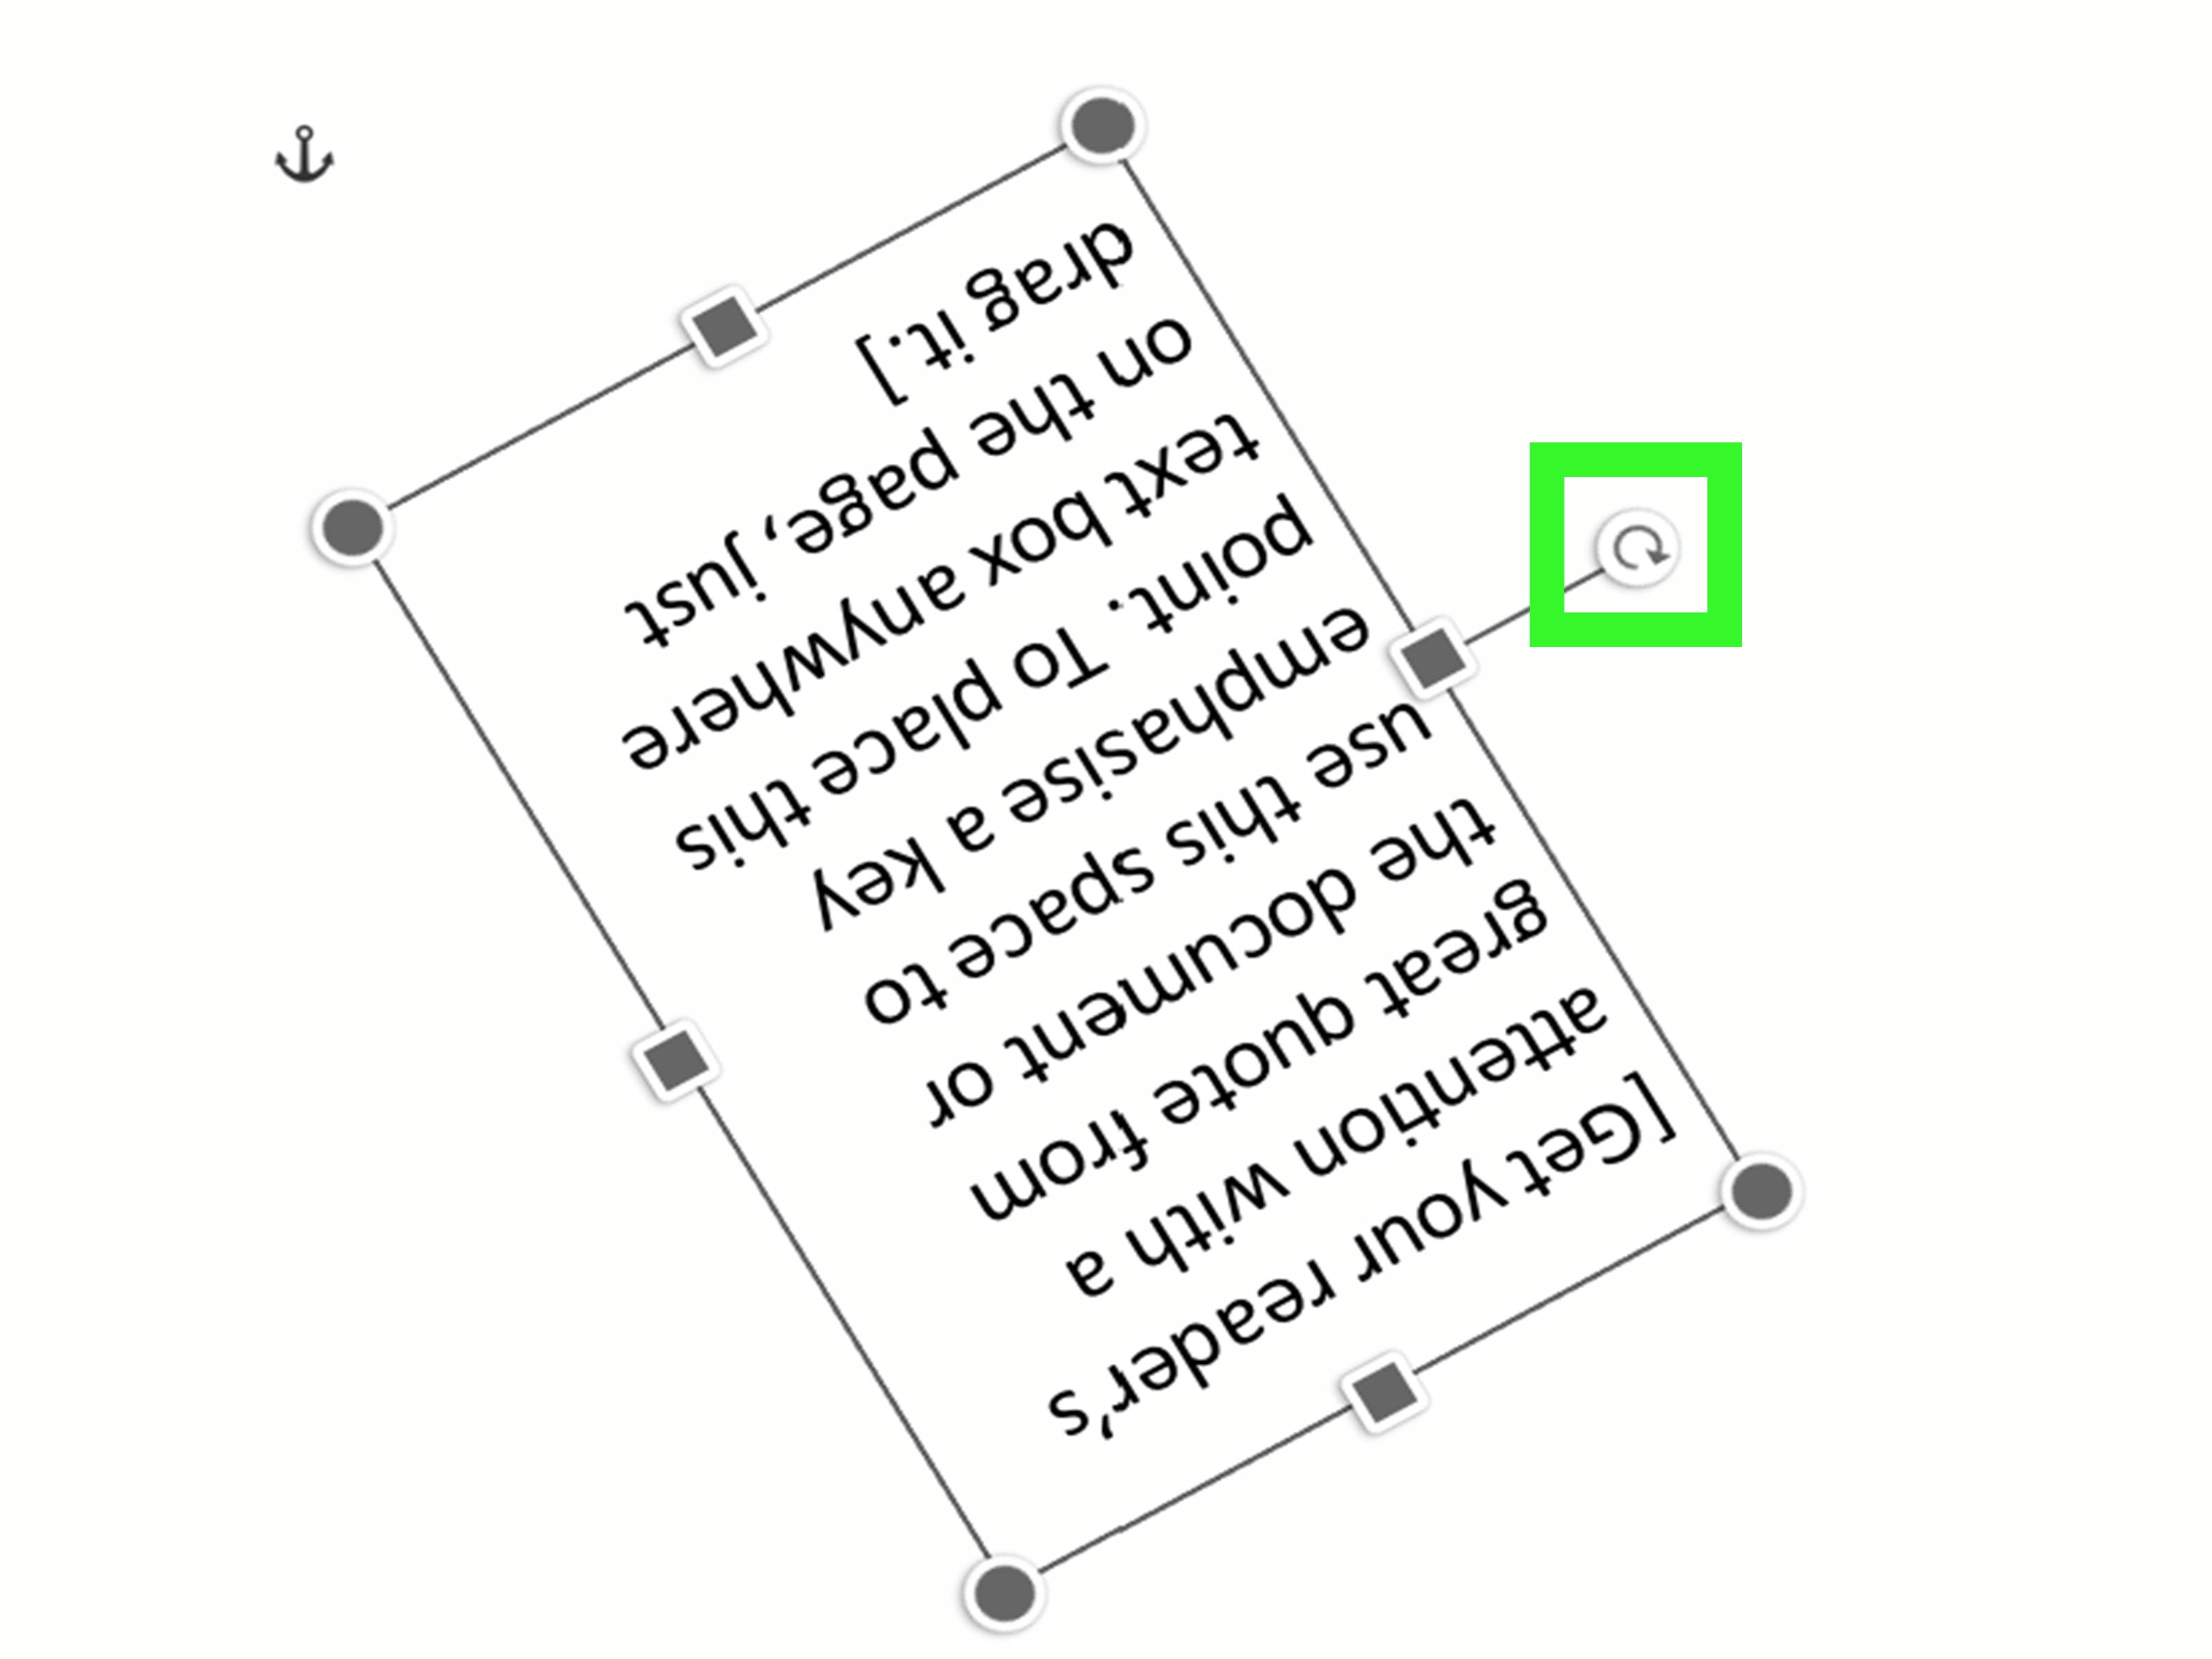
If you have ever stared at a Word document and thought, “This would look much better if this heading were sideways,” congratulations: you are officially doing more than writing a grocery list. Rotated text in Microsoft Word can make labels easier to read, tables less cramped, flyers more polished, and design-heavy documents look far less like they were formatted during a caffeine shortage.
The catch is that Word does not let you freely spin ordinary paragraph text like a pizza dough toss. In most cases, you rotate text by putting it inside a text box or shape, then rotating the object. You can also change text direction for vertical text or rotate text inside table cells. On mobile, the process is simpler but more limited: you usually rotate the selected object by dragging its rotation handle.
This guide walks through the easiest ways to rotate text in Microsoft Word on desktop and mobile, when to use each method, what to do if Word refuses to cooperate, and how to avoid turning your document into a modern art experiment.
Quick Answer: How Do You Rotate Text in Word?
Here is the short version:
- For any-angle rotation on desktop: Insert a text box, click it, then drag the rotation handle or use the Rotate menu.
- For vertical text: Use Text Direction inside a text box, shape, or table cell.
- For precise angles: Open More Rotation Options and enter the exact degree value you want.
- For mobile: Tap the text box or shape, then drag the rotation handle.
- For mirrored or flipped text: Use Word’s 3-D Rotation settings in the Format pane on desktop.
If you only remember one thing, make it this: plain body text usually does not rotate by itself in Word. Put it in a box first, then give it the dramatic entrance it deserves.
Why Rotating Text in Word Works Differently Depending on What You Select
Word treats text in different containers differently. That sounds obvious, but it is the reason people click around for ten minutes before muttering at the screen.
If your text sits in a normal paragraph, Word mainly wants to keep it flowing with the rest of the document. If your text lives inside a text box, shape, WordArt object, or table cell, Word gives you more control. That is why rotating text in Microsoft Word is less about the letters themselves and more about where the letters live.
Think of it this way: if text is renting an apartment in the document body, it has to follow building rules. If text moves into a text box, suddenly it owns a sports car and starts making bold life choices.
Method 1: Rotate Text in a Text Box on Desktop
This is the most flexible method and the one most people need. It works well for callouts, cover pages, diagrams, labels, newsletters, sidebars, and decorative headings.
How to Insert and Rotate a Text Box in Word
- Open your Word document.
- Go to Insert on the ribbon.
- Click Text Box.
- Choose a built-in style or draw your own text box.
- Type your text inside the box.
- Click the outer edge of the text box to select it.
- Use the rotation handle at the top of the box and drag it to the angle you want.
That is the quickest way to rotate text in Word on desktop. You can tilt it diagonally, rotate it vertically, or turn it to a custom angle if your design calls for extra flair.
Tips for Better Results
- Hold Shift while dragging to snap the rotation in tidy increments.
- Resize the text box after rotating if the words look cramped.
- Use No Fill and No Outline if you want the text box to disappear visually.
- Adjust text wrapping if the box is fighting the rest of your layout.
If your rotated text looks awkward, the problem is often not the rotation. It is usually the box size, line breaks, or text wrapping. Word loves to make innocent formatting look guilty.
Method 2: Change Text Direction for Vertical Text
Sometimes you do not want angled text. You just want the text to run vertically. That is where Text Direction comes in.
This is useful for narrow labels, spine text, column headers, and design elements where a clean 90-degree change looks better than a diagonal tilt.
How to Change Text Direction in a Text Box or Shape
- Insert a text box or shape.
- Click the border of the object.
- Open the formatting controls for the object.
- Choose Text Direction.
- Select the direction that fits your layout, such as rotating the text 90 or 270 degrees.
This method changes how the text flows inside the object, which is different from rotating the whole object itself. That difference matters. Rotating the object tilts everything. Changing text direction keeps the object stable while the lettering changes orientation inside it.
In other words, one method spins the frame, and the other method rearranges the furniture.
Method 3: Rotate Text in a Table Cell
If you are working with a table, especially one with narrow columns, rotating text in a cell can save a huge amount of space. This is a classic trick for schedules, comparison charts, inventory sheets, and forms with tight column widths.
How to Rotate Table Text in Word
- Click inside the table cell that contains the text.
- Go to the Table Layout or related table formatting tools.
- Click Text Direction.
- Keep clicking or choose the option that gives you the orientation you want.
This method is especially handy for column headings. Instead of shrinking the font until it looks like it belongs on a vitamin label, you can rotate the text and preserve readability.
It is not as flexible as a text box for fancy angles, but it is perfect for practical document design.
How to Rotate Text in Word on Mobile
The mobile version of Word is useful for quick edits, but it is not as deep as the desktop app. That said, if you already have a text box or shape in your document, you can usually rotate the selected object right on your phone or tablet.
Android
- Open the document in the Word app.
- Tap the text box or shape you want to rotate.
- Wait until the object handles appear.
- Drag the rotation handle to the angle you want.
iPhone and iPad
- Open the document in Word.
- Select the text box or shape.
- Use the visible handles around the object.
- Drag the rotation handle to rotate it.
That is the good news. Here is the less glamorous news: advanced text rotation tasks are still easier on desktop. If you need an exact degree, mirrored text, detailed text direction settings, or more reliable layout control, the desktop app is the better choice.
And if you are using Word for the web, keep expectations realistic. It can display rotated text boxes, but it is not the best place to create or rotate them from scratch.
How to Rotate Text to an Exact Angle in Word
Dragging is fine when you want something roughly diagonal. It is less fine when you need 45 degrees exactly, because “close enough” tends to become “why does this look crooked?”
Steps for Exact Rotation
- Select the text box, shape, or WordArt object.
- Go to Shape Format.
- Choose Rotate.
- Click More Rotation Options.
- Enter the exact degree value you want.
This is the best option when consistency matters, such as in branded documents, classroom materials, printable labels, or templates you plan to reuse.
If you are making several rotated text elements, exact angles keep everything looking intentional instead of “creative in a panic.”
How to Flip or Mirror Text in Word
Need a mirror-image effect for crafts, window signs, iron-on transfers, or a design that wants to feel a little dramatic? Word can do that too.
How to Mirror Text
- Insert your text into a text box.
- Select the text box.
- Open the Format Shape pane.
- Go to Effects or 3-D Rotation.
- Set the X Rotation or Y Rotation to 180 degrees.
This is not the same as simple rotation. Mirroring flips the text so it reads backward or upside down. Very useful for special projects. Less useful for your quarterly report, unless the quarterly report has truly gone off the rails.
Common Problems When Rotating Text in Microsoft Word
1. “I can’t rotate the text at all.”
You are probably selecting normal paragraph text instead of a text box, shape, WordArt object, or table cell. Put the text inside a rotatable object first.
2. “The rotation handle is missing.”
Make sure you selected the border of the text box, not just the text inside it. Clicking inside the words edits the text. Clicking the outer edge selects the object.
3. “The text box rotates, but the text looks weird.”
Try increasing the box size, changing line spacing, or using Text Direction instead of rotating the whole box. Sometimes the better solution is not more spin. It is less chaos.
4. “My layout shifts after rotation.”
Check the text wrapping and positioning settings. Floating objects in Word can move around if their anchor or wrap style changes. If the object suddenly wanders across the page, it is not haunted. Usually.
5. “It works on desktop but not on the web.”
That is normal. Word for the web is great for many tasks, but it still has limitations compared with the full desktop app.
Best Uses for Rotated Text in Word
Rotating text is not just a novelty feature. It can solve real layout problems and make documents easier to scan.
- Table headers: Saves width in narrow columns.
- Labels and tabs: Great for forms, binders, and printable inserts.
- Flyers and posters: Adds visual variety and emphasis.
- Sidebars and pull quotes: Makes long pages look less flat.
- Craft and print projects: Helpful for mirrored transfers and signage.
- Infographics and diagrams: Useful when text has to follow the structure of a visual layout.
The trick is moderation. A single rotated heading looks smart. Six different angles on one page look like your document lost a bet.
Desktop vs. Mobile: Which Version of Word Is Better for Rotating Text?
Desktop Word is the clear winner if you want control. It handles text boxes, WordArt, exact angles, mirrored text, formatting panes, and cleaner layout management.
Mobile Word is best for quick edits, simple repositioning, and light design touch-ups when you are away from your computer. It can be surprisingly useful, but it is not where most people want to build a polished layout from scratch.
If your project is simple, mobile is enough. If your project needs precision, branding, or print-ready formatting, go desktop and save yourself a headache.
Experience Section: What I’ve Learned from Actually Rotating Text in Word
One of the most useful things I have learned about rotating text in Microsoft Word is that the “right” method depends entirely on the job. Early on, I used to assume there was one magic button that would rotate any selected words. Word, naturally, responded by teaching me humility. After a few attempts, I realized that plain paragraph text and text inside a text box are treated like two different species. Once I started using text boxes on purpose, the whole process became easier and a lot less frustrating.
I have found that rotating a text box works best when I am creating something visual, like a flyer, worksheet, label, or cover page. In those situations, a small diagonal headline or a vertical side label can make a document look much more polished. It also helps break up long blocks of text. A page full of standard horizontal paragraphs is perfectly fine, but sometimes it feels a little too flat. Rotated text adds movement without requiring fancy design software.
Tables are where rotating text becomes a real lifesaver. If you have ever tried to fit long headings into narrow columns, you already know the pain. You can widen the columns and ruin the page layout, shrink the font until it becomes microscope content, or rotate the heading text and suddenly everything fits. That one adjustment can turn a messy table into something clear and professional. It is one of those small formatting tricks that looks much more impressive than it is.
On mobile, my experience has been more of a “good for emergencies” situation. If a text box already exists and I just need to tilt it a little or fix the angle, the Word app can do the job. But if I am building a document from scratch or trying to make everything line up perfectly, I prefer the desktop app every time. Mobile editing feels a bit like trying to hang a picture frame while wearing oven mitts: possible, but not my dream workflow.
I have also learned that exact angles matter more than people think. A text box that is supposed to be at 45 degrees but is actually at 43 degrees can make a document feel subtly off. Readers may not know why it looks strange, but they will feel it. Using exact degree controls on desktop creates a cleaner, more intentional design. That is especially true if several rotated elements appear on the same page.
Probably the biggest lesson is this: rotated text should support the document, not steal the whole show. When used sparingly, it helps with emphasis, space-saving, and visual interest. When overused, it turns the page into a formatting circus. My rule is simple: if the rotation makes the text easier to notice or easier to fit, keep it. If it only makes the page look louder, it is probably too much. Word gives you the tools, but it still expects you to have a little self-control.
Final Thoughts
If you want to rotate text in Microsoft Word, the easiest and most reliable method is to place the text in a text box or shape, then rotate the object. For vertical text, use Text Direction. For tables, rotate the text inside the cell. On mobile, select the object and drag the rotation handle for quick edits, but keep the desktop app in your back pocket for anything that requires precision.
Once you know which container to use, rotating text in Word stops feeling mysterious and starts feeling practical. And that is a beautiful thing, because nobody should have to negotiate with a word processor just to make a heading go sideways.