Research note: This article synthesizes practical material, adhesive, finishing, and safety guidance from U.S. home-improvement retailers, manufacturers, and workplace-safety resources.
Some holiday decorations require a workshop, a shopping cart full of lumber, and the emotional resilience of someone assembling furniture at 11 p.m. This DIY wood snowflake decoration is not one of those projects.
With a bundle of inexpensive wood shims, a little glue, and a willingness to embrace a few tiny splinters, you can create a rustic snowflake that looks surprisingly polished. Wood shims are usually used to level doors, windows, cabinets, and other home-improvement projects, but their tapered shape also makes them perfect for creating layered winter décor.
This wood shim snowflake can hang on a front door, brighten a mantel, dress up a holiday table, or become a charming handmade Christmas gift. Paint it snowy white, stain it warm walnut, add glitter for a frosty effect, or leave the wood natural for a farmhouse-style finish. Best of all, you do not need advanced woodworking skills. If you can measure, glue, and resist putting glitter on every available surface, you are ready.
Note: This project involves cutting thin wood pieces and using adhesive. Work on a stable surface, wear eye protection when cutting or sanding, and keep hot-glue tools away from children and pets. Fine wood dust can become airborne during sanding, so work in a ventilated area and clean dust carefully rather than turning your craft table into a tiny lumberyard.
Why Wood Shims Work So Well for DIY Snowflake Decorations
Wood shims are thin, tapered wedges commonly sold in affordable bundles at home-improvement stores. Their narrow tips and wider ends naturally create the long, pointed lines of a snowflake. You do not need to carve fancy angles or operate a table saw like you are starring in a home-renovation show.
Most wood shims are made from softwoods such as pine, fir, spruce, or cedar. They are lightweight, easy to cut with a small hand saw, and simple to paint or stain. Standard shims are often around 8 inches long, while longer options can create oversized snowflakes for doors, porches, or large walls.
The tapered profile gives the finished snowflake more character than flat craft sticks. Instead of looking like it came from a school supply bin, it has a layered, dimensional appearance that feels handmade in the best possible way.
Supplies You Will Need
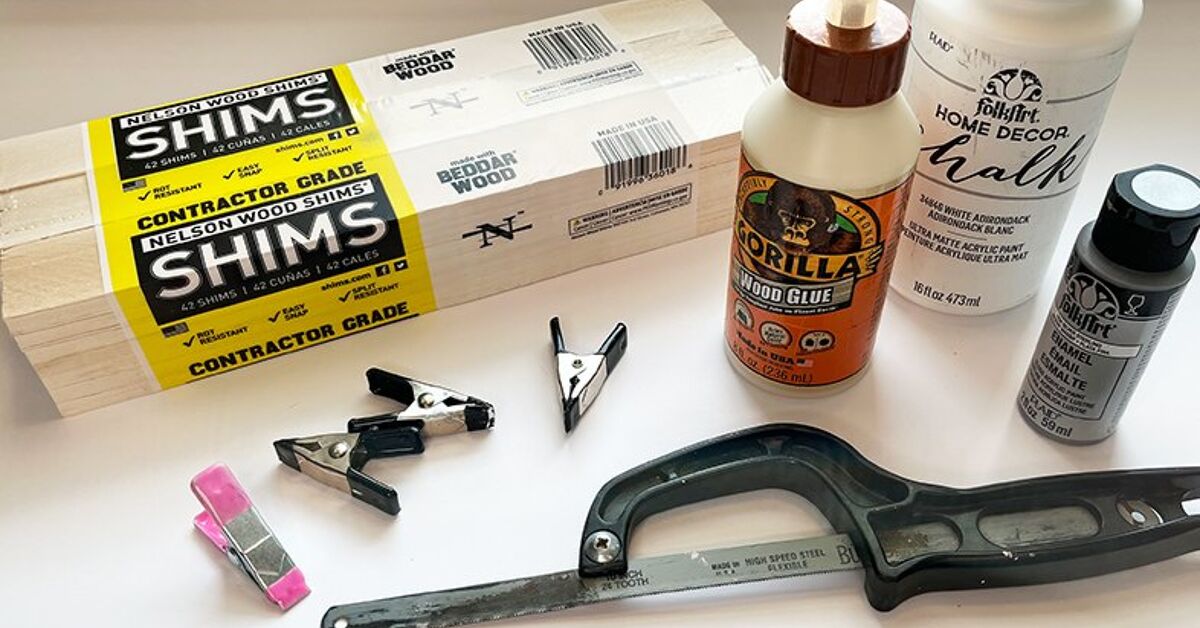
For one medium wood shim snowflake, gather the following supplies:
- 16 unfinished wood shims, approximately 8 inches long
- A ruler or measuring tape
- A pencil
- A small hand saw, craft saw, or miter box and saw
- Medium- and fine-grit sandpaper
- Wood glue or clear-drying craft glue
- A hot glue gun for quick positioning, optional
- Painter’s tape, clips, small weights, or clothespins
- Acrylic craft paint, wood stain, or spray paint
- Clear sealer, optional but recommended
- Twine, ribbon, fishing line, or a small hanging hook
- A scrap piece of cardboard or kraft paper to protect your work surface
You can make this project with basic tools, but do not skip the sandpaper. Shims are construction materials, not tiny wooden royalty. They may have rough edges, uneven fibers, or an occasional splinter just waiting to introduce itself.
Plan the Shape Before You Start Gluing
The easiest version of this DIY wood snowflake uses eight long shims as the main rays and sixteen shorter pieces as decorative branches. The result is an eight-point snowflake with enough detail to look intentional without requiring an engineering degree.
The Basic Snowflake Layout
Lay eight full-length wood shims on a flat surface. Arrange them in a circle so their wider ends meet in the center and their narrow tips point outward. Think of the shape as a compass rose, a starburst, or a very organized wooden spider.
Space the eight shims evenly around the center. You should have one ray pointing up, one down, one left, one right, and four diagonal rays in between. Do not worry if the center looks slightly imperfect during the dry layout. A small wood backing piece will later hide the middle and make the decoration sturdier.
Cut the Decorative Branches
Use eight additional shims to create the smaller branches. Mark each shim at the 3-inch point, then cut two 3-inch pieces from each shim. This gives you sixteen short pieces total.
Lightly sand the cut edges after trimming. Sand in the direction of the wood grain whenever possible, using a medium grit first and a finer grit for a smooth finish. Proper prep helps paint and stain look cleaner, especially on soft unfinished wood.
Set the short pieces aside in pairs. Each pair will be attached to one long snowflake ray.
How to Assemble the Wood Shim Snowflake
Step 1: Create a Full Dry Layout
Before reaching for glue, place all eight long shims in their final snowflake pattern. Position the wide ends near the center, with the narrow points facing outward.
Next, add two short branch pieces to each long ray. Place them about halfway between the center and the outer tip. Angle one short piece toward the left and the other toward the right, creating a branching “V” shape.
Try to keep the short pieces angled consistently. Snowflakes in nature may be unique, but your wall decoration does not need to look like it survived a windstorm in a craft store aisle.
Step 2: Glue the Main Rays Together
Once you like the layout, begin by attaching the eight long shims at the center. Apply a small amount of wood glue where the wide ends overlap. Avoid using too much glue, because excess adhesive can squeeze out and create shiny blobs that paint does not always hide gracefully.
Use painter’s tape, small clips, or lightweight objects to hold the pieces in place while the glue sets. If you want faster initial grip, you can place a tiny dot of hot glue at each joint and reinforce it with wood glue afterward.
Hot glue can be convenient for indoor crafts, but it gets extremely hot. Keep your fingers away from the nozzle, allow the tool to cool fully before storing it, and never try to peel hot glue off skin immediately.
Step 3: Attach the Smaller Branch Pieces
Glue two 3-inch pieces onto each main ray. The wider end of each short piece should touch the long shim, while the narrow end points outward. This creates the delicate branching detail associated with classic snowflake shapes.
Work one ray at a time. Apply glue, position the two branch pieces, and check that both sides look balanced before moving to the next ray. A ruler can help you keep the branch pieces at a similar distance from the center.
Let the snowflake dry completely according to the adhesive label. If you rush this step, your snowflake may slowly rearrange itself overnight. That is called “modern art,” but it is rarely the goal.
Step 4: Reinforce the Center
Flip the snowflake over once the glue has dried. Glue a small wooden circle, square, or scrap piece of shim across the center on the back side. This reinforcement connects several rays at once and makes the decoration much more stable.
A 1½- to 2-inch wood disk works especially well, but you can also cut a simple square from thin scrap wood. The backing will not be visible from the front, so this is an excellent place to prioritize strength over beauty. Even snowflakes deserve structural support.
Finish Your Wood Snowflake Decoration
The finishing step is where your wood shim snowflake becomes personal. You can keep it rustic and natural, give it a cozy farmhouse appearance, or make it sparkle like it has a starring role in a holiday movie.
Option 1: Natural Wood Finish
For a warm, rustic look, lightly sand the surface and apply a clear sealer. This allows the grain and natural variation in the shims to remain visible. A natural finish pairs beautifully with greenery, pinecones, burlap ribbon, and neutral holiday décor.
If you use a stain, test it first on a shim offcut. Softwoods can absorb stain unevenly, which may create darker patches. Testing on scrap wood is far less dramatic than discovering blotches after the whole snowflake is finished.
Option 2: Whitewashed Winter Snowflake
For a snowy farmhouse style, use diluted white acrylic paint or a whitewash finish. Brush it on lightly, then wipe away some of the paint with a soft cloth so the wood grain still shows through.
This technique gives the snowflake an aged, frosted appearance without making it look like it was dipped in cake frosting. Add a light dusting of silver glitter while the paint is still damp if you want extra sparkle.
Option 3: Painted Holiday Snowflake
Acrylic paint works well for indoor décor. Choose white, icy blue, silver, pale gray, gold, forest green, or even bright red for a playful holiday look. Use a foam brush for broad coverage and a small artist brush for edges and branch joints.
When spray painting wood, apply several light coats rather than one heavy coat. Heavy paint can drip, fill in the wood texture, and turn your elegant snowflake into a glossy mystery object. Follow the drying and recoating instructions printed on the paint label.
Option 4: Outdoor Porch Snowflake
Wood shims are best suited to indoor or covered outdoor décor. If you plan to display your snowflake on a porch, covered patio, or sheltered front door, seal every exposed side, including the edges and back.
Choose an exterior-rated wood finish or weather-resistant clear coat, and apply it only when the wood is completely dry. For outdoor products, follow the temperature, humidity, and rain guidance on the label. A decorative wood snowflake can tolerate a covered porch much better than a full season of direct rain, snow, and surprise sprinkler attacks.
How to Hang a Wood Shim Snowflake
There are several simple ways to display your finished snowflake:
- Front door: Attach a ribbon or twine loop to the reinforced back center.
- Wall décor: Use a small picture-hanging nail or removable wall hook.
- Christmas tree ornament: Make a smaller version using shorter shims or cut pieces.
- Mantel display: Lean the snowflake against a mirror, framed art, or a small stack of books.
- Holiday centerpiece: Lay it flat beneath candles, ornaments, greenery, or a glass cloche.
- Window decoration: Hang it with fishing line so it appears to float.
For heavier versions, create a sturdy hanging loop by sandwiching a loop of twine between two small wood backing pieces. Glue both pieces to the back center and allow them to dry thoroughly before hanging.
Creative Variations for Wood Shim Snowflakes
Once you make one wood shim snowflake, it becomes dangerously easy to make five more. Consider creating a collection in different sizes, colors, and finishes.
Make a Set of Three
Create one large snowflake, one medium snowflake, and one small snowflake. Hang them vertically near a staircase, over a mantel, or in a large window. Use the same paint color for a coordinated look, or vary the shades from white to pale blue to silver.
Add a Centerpiece Accent
Glue a wooden bead, small ornament, faux berry cluster, metal star, or miniature pinecone at the center. This is especially helpful if your snowflake has a slightly awkward middle section. Congratulations: that glue bump is now intentional design.
Create a Scandinavian-Style Version
Leave the wood natural, use simple white cotton cord for hanging, and avoid glitter or bright colors. Pair the finished snowflake with evergreen branches, wooden beads, linen ribbon, and neutral candles for a calm Nordic-inspired holiday display.
Make It Glamorous
Paint the snowflake metallic gold, silver, champagne, or rose gold. Add fine glitter along the branch edges, then finish with a clear topcoat. This version looks beautiful on a dining-room wall, holiday bar cart, or festive party backdrop.
Troubleshooting Common Wood Shim Snowflake Problems
The Snowflake Looks Uneven
Before gluing, use a ruler to measure the distance between each branch piece and the center. If the main rays are not evenly spaced, gently adjust them while the glue is still wet. A simple paper template with eight guide lines can also make the layout much easier.
The Shims Split While Cutting
Thin wood can split when cut too quickly or with a dull blade. Use a fine-tooth hand saw, support the shim near the cut line, and cut slowly. Sanding a rough edge afterward is easier than trying to disguise a dramatic crack with extra glue.
The Glue Does Not Hold
Wood glue works best when the wood surfaces are clean, dry, and pressed together securely while curing. Remove sanding dust before gluing, use only a thin layer of adhesive, and reinforce the back center with a wood disk or scrap backing piece.
The Paint Looks Rough
Lightly sand the snowflake before painting, remove dust with a dry cloth, and apply thin coats. If you are using spray paint, avoid spraying too close to the surface. Several light coats create a smoother finish than one thick coat.
Real-World Experiences and Lessons From Making Wood Shim Snowflakes
The first thing many people notice when making a wood shim snowflake is that the project looks almost too simple at the beginning. You place a few skinny pieces of construction wood on a table and wonder how they are supposed to become holiday décor instead of leftovers from installing a door frame. Then the pattern starts to come together, and suddenly the shims look less like hardware supplies and more like a winter star.
A common early mistake is gluing too soon. It is tempting to arrange two or three rays, decide everything looks “probably fine,” and start squeezing glue like a person who has holiday deadlines. But wood shim snowflakes look best when you spend a few extra minutes adjusting the layout before committing. The eye notices uneven spacing immediately, especially with an eight-point design. A dry layout is your opportunity to be picky without having to wrestle with sticky wood later.
Another lesson is that the tapered shape is both the magic and the challenge. Wood shims are not perfectly flat craft sticks, so some joints may sit slightly higher than others. That is normal. Instead of trying to force every piece into identical alignment, use the taper as part of the design. The varying thickness creates shadows and dimension, which makes the snowflake look more interesting from across the room.
Painting also teaches a useful DIY truth: less is usually more. A heavy coat of white paint can hide the wood grain and make the project look plastic. A lighter coat, whitewash, dry-brushing technique, or soft spray-paint finish often creates a more expensive-looking result. The goal is not to erase the fact that the snowflake is made from wood shims. The goal is to make that humble material look intentional.
Makers also tend to discover that one snowflake is rarely enough. The first one becomes a test piece. The second one gets a better center detail. The third one suddenly has metallic paint, a velvet ribbon, and an alarming amount of glitter. This is how holiday crafting works: you begin with a modest decoration and end with a small seasonal production line.
For families, this project works well as a shared activity when adults handle measuring, cutting, and hot glue while children help with painting, glitter, ribbon, or choosing colors. It can become a yearly tradition, especially if each family member creates a snowflake in a different style. Over time, the collection becomes more than décor. It becomes a visual record of changing tastes, handmade memories, and the year someone decided neon purple was definitely a Christmas color.
The most satisfying part comes after the snowflake is finally hung. From a distance, no one sees a pack of construction shims. They see a warm handmade decoration with texture, shape, and personality. That transformation is the real appeal of DIY holiday crafts: ordinary materials become something worth displaying.
Final Thoughts
A wood snowflake decoration made from wood shims is an affordable, beginner-friendly project with plenty of room for creativity. The basic structure is simple: arrange long shims into rays, add shorter branch pieces, reinforce the center, and finish it in a style that fits your holiday décor.
Whether you choose a rustic natural finish, frosted white paint, glittery silver accents, or bold modern colors, this DIY snowflake brings handmade warmth to winter decorating. It is proof that even the most practical building material can have a festive side. Sometimes all a wood shim needs is a little glue, a little paint, and permission to stop leveling cabinets for the season.