A children’s bathroom must perform several jobs before most adults have finished their first cup of coffee. It hosts sleepy tooth-brushing, dramatic hair detangling, bath-time naval battles, and mysterious puddles that nobody remembers creating. Our bathroom did all those things, but it certainly did not do them gracefully.
The original room was functional in the most technical sense. Water came from the faucets, the toilet flushed, and the door usually closed. Beyond that, the space felt dated, dim, and poorly prepared for growing children. This fun kids bathroom makeover transformed it into a colorful, organized, safer space without making it look like a cartoon exploded inside a plumbing showroom.
Here is the complete kids bathroom reveal, including what changed, which design ideas delivered the biggest improvement, and what we learned along the way.
Before the Kids Bathroom Makeover
The “before” bathroom had beige walls, a builder-grade oak vanity, a frameless mirror, and a strip light that made everyone look as though they were being questioned by airport security. The room was not terrible, but it had no personality and very little practical storage.
One long towel bar occupied most of a wall, yet wet towels still landed on the floor. Toothbrushes crowded the countertop. Bath toys gathered around the tub like colorful barnacles. Extra toilet paper lived in a basket that somehow became a laundry hamper, toy chest, and occasional pirate ship.
The Main Problems We Wanted to Solve
- The neutral color scheme felt dull and uninviting.
- The vanity had cabinets but no useful interior organization.
- The lighting created shadows around the mirror.
- Towels, toiletries, and bath toys lacked assigned homes.
- Several accessories were installed too high for younger children.
- The room contained slippery surfaces and sharp-looking details.
- The finishes were difficult to keep clean during busy weeks.
We decided to keep the existing plumbing locations and bathtub. Moving supply lines or drains would have consumed a large portion of the budget without noticeably improving the daily routine. Instead, the plan focused on high-impact changes: color, storage, lighting, hardware, flooring, and child-friendly details.
The Design Plan: Playful but Built to Grow
The goal was not to create a bathroom that only a six-year-old could love. Children grow quickly, and permanent dinosaur tile can become a complicated design conversation once its owner becomes a teenager. We therefore chose durable, relatively timeless materials for expensive surfaces and introduced youthful character through paint, artwork, towels, and accessories.
The final palette combines watery blue-green walls, a deep navy vanity, crisp white surfaces, warm wood accents, and small bursts of coral and sunny yellow. The colors feel energetic in the morning but calm enough for bedtime baths.
A Practical Kids Bathroom Color Palette
Moisture-resistant, washable bathroom paint was essential. Children do not merely use a sink; they appear to negotiate with it during a small indoor hurricane. A durable bathroom-rated finish makes toothpaste spots, damp fingerprints, and soap splashes easier to clean.
The blue-green walls also help the compact room feel brighter. Rather than covering every surface in a bold pattern, we reserved the livelier colors for framed prints, labeled bins, and textiles. Those items can be replaced inexpensively as tastes change.
The Kids Bathroom After: A Bright and Cheerful Reveal
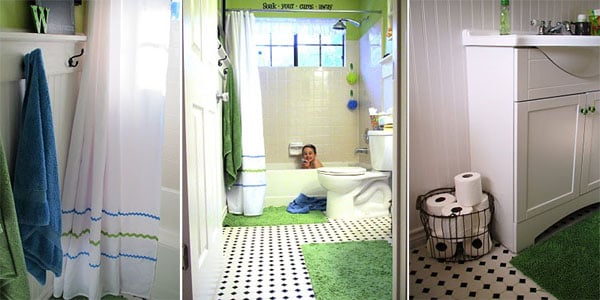
The renovated room feels larger even though its footprint has not changed by a single inch. Better lighting, a cleaner color palette, and less visual clutter give the room breathing space. The navy vanity anchors the design, while the pale walls and white tub surround reflect light around the room.
Most importantly, the new bathroom works at a child’s level. Towels are easier to hang, frequently used supplies are easier to find, and cleanup no longer requires an archaeological expedition through the vanity cabinet.
The Vanity Transformation
Replacing the structurally sound vanity would have added considerable cost, so we refreshed it instead. The doors and drawer fronts were removed, labeled, cleaned thoroughly, lightly sanded, primed, and coated with durable cabinet enamel. Navy paint concealed the dated orange tone of the original wood and gave the room a strong focal point.
New rounded pulls are comfortable for small hands and less severe than hardware with sharp corners. Inside the vanity, pullout bins separate hair supplies, washcloths, bath products, and backup toiletries. Each child has a labeled container, which dramatically reduces the morning chorus of “Where is my toothbrush?”
A white countertop keeps the area bright and visually quiet. We paired it with a single-handle faucet because it is easy for children to operate. When selecting a new faucet or toilet, an EPA WaterSense-labeled model can help reduce water use while maintaining performance.
Mirrors and Better Bathroom Lighting
The old wall-to-wall mirror was replaced with a large rounded rectangle mirror. Its softened corners repeat the shape of the cabinet hardware and add a friendlier look. It is still generous enough for two children to use during the morning rush, assuming they agree that both faces may occupy the mirror simultaneously.
A new damp-rated vanity fixture spreads light more evenly across the sink area. Bright, comfortable lighting matters when children are learning to brush thoroughly, wash their faces, or style their own hair. The light color remains neutral rather than icy blue, so the bathroom feels clean without resembling a laboratory.
Electrical work in wet areas should follow local building requirements, including the appropriate use of protected outlets and bathroom-rated fixtures. When wiring changes are required, a qualified electrician is worth every penny and several fewer gray hairs.
Fun Flooring Without Visual Chaos
The dated floor was replaced with durable patterned porcelain tile. Its small-scale geometric design supplies personality while disguising the occasional speck of lint. The surface has enough texture to feel secure underfoot and is far easier to maintain than a fluffy rug parked beside a splash zone.
For a lower-cost makeover, waterproof vinyl flooring can produce a similar visual transformation. Whatever material is selected, bathroom flooring should be rated for wet locations, installed according to the manufacturer’s directions, and paired with a stable nonslip bath mat where appropriate.
Storage Ideas That Children Can Actually Use
Storage only works when the intended users can reach it. A beautiful basket placed six feet above the floor is not children’s storage; it is parental storage wearing a charming label.
We divided the room into simple zones. Daily grooming products live in vanity drawers. Clean towels occupy a wall cabinet. Bath toys drain in an open mesh container near the tub. Cleaning products, medicines, razors, and other adult-only items remain secured and out of children’s reach.
Individual Towel Hooks
The long towel bar was replaced with individual hooks mounted at child-friendly heights. Each hook has a small color marker, so everyone knows which towel belongs to whom. Hooks are much easier for young children than bars because a towel does not need to be folded with the precision of a luxury hotel employee.
Spacing the hooks apart improves airflow and helps damp towels dry. They are also positioned away from the toilet and close to the tub, reducing the wet march across the floor after bathing.
Bath Toy and Toiletry Organization
Mesh or open-sided containers are useful for wet bath toys because they allow water to drain and air to circulate. Toys are rinsed, shaken, and returned to their container after each bath. The setup takes seconds and prevents a plastic submarine from becoming an unpleasant science project.
Clear or labeled bins inside the vanity make categories obvious. The labels use both words and simple icons so younger children can participate in cleanup. Frequently used products remain accessible, while extras are stored higher or farther back.
Child-Friendly Bathroom Safety
A fun kids bathroom must also be a safety-conscious bathroom. Design features can support safer routines, but they never replace active adult supervision. Young children should remain within an adult’s reach around bath water, even when the water is shallow or a bath seat is being used.
We added a nonslip tub mat, a stable step stool with a grippy base, and soft-edged accessories. The stool is wide enough for secure footing and slides into a dedicated space when not in use, keeping it out of the main walkway.
Hot water deserves particular attention. Caregivers should test bath water before a child enters and consider anti-scald protection where appropriate. The room also keeps electrical devices, medicines, cleaners, and sharp grooming tools secured away from curious hands.
A toilet-lid lock and controlled bathroom access may be appropriate for households with infants or toddlers. Safety needs should be reviewed as children grow because yesterday’s inaccessible shelf has an astonishing habit of becoming tomorrow’s climbing challenge.
Moisture Control and Easy Cleaning
Colorful towels cannot rescue a bathroom with persistent moisture problems. Effective ventilation helps humid air leave the room and reduces the conditions that encourage peeling paint, mildew, and musty odors.
We cleaned the exhaust fan, confirmed that it vents properly, and added a timer control so it can continue running after bathing. A fan should be selected and installed for the room’s size and duct configuration. Doors, windows, grout, and plumbing connections should also be checked for signs of excess condensation or leaks.
Easy-clean surfaces were another priority. The vanity has a washable finish, the countertop has minimal seams, and the accessories can be wiped without special products. Fewer objects remain on the counter, which means routine cleaning no longer begins with relocating nineteen tiny possessions.
Where We Saved and Where We Spent
The makeover stayed manageable because we reused elements that still worked. We kept the tub, plumbing locations, vanity cabinet, and basic room layout. Paint, hardware, baskets, hooks, and artwork delivered a large decorative return without requiring demolition.
We spent more on areas tied to durability and safety: quality flooring, reliable lighting, a water-efficient faucet, moisture-resistant coatings, and proper professional help where needed. The final result proves that a successful kids bathroom remodel does not require selecting the most expensive item in every aisle.
Budget-Friendly Ideas to Borrow
- Paint a sound vanity instead of replacing it.
- Use colorful towels and artwork rather than expensive novelty tile.
- Keep plumbing fixtures in their existing locations.
- Install labeled baskets or drawer organizers inside current cabinets.
- Replace one outdated light fixture for an immediate visual lift.
- Trade a difficult towel bar for several accessible hooks.
- Choose one playful pattern and let surrounding surfaces stay simple.
Before-and-After Results That Matter
The visual change is satisfying, but the daily improvements are better. Before the makeover, the countertop collected clutter, wet towels gathered on the floor, and bath toys occupied every available ledge. Afterward, belongings have designated homes and children can complete more of their routines independently.
The room also has a longer design life. The permanent materials are cheerful without being childish, while the most playful elements can be updated in an afternoon. Coral towels could eventually become olive green, animal prints could become abstract art, and the navy vanity would continue working with either choice.
| Before | After |
|---|---|
| Flat beige walls | Washable blue-green bathroom paint |
| Dated oak vanity | Refinished navy cabinet with rounded pulls |
| Harsh strip lighting | Even, damp-rated vanity lighting |
| One high towel bar | Individual child-height hooks |
| Loose toys around the tub | Drainable bath-toy storage |
| Unsorted cabinet contents | Labeled bins and assigned drawers |
| Random decorative details | A coordinated, flexible color palette |
Experience Notes from a Kids Bathroom Makeover
The most useful lesson from this type of project is to observe the room before designing it. For several days, we paid attention to where towels landed, which products stayed on the counter, and where children naturally stood while using the sink. Those little habits were more informative than a folder containing a hundred flawless inspiration photos.
For example, our first plan included open shelves above the toilet. They looked attractive in the sketch, but they would have placed everyday supplies outside a younger child’s comfortable reach. The plan changed to low vanity storage for daily items and a closed wall cabinet for adult-controlled supplies. That single decision made the completed bathroom far more practical.
We also learned to test paint colors inside the actual room. The preferred blue-green looked fresh under store lighting but much grayer in the bathroom during the morning. A slightly warmer sample worked better beside the navy cabinet and white tile. Viewing samples at different times prevented us from painting the entire room and then pretending the disappointing color was “subtle.”
Painting the vanity required more patience than creativity. Cleaning was the most important step because bathroom cabinets collect residue from soap, lotions, sprays, and years of enthusiastic handwashing. Removing the doors and labeling every hinge position saved time during reassembly. Allowing the finish to cure before returning the bathroom to full service was difficult, but it prevented early scratches.
Another surprise involved storage. We initially bought several tiny organizers because small containers seemed appropriate for small belongings. In practice, too many containers produced a complicated sorting system that nobody wanted to maintain. Four broad categoriesdental care, hair supplies, bath items, and extrasworked much better. Children are more likely to put something away when the decision takes one second.
The towel hooks produced the biggest improvement for the least effort. Lower placement gave the children genuine responsibility for hanging their towels, and the color markers eliminated arguments over ownership. We left enough wall space to raise or reposition the hooks later as the children grow.
During installation, we kept one working bathroom available and completed messy tasks in a sensible order. Repairs came first, followed by painting, flooring, lighting, hardware, and accessories. Trying to install decorative pieces before dusty or wet work is finished only creates more cleaning and a strong desire to speak sternly to an innocent basket.
Finally, we invited the children to make limited choices. They selected between two approved artwork sets and chose their towel colors. Giving them a role created excitement without handing over control of permanent materials. The finished room feels like their space, but it can still welcome guests and adapt as they get older.
Final Thoughts on the Fun Kids Bathroom Reveal
This before-and-after kids bathroom reveal is a reminder that good family design begins with routines, not decorations. The brighter palette makes the room cheerful, but accessible hooks, organized storage, durable finishes, safer surfaces, improved ventilation, and better lighting are what make it successful.
The bathroom now supports growing independence while remaining easy for adults to manage. It is playful without being temporary, practical without being boring, and organized without expecting children to maintain a museum-quality countertop. That may be the most realistic bathroom luxury of all.