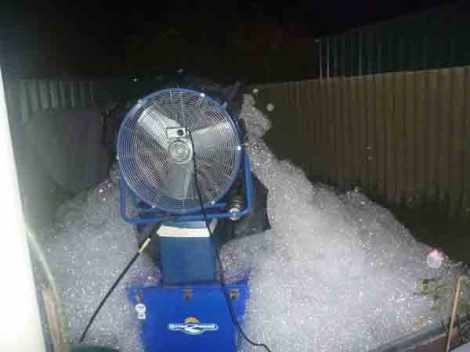
Want your backyard party to feel like a music festival… without paying festival prices (or waiting 45 minutes for a taco)? A DIY foam machine is one of those “ridiculous in the best way” projects: it’s part science experiment, part power tool flex, and 100% guaranteed to make guests say, “Wait… you BUILT this?”
This guide walks you through two practical buildsfrom a budget-friendly leaf-blower “Bucket Blaster” to a sturdier “Foam Cannon” style setup plus foam solution tips, safety must-dos, troubleshooting, and cleanup. Let’s turn your next party into a foam party (minus the chaos you didn’t ask for).
How a Foam Machine Works (So You’re Not Just Duct-Taping Hope Together)
A foam machine is basically a bubble factory with better PR. Foam needs three things: air, foaming solution, and a mesh “foam head”. Air is forced through mesh that’s soaked in solution. The mesh breaks the liquid into millions of tiny bubbles. More air = more output. Better mesh coverage = thicker foam. The “secret sauce” is not magicit’s surface tension.
Most DIY designs follow the same blueprint:
- Air source: leaf blower, box fan, or shop vac (blow mode).
- Solution feed: gravity drip or a small pump.
- Foam head: mesh screen/netting where the foam actually forms.
- Housing: bucket, trash can, or PVC cone to aim the foam.
Safety First (Because “Foam Party” Shouldn’t Turn Into “Urgent Care After-Party”)
Electricity + water = nope
Your foam machine uses electricity near water. Treat that like a raccoon near an open trash can: assume it will go wrong if you don’t plan for it. Run your setup on a GFCI-protected outlet (or use a portable GFCI). Keep plugs, connections, and power strips elevated and away from splash zones. If an electrical device gets soaked, shut it down and don’t reuse it until it’s fully dry and inspected.
Slip hazards are real
Foam looks like whipped cream. Underneath, it’s basically a wet floor. Create a defined “foam zone,” keep walkways clear, and slow the “full-speed sprint into bubbles” behavior (especially around steps, decks, and concrete). If this is a kids’ party, have a grown-up posted like a lifeguardjust with less whistle and more “please stop tackling your cousin.”
Skin and eye comfort matters
Even gentle soaps can irritate sensitive skin or sting eyes. Use fragrance-free products when possible, avoid harsh degreasers, and remind guests not to rub their eyes with foamy hands. If someone gets foam in their eyes, rinse with clean water right away and keep rinsing until the sting is gone.
Tool safety (a.k.a. the leaf blower isn’t a toy)
Keep fingers, hair, and loose clothing away from intakes. Secure the blower so it can’t tip into foam. Consider ear protection if you’re running loud equipment for long stretches.
Materials & Tools (Two Build Options)
Option A: “Bucket Blaster” (fast, cheap, works great)
Best for: backyards, birthdays, BBQs, and anyone who enjoys building things with a suspicious amount of zip ties.
- 1 leaf blower (corded or battery)
- 1 sturdy 5-gallon bucket with lid (or a small plastic trash can)
- Flexible duct hose or coupler to connect blower to bucket (you can improvise with adapters + tape)
- Plastic mesh/screen/netting (window screen, pool skimmer net, or similar)
- Zip ties / hose clamps / duct tape (choose your fighter)
- Small submersible pump (aquarium/fountain style) or gravity feed (a bottle + tubing)
- Tubing that fits your pump (plus a simple valve if you want flow control)
- Foam solution (store-bought foam fluid or DIY mixmore on that below)
- Basic tools: utility knife, scissors, drill (optional), marker
Option B: “Foam Cannon” (bigger output, more control)
Best for: larger parties, longer runtimes, and people who say “I could totally build a better version” and then actually do.
- Air source (leaf blower or high-CFM fan)
- PVC pipe & fittings (frame + nozzle/cone)
- Mesh material for foam head (more surface area = more foam)
- 5-gallon bucket or tote for solution reservoir
- Submersible pump + tubing + flow control
- Mounting base (plywood) + straps or clamps
Build Option A: The Bucket Blaster (Leaf Blower + Bucket + Mesh)
Step 1: Plan your airflow path
Air goes from blower → into bucket → out through mesh. The mesh should cover an opening where foam can push through easily. Many DIYers put the mesh on the front of the bucket (like a foam “mouth”).
Step 2: Cut the foam outlet
On the side of the bucket near the top, mark a large opening (think: “small window” size). Cut it cleanlybigger outlets generally allow more foam output. Save the cut-out piece as a rough template if you want to reinforce edges later.
Step 3: Add the mesh foam head
Stretch mesh over the opening. The goal is a tight, flat “drum skin,” not a saggy hammock. Use zip ties through small holes around the opening, or clamp it with a frame (even a cut ring of plastic works). For thicker foam, use multiple layers of mesh.
Step 4: Create the blower intake port
Cut a hole in the bucket lid (or back side of the bucket) sized to fit your blower nozzle or duct hose. You want this connection sealed so air pressure doesn’t leak everywhere like your friend who can’t keep a secret.
Step 5: Secure the blower connection
Connect the blower to the bucket using a hose/coupler and clamp/tape it firmly. The bucket should not wobble when the blower runs.
Step 6: Add solution delivery
You have two easy choices:
- Pumped feed (recommended): Put a small submersible pump in a separate solution reservoir (bucket/tote). Run tubing into the foam bucket and aim it at the mesh area.
- Gravity feed (simplest): Hang a bottle above the bucket with a small tube dripping onto the mesh.
The key: keep the mesh wet but not flooded. Flooded mesh makes watery foam and can drip like a sad snow cone.
Step 7: Do a dry test (no liquid yet)
Turn on the blower for 10–15 seconds. Check for air leaks, rattles, or the bucket trying to become a tumbleweed. Fix issues nowfoam makes everything harder to see and easier to regret.
Step 8: Run a wet test and adjust
Start the blower, then start solution flow slowly. The output should go from “air” to “bubbly” to “fluffy foam.” If you get big bubbles and spray, use more mesh layers and reduce the liquid flow. If you get almost nothing, increase airflow or slightly increase solution flow.
Build Option B: The Foam Cannon Upgrade (More Output, Better Aim)
If you want more foam and less “bucket aesthetic,” build a simple PVC frame with a front-mounted mesh head and a cone/nozzle to guide the foam. This isn’t mandatory for funbut it’s great for bigger crowds and longer sessions.
Core idea
- Air enters a chamber (PVC box, tote, or bucket).
- Solution is sprayed or dripped evenly across a large mesh head.
- A cone/nozzle helps push foam outward and keep it directional (especially outdoors with wind).
Simple build approach
- Build a base: Mount the chamber and blower connection on plywood so everything stays stable.
- Create a larger mesh head: A wider foam head = more surface area = more foam at the same airflow.
- Add a cone/nozzle: Use a tapered plastic funnel, modified traffic cone, or a DIY cone shape to direct output.
- Evenly wet the mesh: Use a pump line with small holes (a DIY “spray bar”) aimed across the mesh so it wets evenly instead of one soggy corner.
The upgrade isn’t about complexity for complexity’s sake. It’s about control: consistent foam texture, predictable direction, and less babysitting.
Foam Solution: What to Use (and What to Avoid)
Store-bought foam solution (best overall)
Commercial foam fluids/powders made for foam parties are designed to foam well, rinse easier, and be gentler on skin than random cleaning products. If you’re hosting a big group (especially kids), this is usually the least stressful path.
DIY solution (budget-friendly, test first)
If you’re mixing your own, prioritize mild, fragrance-free soap. A common DIY approach is a gentle shampoo/body wash plus a small amount of glycerin (helps bubbles last longer). Avoid heavy degreasers or “extra strength” dish soaps if you canthose are designed to strip oils, which can be rough on skin and eyes.
A practical DIY starting ratio
Start small and scale up once you like the foam texture:
- 1 gallon of warm water
- 2–4 ounces of gentle, fragrance-free shampoo/body wash
- 1–2 tablespoons of glycerin (optional, for longer-lasting foam)
Mix gently (don’t whip it into a bubbly mess in the bucketsave the bubbles for the machine). Then run a 2-minute test. If foam is thin, add a little more soap. If foam is too sticky or hard to rinse, dilute with more water.
Party Setup: Where to Put the Machine (So Foam Goes on Guests, Not on Your Outlet)
- Choose a foam zone: Grass is ideal. Avoid slick decks, tile, and steep driveways.
- Point with the wind: If it’s breezy, aim downwind so foam drifts into the zone.
- Keep power dry: Put electrical connections far from the foam zone and elevate them.
- Make a “dry lane”: A path for people to exit without sliding like cartoon penguins.
- Set rules early: “No running near steps” is not a vibe-killer; it’s a hospital-visit preventer.
Troubleshooting (Because Every DIY Project Has a Personality)
Problem: It’s spraying soapy water, not foam
- Reduce solution flow (mesh is flooded).
- Add mesh layers or switch to tighter mesh.
- Increase airflow (more fan/blower power, reduce air leaks).
Problem: Barely any foam
- Increase solution concentration slightly.
- Make sure solution is reaching the mesh evenly.
- Seal air leaks at the blower connection.
Problem: Foam is “too dry” and disappears fast
- Increase solution flow a little.
- Try a bit of glycerin (small amount goes a long way).
- Use warmer water for mixing (then test again).
Problem: Pump keeps clogging
- Pre-mix solution fully in a separate container.
- Use a simple inline filter/mesh over the pump intake.
- Rinse pump with clean water after each use.
Cleanup & Storage (Future-You Will Be Grateful)
- Flush the system: Run clean water through the pump/tubing for 1–2 minutes.
- Rinse mesh: Remove and rinse thoroughly. Let it dry fully to avoid funk.
- Wipe and dry: Buckets, hoses, and fittings should dry before storage.
- Dispose responsibly: Don’t dump large amounts of soapy solution into storm drains or waterways. If possible, dilute heavily and dispose via sanitary drain where wastewater is treated.
Wrap-Up: Your Party, Now With 73% More Legend
A foam machine looks like a wild luxury item, but the DIY version is totally doable with common tools and a little patience. Start with the Bucket Blaster, test in daylight, keep your power protected, and dial in the foam until it’s fluffynot watery. Then let the foam do what it does best: make everyone act like a kid again (including the adults who swore they “won’t get in”).
Experience Notes: What People Learn After Their First Foam Party (So You Don’t Have To)
Here’s the funny thing about building a foam machine: the build is only half the adventure. The other half is learning what happens when real humans meet real foam in a real backyard. First lesson: foam travels. Even if your machine is aimed perfectly, the breeze will take your beautiful bubble cloud and gently deposit it onto places you didn’t invitelike your grill, your patio furniture, and (somehow) the neighbor’s hydrangeas. Veterans of foam parties swear by doing a “wind check” before you commit, and setting your foam zone where drifting foam won’t create a slip-and-slide on concrete.
Second lesson: your best foam isn’t your first foam. Most builders run a test and think, “Great, it works!” Then 20 guests arrive, and suddenly you’re either drowning the mesh (watery spray) or starving it (sad bubbles). Real-world setups behave differently because people stand in front of the outlet, foam piles up, and the mesh gets unevenly wet. The fix is simple: add a basic flow control (even a cheap valve) and get comfortable making tiny adjustments. Think of it like seasoning foodstart light, taste, adjust.
Third lesson: kids will attempt to eat the foam. Not because they’re hungry. Because kids are scientists with zero lab supervision. Even if you use a gentle solution, it’s still soap. The practical move is to do a quick “foam talk” at the start: no eating foam, no rubbing eyes, and if something feels stingy, rinse with water right away. You’ll feel like the least cool person for 12 seconds, and then you’ll feel very cool when nobody’s crying.
Fourth lesson: the machine needs a handler. A foam machine is not a “set it and forget it” crockpot situation. Someone should be in charge of: keeping power connections dry, watching the blower intake, monitoring solution level, and turning the whole thing off if the foam zone creeps toward steps, cords, or anything sharp. The best parties assign one “Foam Captain” in 20-minute shifts. Yes, it sounds dramatic. No, you will not regret it.
Fifth lesson: cleanup is easier when you plan for it. Foam looks like it disappears on its own, but the soapy residue hangs around on decks, patio stones, and anything textured. The pros put a hose nearby, keep towels for quick wipe-downs, and flush the pump with clean water before packing up. If you’re on grass, you’re usually fine (especially with a diluted, biodegradable mix). If you’re on hard surfaces, do a rinse pass before everyone leavesbecause the next morning you don’t want to discover your driveway has become an extreme sport.
Last lesson: the best foam parties have pacing. Continuous foam for two hours can turn into “okay, we get it, it’s foam.” But running the machine in bursts10 minutes on, 10–15 minutes offkeeps the excitement high and gives you time to reset the zone, check cords, and top up solution. It also creates natural “photo moments” when the foam hits peak fluff. Your guests leave with great memories, your yard survives, and your DIY pride stays intact. That’s the sweet spot.